Introduction
GuardWare PROTECT encrypts and secures all types of files, including MS Office documents, PDFs, images, videos, and AutoCAD files. It ensures the files remain protected from unauthorised use and theft, whether stored locally or shared externally via USB, cloud drives, email, or other methods. Only authorised users and applications can open protected files. These users and applications are configured by your administrator in the GuardWare PROTECT Management Console.
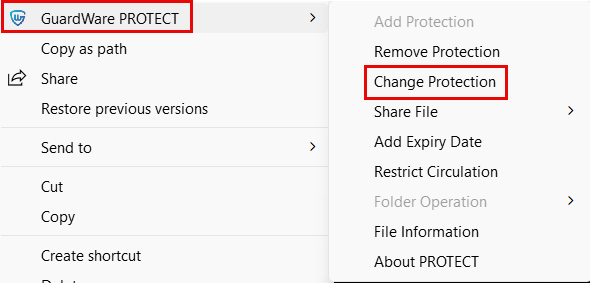
As an end user, you interact with GuardWare PROTECT Client through the Windows Explorer right-click menu. From there, you can protect sensitive files by setting classifications, restricting access to specific Security Groups, limiting file circulation, adding an expiry date, and so on.
If you use Save As or Export to save a protected file in another format or extension, the new file will also be protected.
If an unprotected file contains sensitive data, it will be automatically protected when saved. Sensitive data types are defined by your administrator in the GuardWare PROTECT Management Console.
Auto-save and OneDrive sync while editing protected Office documents are disabled by default.
This guide introduces the features of GuardWare PROTECT Client and explains how to use it to securely protect, manage, and share files.
Security Group
A Security Group is a set of users within your organisation who have specific access permissions. Once a file is protected, Security Groups determine who can access the file. Only members of the authorised Security Groups can open or modify the file; others are restricted, ensuring it remains secure and accessible only to authorised users. For example, you might allow only the Finance group to access payroll reports or the HR group to view employee records.
Security Groups are created by your administrator in the GuardWare Management Console. Any new user who installs GuardWare PROTECT Client and logs in successfully is automatically assigned to the default Security Group called All Users.
GuardWare PROTECT Features
Add File Protection
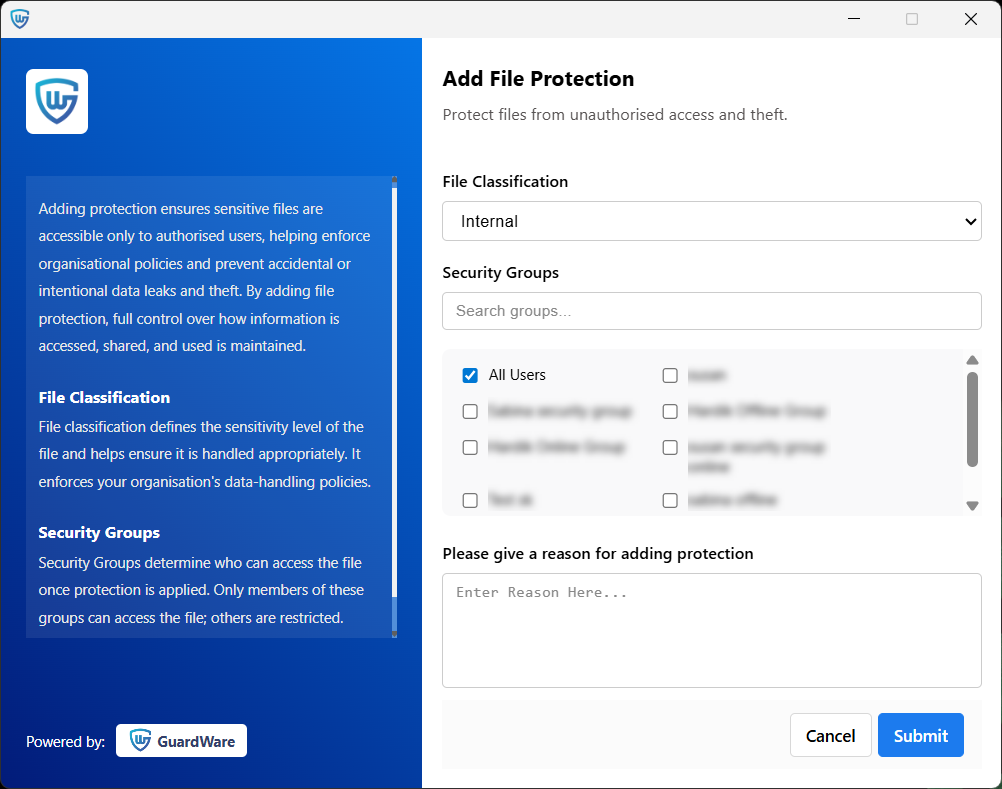
Adding file protection encrypts the file and allows access only to the selected Security Groups. Adding protection ensures that sensitive files remain accessible only to authorised users, supporting organisational security policies and reducing the risk of accidental or deliberate data leaks or theft. It allows you to manage how information is accessed, shared, and used across your organisation.
To add protection to a file:
-
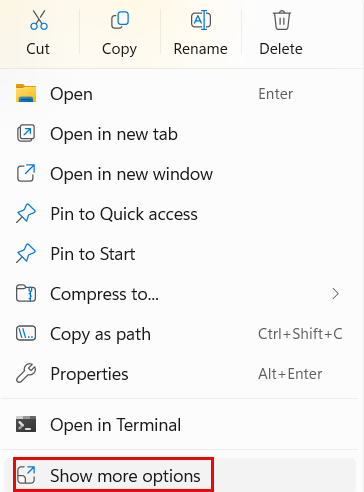
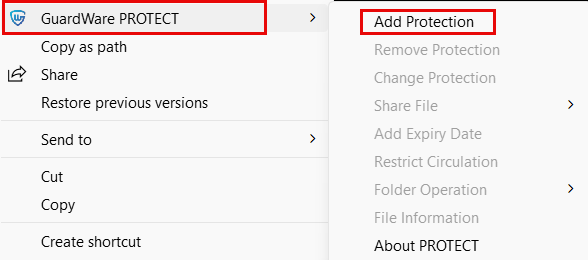
Right-click the file in Windows Explorer and click Show more options.
-
Click GuardWare PROTECT > Add Protection.
-
Select the File Classification. File classification defines the sensitivity level of the file and helps ensure it is handled appropriately.
-
Select the Security Groups who are authorised to access the file.
-
Provide a reason for adding protection and click Submit. Your reason explains why the action was taken and supports audits or incident investigations.
-
Click Exit to close the window.
When opening a protected file, GuardWare PROTECT verifies your Security Group. If you’re in the authorised Security Group, the file is decrypted; else, access is denied, and you will see a lock icon.
Files show an icon overlay to indicate protection. By default, the colour and classification are set as follows, but administrators can customise both according to their needs, so the overlays may differ depending on your system setup.
-
Blue: Internal (default)
-
Red: Confidential
-
Yellow: Sensitive
-
Black: Not accessible (you are not authorised to access the file.)
If multiple files are selected, protection is applied only to those that are not already protected.
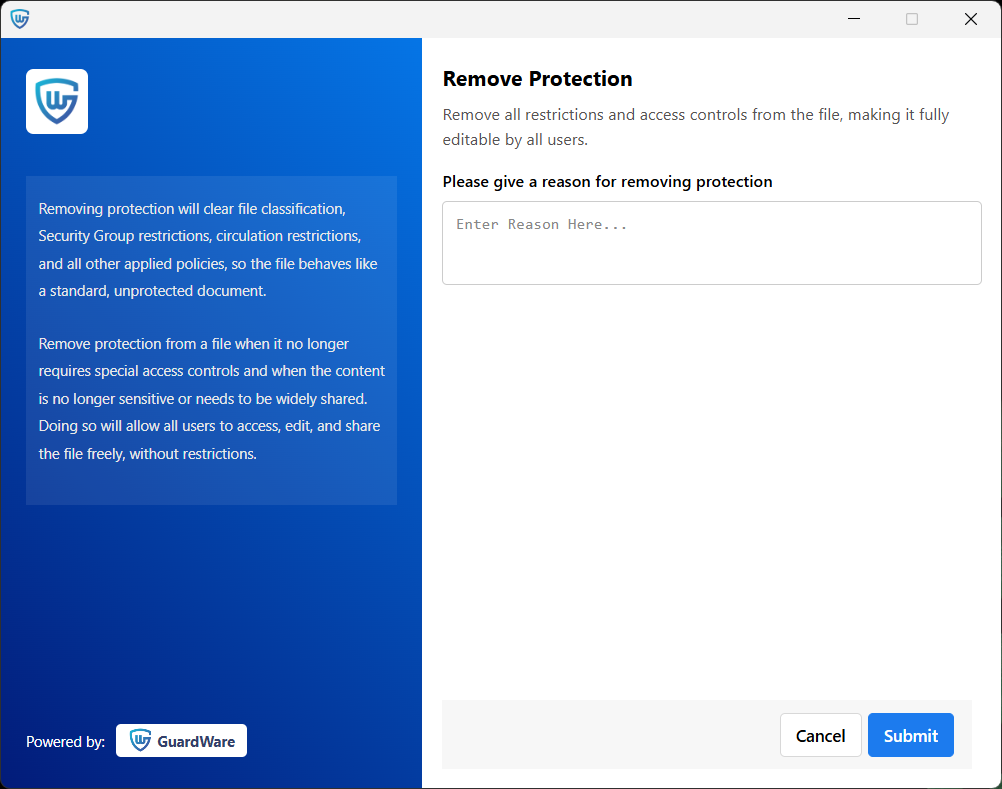
Remove File Protection
Removing a file’s protection clears file classification, Security Group restrictions, circulation restrictions, and all other applied protection, so the file behaves like a standard, unprotected document.
Removing file protection is recommended when it no longer requires special access controls and when the content is no longer sensitive or needs to be widely shared. Once protection is removed, all users can freely access, edit, and share the file without restrictions.
To remove protection from a file:
-
Right-click the file in Windows Explorer and click Show more options.
-
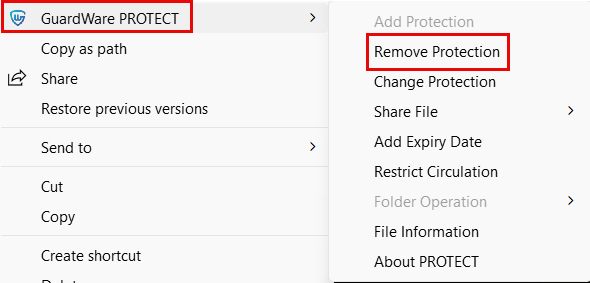
Click GuardWare PROTECT > Remove Protection.
-
Provide a reason for removing protection and click Submit. Your reason explains why the action was taken and supports audits or incident investigations.
-
Click Exit to close the window.
Change File Protection
Changing file protection allows you to update the file classification and the Security Groups that can access the file. Changing a file’s protection ensures that the file’s security and access controls remain accurate as the file’s content or context changes over time.
For example, a confidential file about a takeover bid might be initially classified as Internal Only because it contains a customer’s phone number. However, a user who understands the file’s true content can reclassify it as Restricted and also change the Security Groups that can access it to prevent misuse. By changing protection, files always reflect the right level of security.
To change protection of a file:
-
Right-click the file in Windows Explorer and click Show more options.
-
Click GuardWare PROTECT > Change Protection.
-
Select a File classification. File classification defines the sensitivity level of the file and helps ensure it is handled appropriately.
-
Select Security Groups. Security Groups determine who can access the file once protection is applied. Only members of these groups can access the file; others are restricted.
-
Provide a reason for changing protection and click Submit. Your reason explains why the action was taken and supports audits or incident investigations.
-
Click Exit to close the window.

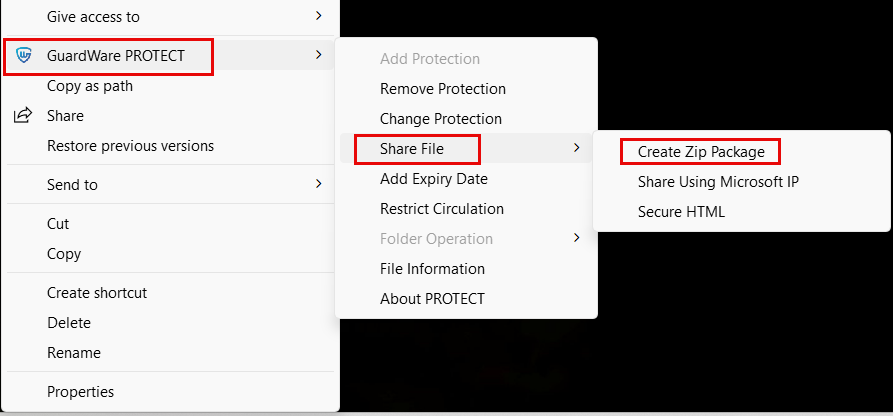
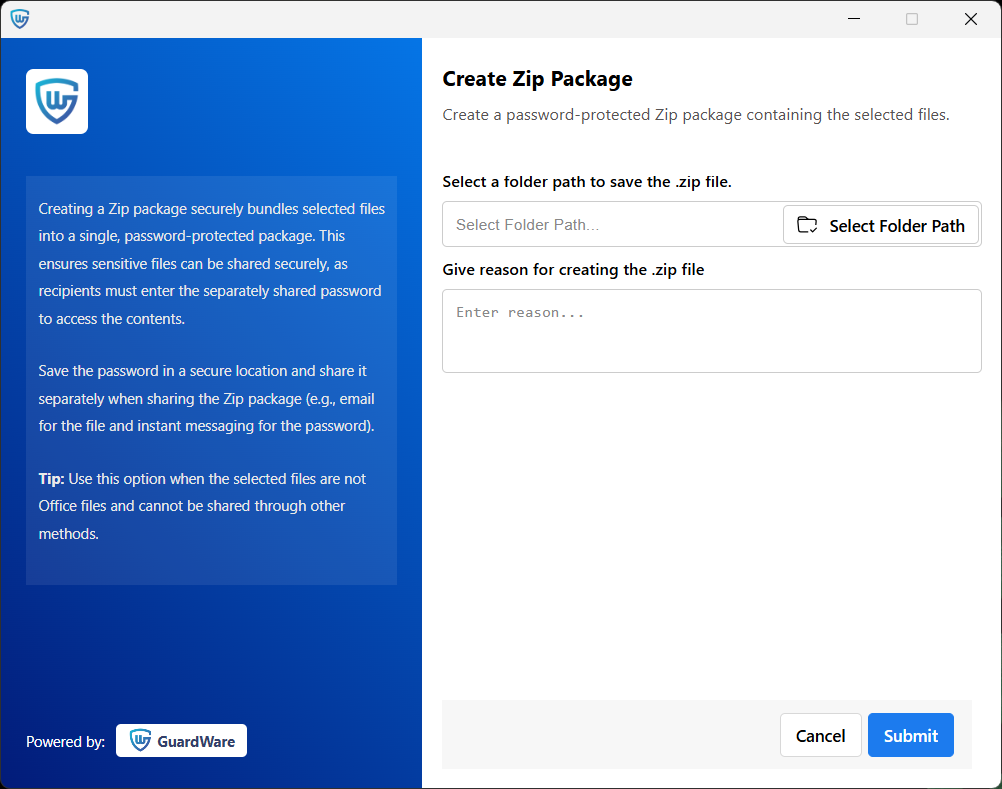
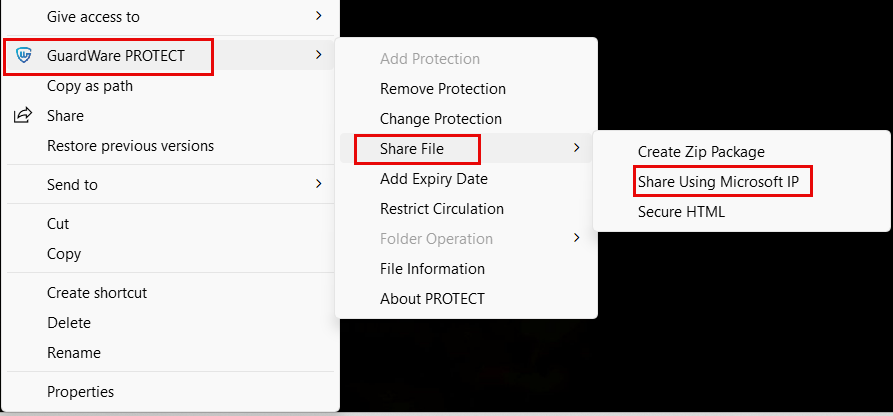
Create Zip Package
Creating a Zip package securely bundles selected files into a single, password-protected package. This ensures sensitive files can be shared securely, as recipients must enter the separately shared password to access the contents. This option is useful for files that are not Office documents or cannot be shared through other protection methods, and for sharing files with users who do not have GuardWare PROTECT installed. In such cases, the files’ protection can be temporarily removed and secured within the password-protected Zip package.
To create a Zip package:
-
Select the files you want to zip, right-click, and click Show more options.
-
Click GuardWare PROTECT > Share File > Create Zip Package.
-
Select a folder path to save the Zip package.
-
Provide a reason for creating the Zip package and click Submit. Your reason explains why the action was taken and supports audits or incident investigations.
-
You’ll see the password for the Zip package on the dialog screen. Copy and save the password in a secure location, as you will not be able to access it after you close the dialog. Anyone who needs to access the Zip package will require the password. Share the password separately when sharing the Zip package. For example, share the Zip package in an email and password through instant messaging apps.

-
Click Exit to close the window.
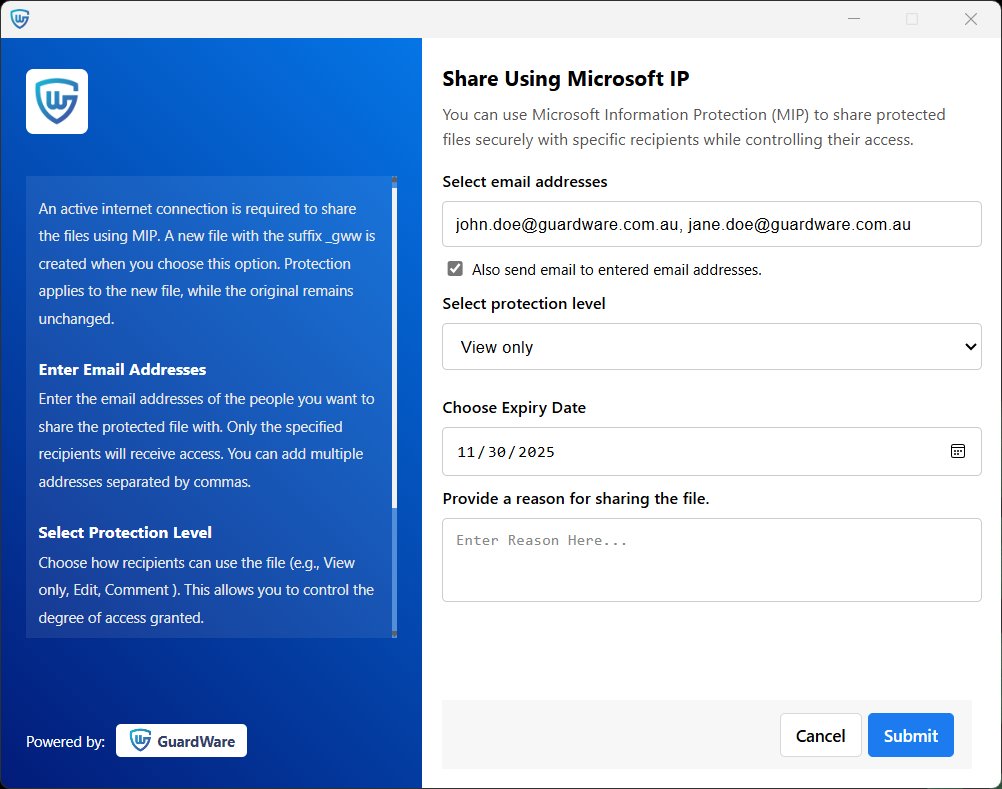
Share Using Microsoft IP
PROTECT integrates with Microsoft Information Protection (MIP) to let you securely share protected MS Office documents and PDFs with chosen recipients while maintaining control over their access.
An active internet connection is required to share the files using MIP. This option is useful for sharing files on devices that do not have the GuardWare PROTECT installed. When this option is selected, a new file with the suffix _mipProtect is created, and MIP is applied first in the new file before PROTECT’s protection is removed; the original remains unchanged. This ensures the file is never saved in an unprotected form.
When users open a file shared using MIP, they’ll be prompted to sign in with a Microsoft account that has permission to access it. If they don’t have the required permissions, access will be denied.
To share a file using MIP:
-
Right-click the file in Windows Explorer and click Show more options.
-
Click GuardWare PROTECT > Share File > Share Using Microsoft IP.
-
Enter the email addresses of the users you want to share the protected file with. Only the specified recipients will receive access. You can add multiple addresses separated by commas.
-
Enable Also send email to entered email addresses to email a copy of the new MIP-protected file to the specified recipients. When you enable this option and submit, you’ll be prompted to choose your email service provider application, from which you can manually send the email.
-
In Select protection level, choose how recipients can use the file (e.g., View only, Edit, Comment ). This allows you to control the degree of access granted.
-
Set an expiry date to automatically revoke access after a specific time. Once expired, no one can view or use the file.
-
Provide a reason for sharing the file using MIP and click Submit. Your reason explains why the action was taken and supports audits or incident investigations.
-
Click Exit to close the window.
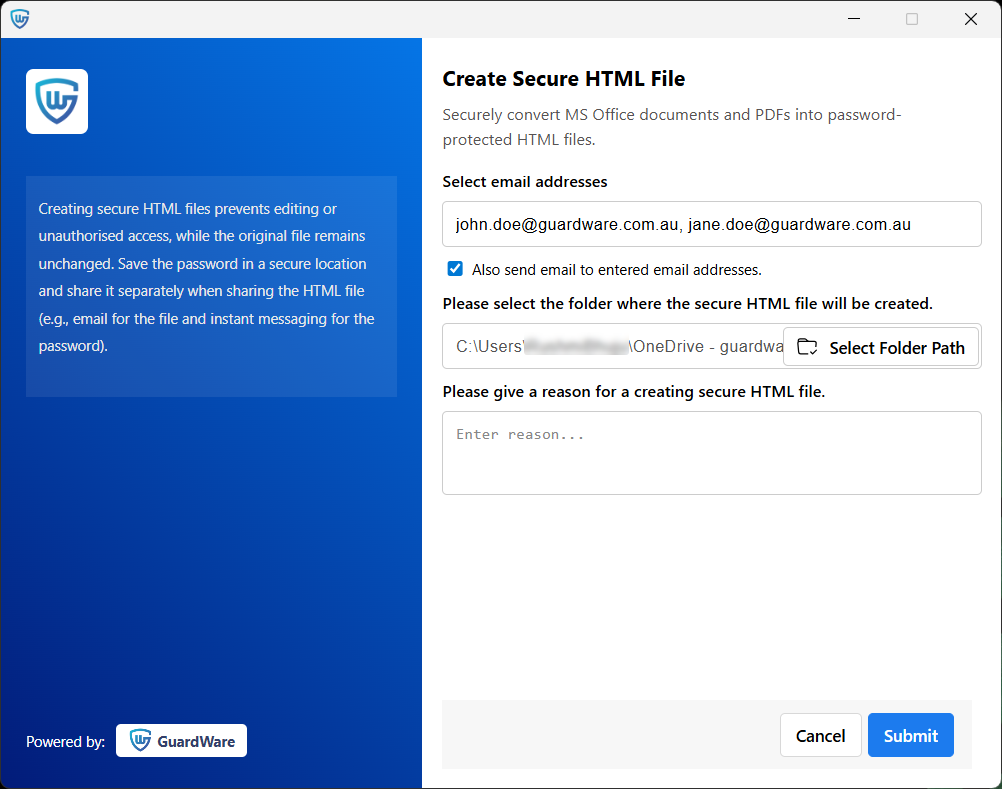
Create Secure HTML File
Creating secure HTML files converts MS Office documents and PDFs into password-protected HTML files, preventing unauthorised access. When this option is selected, a new HTML file is created; the original file remains unchanged. Anyone who needs to access the HTML file will require the password.
To create a secure HTML file:
-
Right-click the file in Windows Explorer and click Show more options.
-
Click GuardWare PROTECT > Share File > Secure HTML.

-
Enter the email addresses of the users you want to share the protected file with. Only the specified recipients will receive access. You can add multiple addresses separated by commas.
-
Enable Also send email to entered email addresses to email a copy of the new secure HTML file and the password to the specified recipients. When you enable this option and submit, you’ll be prompted to choose your email service provider application, from which you can manually send the email.
-
Select the folder where the secure HTML file will be created.
-
Provide a reason for creating the secure HTML file and click Submit. Your reason explains why the action was taken and supports audits or incident investigations.
-
You’ll see the password for the secure HTML file on the dialog screen. Copy and save the password in a secure location, as you will not be able to access it after you close the dialog. Share the password separately when sharing the HTML file. For example, share the HTML file via email and password through instant messaging apps.
-
Click Exit to close the window.
You can also select multiple files and create secure HTML files at once. The password will be same for all HTML files.
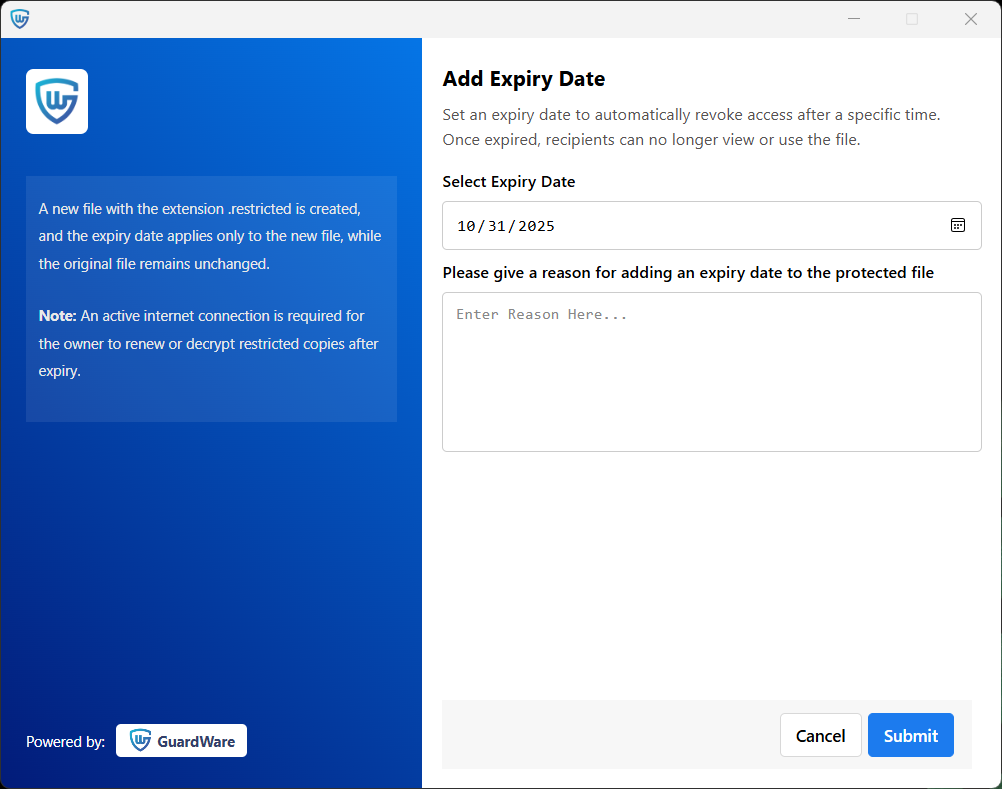
Add Expiry Date
Adding an expiry date automatically revokes access to the file after the specified time. Once expired, no one can view or use the file. An active internet connection is required to decrypt a file before expiry.
To add an expiry date:
-
Right-click the file in Windows Explorer and click Show more options.
-
Click GuardWare PROTECT > Add Expiry Date.
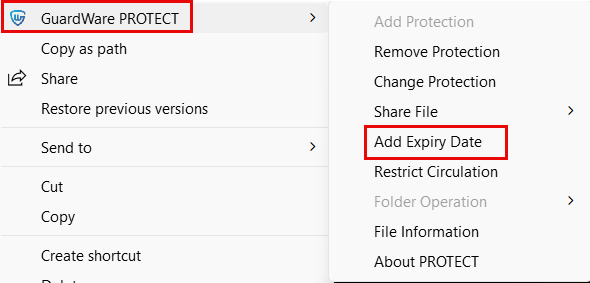
-
Select an expiry date, provide a reason for adding the expiry date, and click Submit.
A new file with the extension .restricted is created, and the expiry date applies only to the new file, while the original file remains unchanged.
-
Click Exit to close the window.
Restrict Circulation
Restricting circulation prevents other users from changing access permissions, i.e., adding Security Groups (and therefore users) who can access the file. This makes sure that only the file owner can manage sharing and access.
A new file with the extension .restricted is created, and the restriction applies only to this new file, while the original file remains unchanged. Authorised recipients can view/decrypt the restricted file.
To restrict circulation:
-
Right-click the file in Windows Explorer and click Show more options.
-
Click GuardWare PROTECT > Restrict Circulation.
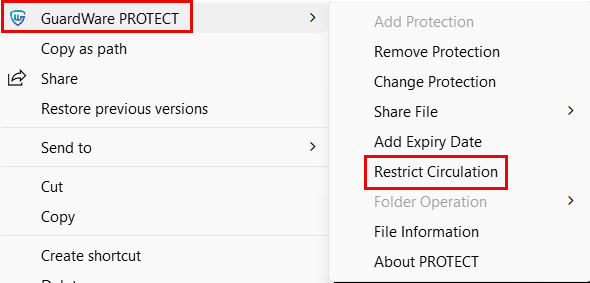
-
Provide a reason for restricting circulation and click Submit.
A new file with the extension .restricted is created, and the restriction applies only to this new file, while the original file remains unchanged. Authorised recipients can view/decrypt the restricted file; however, they cannot change the access permissions. -
Click Exit to close the window.
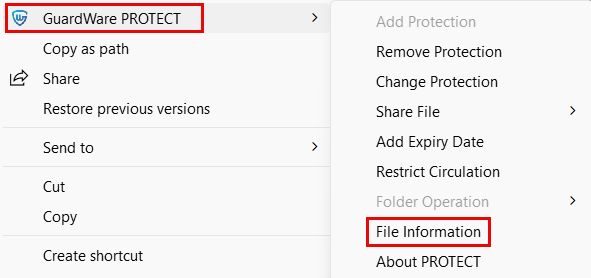
File Information
File Information displays the protection applied to the file, including its classification, assigned Security Groups, expiry date, and all active restrictions.
To access file information: Right-click the file in Windows Explorer > Show more options > GuardWare PROTECT > File Information.
PROTECT Usage Profile
PROTECT Usage Profile provides information on the user’s Security Groups and usage policies that define which features are available to them. This helps users understand their access level and the permissions they have.
To access this PROTECT Usage Profile:
-
Right-click the file in Windows Explorer and click Show more options.
-
Click GuardWare PROTECT > PROTECT Usage Profile.

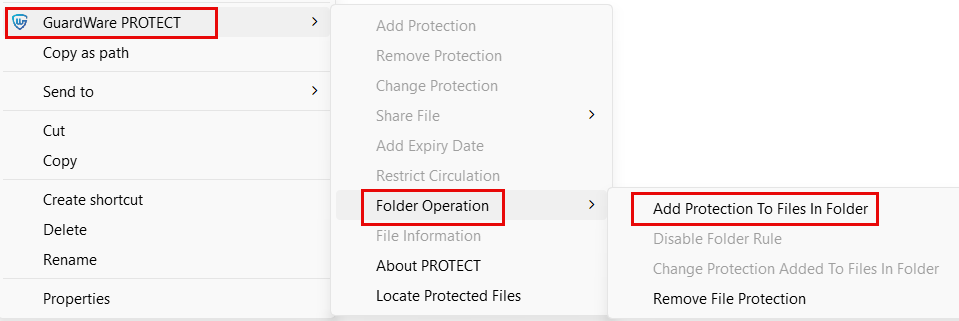
Folder Operation
Add Protection to Files In Folder
When this setting is applied, all new files added to the folder are protected automatically; however, the existing files in the folder remain unchanged. If the folder is moved or renamed, its protection is removed, but the files inside remain protected. To reapply protection to the folder, you’ll need to add protection again.
To add protection to files in folder:
-
Right-click the folder in Windows Explorer and click Show more options.
-
Click GuardWare PROTECT > Folder Operation > Add Protection To Files In Folder.
-
Select the Folder classification. Folder classification defines the sensitivity level of the folder and helps ensure it is handled appropriately.
-
Select Security Groups. Security Groups determine who can access the file once protection is applied. Only members of these groups can access the file; others are restricted.
-
Provide a reason for adding protection and click Submit. Your reason explains why the action was taken and supports audits or incident investigations.
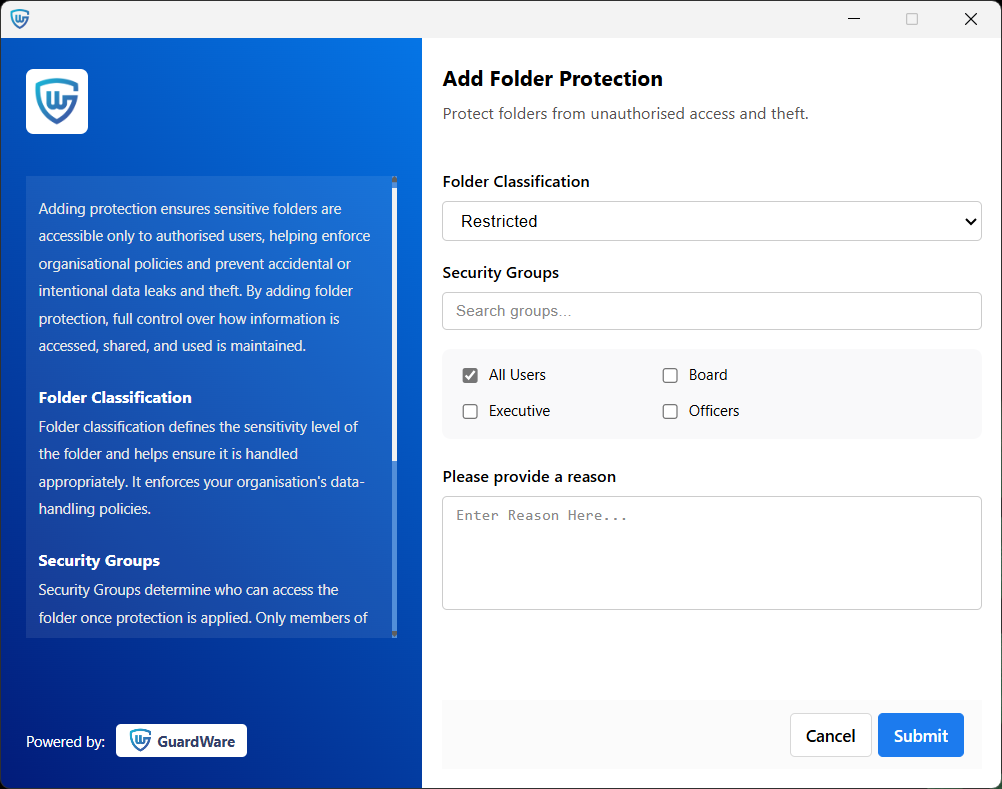
-
Click Exit to close the window.
Change Protection Added to Files In Folder
When this setting is applied, the protection of new files moved to this folder is changed; however, the existing files in the folder remain unchanged. If the folder is moved or renamed, its protection is removed, but the files inside remain protected. To reapply protection to the folder, you’ll need to add protection again.
To change protection of a folder:
-
Right-click the folder in Windows Explorer and click Show more options.
-
Click GuardWare PROTECT > Folder Operation > Change Protection Added to Files In Folder.

-
Select the Folder classification. Folder classification defines the sensitivity level of the folder and helps ensure it is handled appropriately.
-
Select Security Groups. Security Groups determine who can access the file once protection is applied. Only members of these groups can access the file; others are restricted.
-
Provide a reason for changing protection and click Submit. Your reason explains why the action was taken and supports audits or incident investigations.
-
Click Exit to close the window.
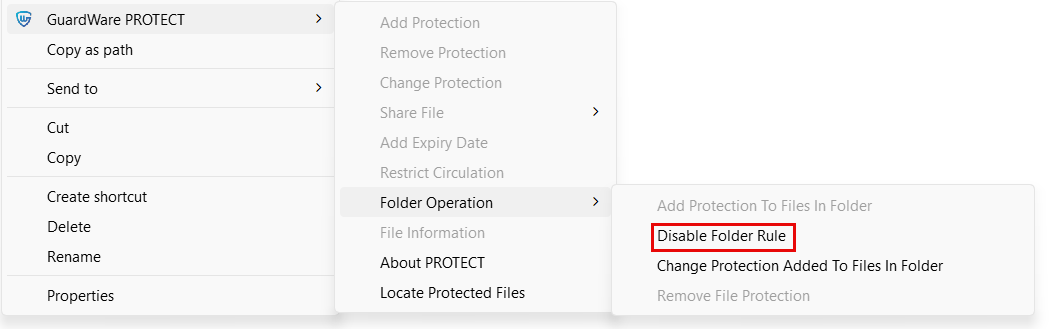
Disable Folder Rules
When this setting is applied, all the applied protection will be removed from the folder, allowing all users to edit and share the folder without restrictions. However, the existing files in the folder remain unchanged. This will remove protection from the folder only, not from the files it contains.
To disable folder rules for a folder:
-
Right-click the folder in Windows Explorer and click Show more options.
-
Click GuardWare PROTECT > Folder Operation > Disable Folder Rules.
-
Provide a reason for removing protection and click Submit. Your reason explains why the action was taken and supports audits or incident investigations.
-
Click Exit to close the window.
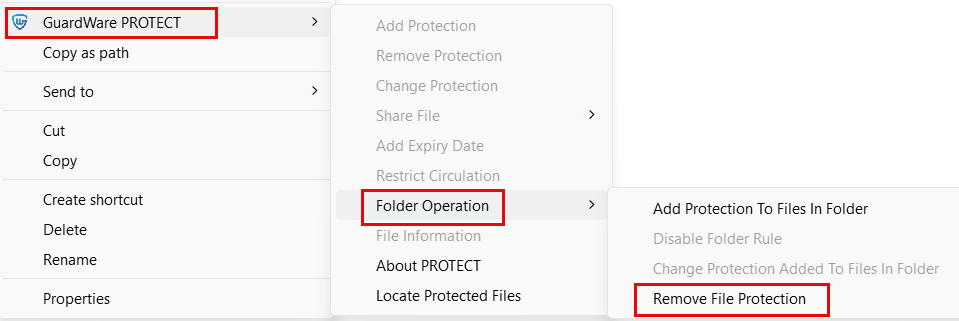
Remove File Protection
When this setting is applied to a folder, protection is automatically removed from any protected files moved into the folder; however, the existing files in the folder remain unchanged. Instead of removing protection from each file one by one, you can simply move the files into the folder, saving time and reducing the chance of errors.
To remove file protection:
-
Right-click the folder in Windows Explorer and click Show more options.
-
Click GuardWare PROTECT > Folder Operation > Remove File Protection.
-
Provide a reason for removing the protection and click Submit. Your reason explains why the action was taken and supports audits or incident investigations.
-
Click Exit to close the window.
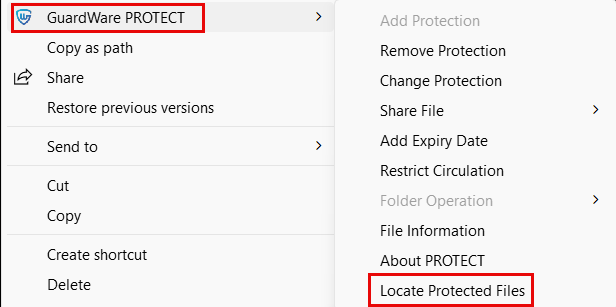
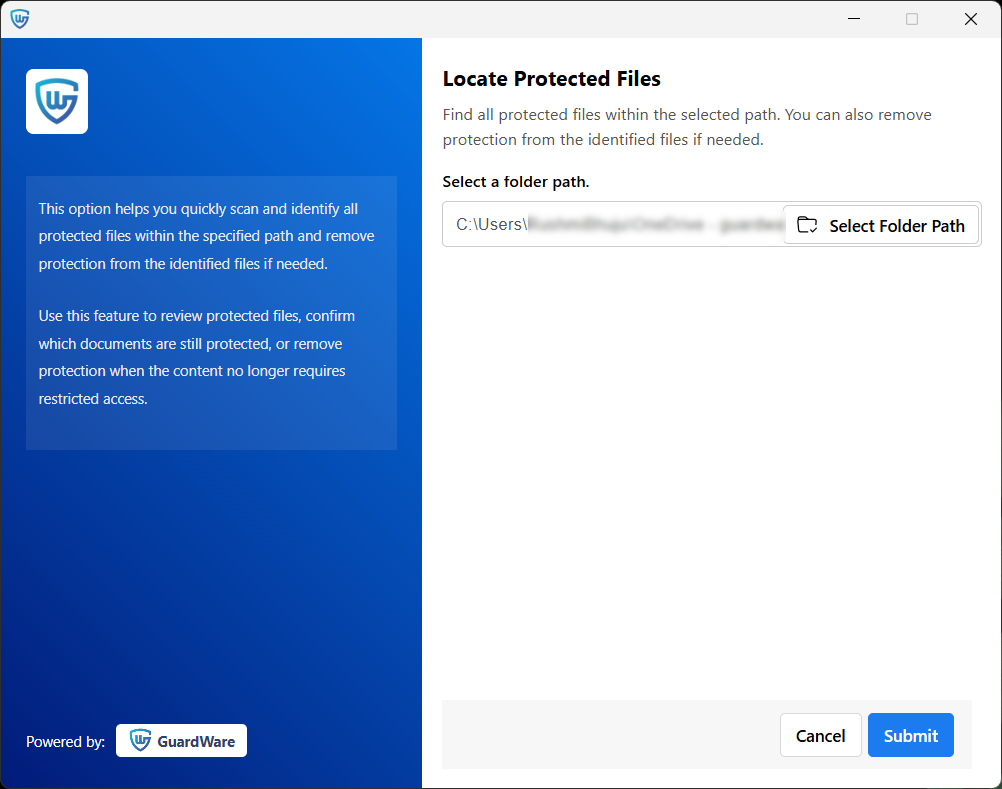
Locate Protected Files
This option helps you quickly scan and identify all protected files within the specified path and remove protection from the identified files if needed.
To locate protected files:
-
Right-click any protected file in Windows Explorer and click Show more options.
-
Click GuardWare PROTECT > Locate Protected Files.
-
Select the folder where you want to search for protected files and click Submit. You’ll see a list of all protected files.
-
If you want to remove protection from any file, select the file(s) and click Remove Protection.
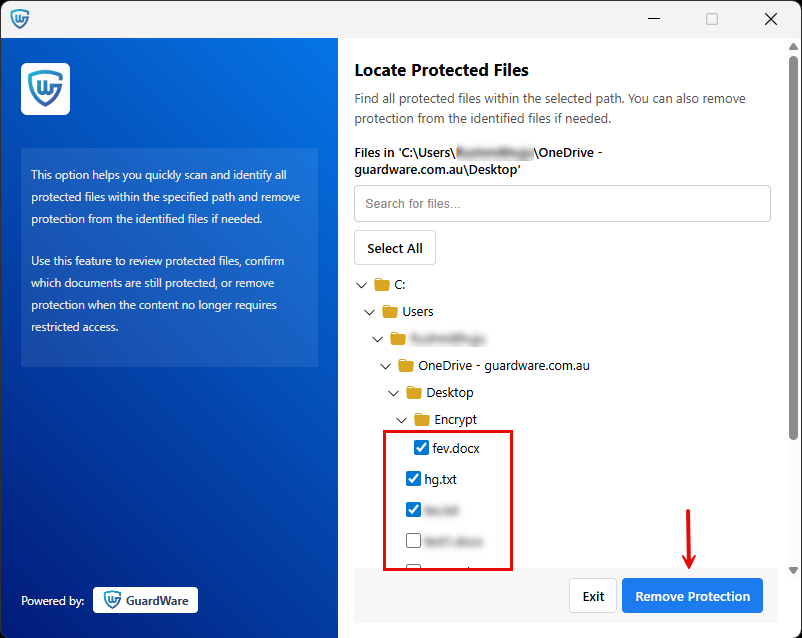
-
Click Submit to confirm and click Exit to close the window.
Uploading to Authorised Websites
When you upload protected files to authorised websites, GuardWare PROTECT automatically decrypts them. When you download files from those websites, PROTECT re-encrypts them. The list of authorised websites can be configured through the GuardWare PROTECT Management Console.