Overview
GuardWare DISCOVER is a cross-platform data discovery and remediation system that enables organisations to locate, analyse, and manage sensitive data across endpoints, file servers, email systems, and cloud services. Its primary focus is the discovery of PCI and PII data, but users can define custom data types as needed to suit organisational requirements.
DISCOVER supports both agent-based and agentless scanning, allowing deployment flexibility to match your organisation’s network infrastructure. Besides standard documents, the system can scan compressed archives and image files as well. Users can take action on exposed data by moving, encrypting, or deleting it from insecure locations.
This guide provides a detailed walkthrough of the DISCOVER Management Console, structured to follow the console’s interface hierarchy. It includes both procedural steps and contextual explanations for each feature.
DISCOVER Management Console Login/Logout
The Management Console is the control hub for Super Admins and authorised users. After logging in, users can set up a secure location to store files for remediation, manage users, create custom data types, create data owners, create classifications, assign data types to data owners, search for devices to scan, perform scans, review results, perform investigations, and remediate sensitive data.
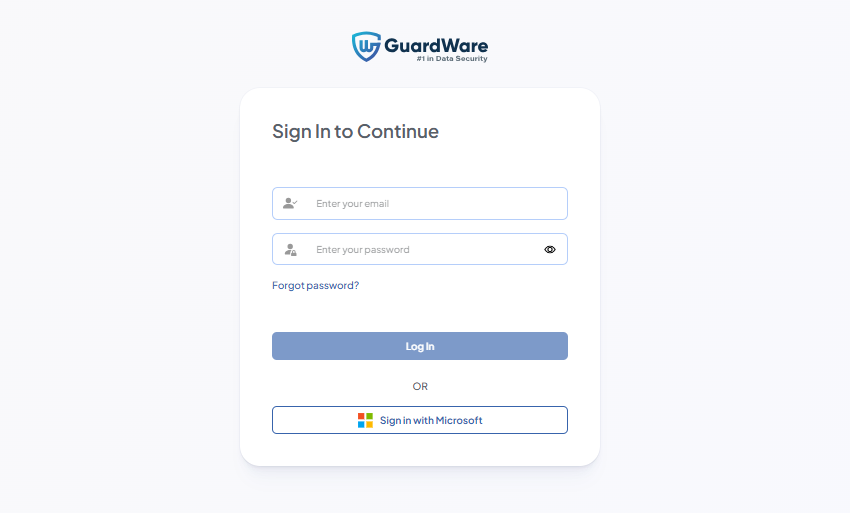
Super Admin Login
The Super Admin is a user account provisioned by GuardWare Australia during the initial setup of DISCOVER for your organisation. This account has full administrative access to the Management Console.
-
Open a web browser and navigate to the DISCOVER Management Console page.
-
Log in using the Super Admin credentials created during the server installation.
-
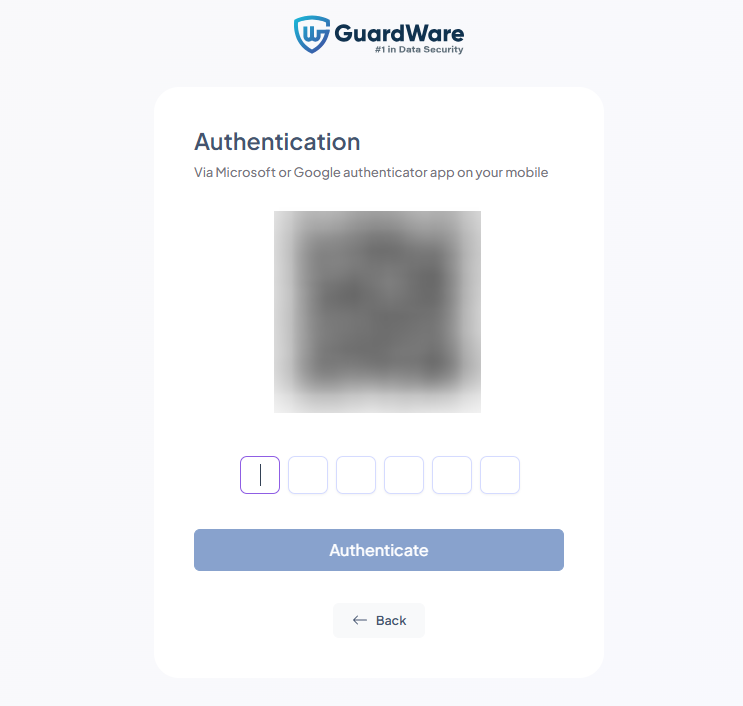
Download Google or Microsoft Authenticator on your mobile device and scan the QR code from the authenticator app.
-
Enter the generated verification code in the Authentication field and click Authenticate.
-
Enter a new password and click Login.
New Organisation User Login
A new organisation user is an account created by a Super Admin or an enrolled organisation user. This account grants the new user access to the GuardWare DISCOVER Management Console.
-
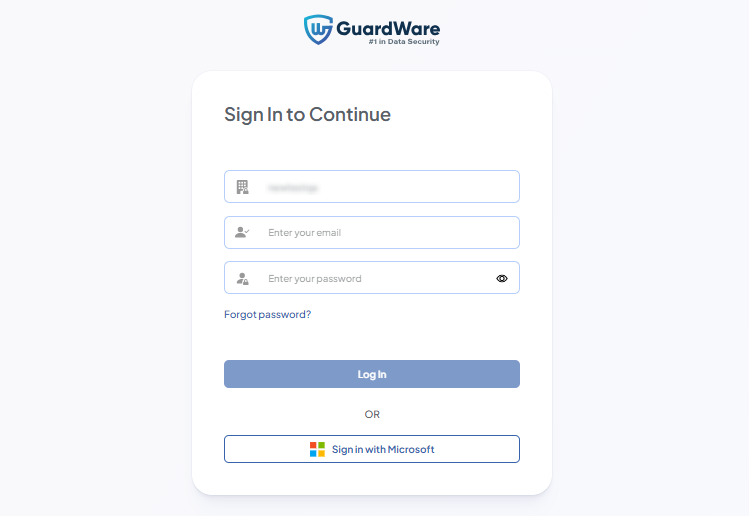
On a web browser, navigate to the DISCOVER Management Console page.
-
Enter your username (email address) and one-time password received via email or sent by your Super Admin.
-
Scan the QR code using the Google or Microsoft Authenticator app on your mobile device.
-
Enter the generated verification code in the Authentication field and click Authenticate.
-
Enter a new password and click Login.
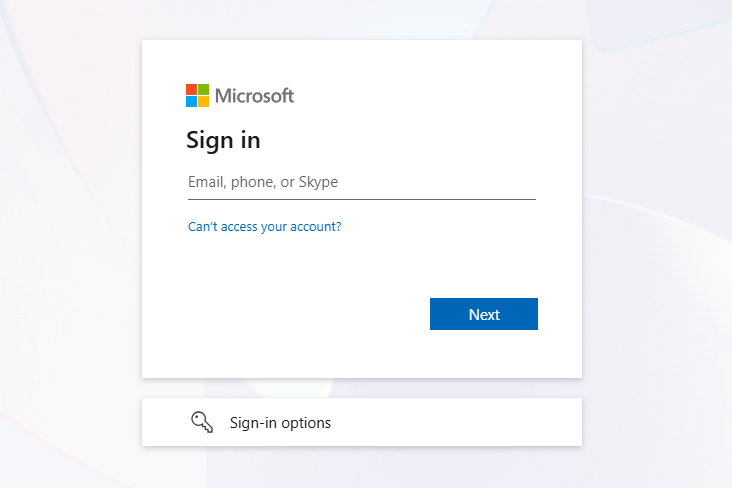
Log In Using your Microsoft Account
If your organisation uses Microsoft Azure AD (Entra ID), you can sign in via single sign-on (SSO). GuardWare delegates authentication to Azure AD, allowing users to access the Management Console without entering a separate password. Access is granted based on existing GuardWare accounts that correspond to your Azure AD identity.
If you choose this method, you can skip the Authenticator QR setup process entirely. Applies to Super Admin as well as organisational users.
-
Click Sign in with Microsoft
-
In the Sign in page, enter your Microsoft account email address.
-
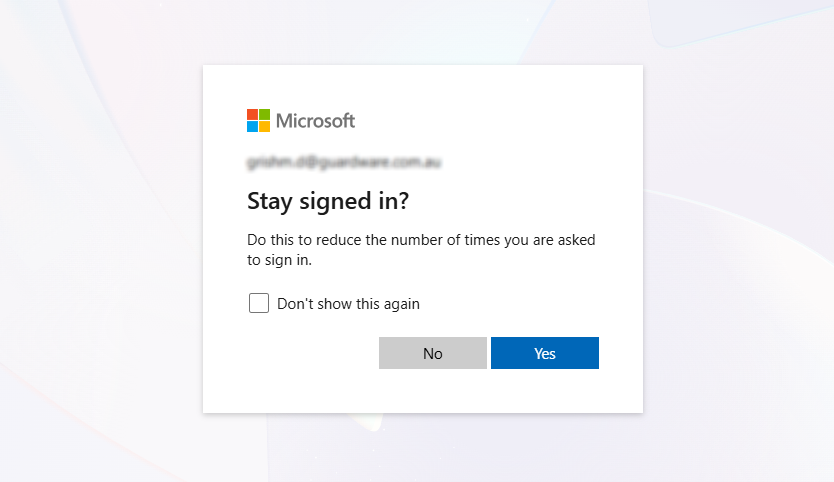
Select Yes if you do not want to be asked for login credentials again, or select No if you want to be asked for email credentials every time you sign in. Additionally, you can check Don’t show this again box if you do not want to see this dialog box again.
Log Out
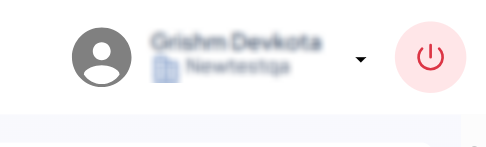
Click the Power (⏻) button at the top-right to log out safely.
ORGANISATION
The ORGANISATION section allows administrators to manage user accounts, configure the DISCOVER Agent for download, and set up key organisational settings. This includes defining a secure file storage location, setting up password protection on ZIP folders, and configuring SMTP email servers for notifications.
These controls ensure that emails and alerts are sent from authorised servers, that user accounts are adequately protected, and that sensitive files are handled in accordance with organisational security and data governance policies.
Organisation Creation
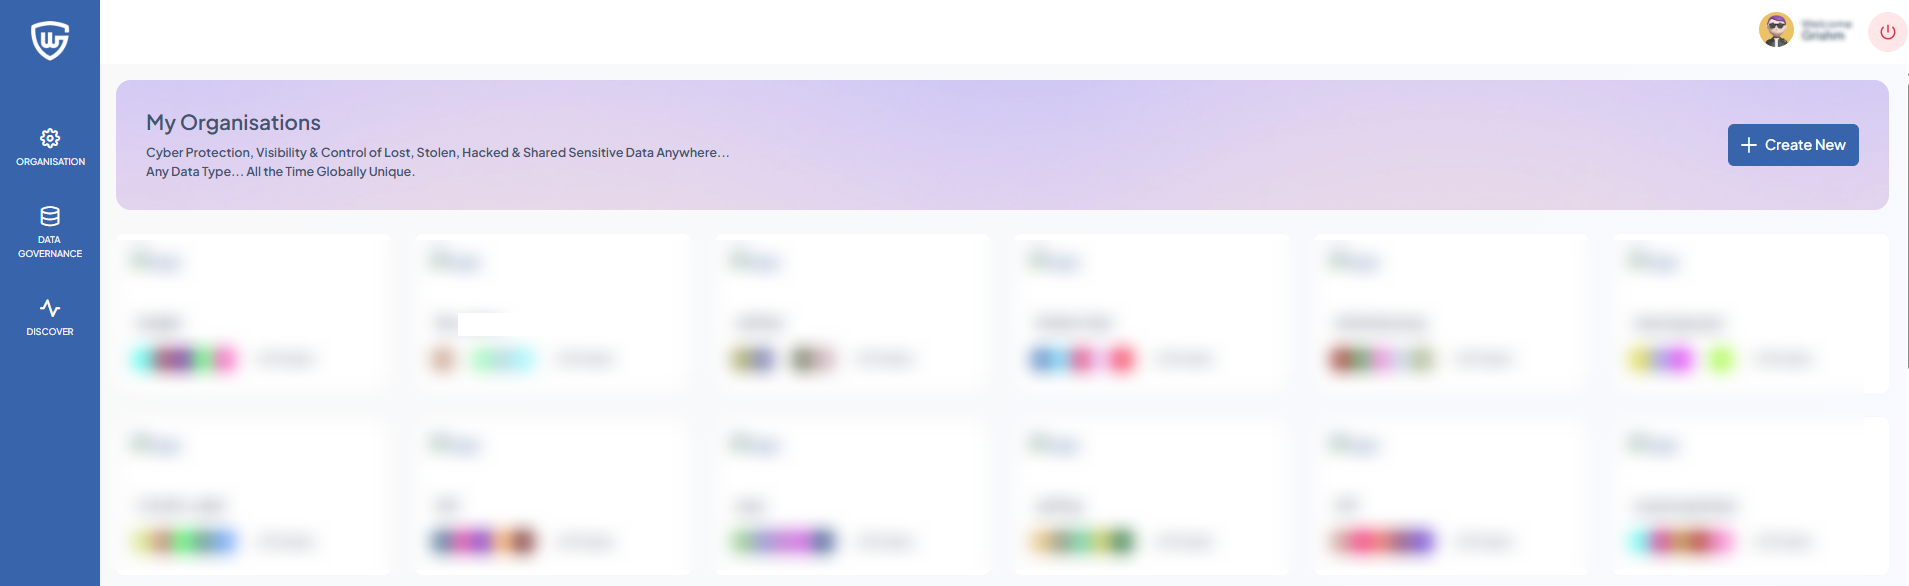
Super Admins logged into the Management Console can create new organisations and add users to them. Each organisation defines its own set of users, data, and permissions, allowing admins to manage operations independently and ensure clear separation between them.
-
Navigate to ORGANISATION and click +Create New.
-
Enter a Name for the new organisation.
-
Enter the Location.
-
The Database Name will be automatically generated based on the organisation’s name.
-
Set a Time Zone that matches your organisation’s location. This will also be used to time the report creation; therefore, enter the timezone that best fits the situation.
-
Upload the logo of your organisation. Supported file types are
.jpg,.jpeg, and.png. -
Enter the URL (optional) and Description (optional).
-
Click Create Organisation.
Adding a User to an Organisation
After creating an organisation, you’ll need to add at least one user to the organisation.
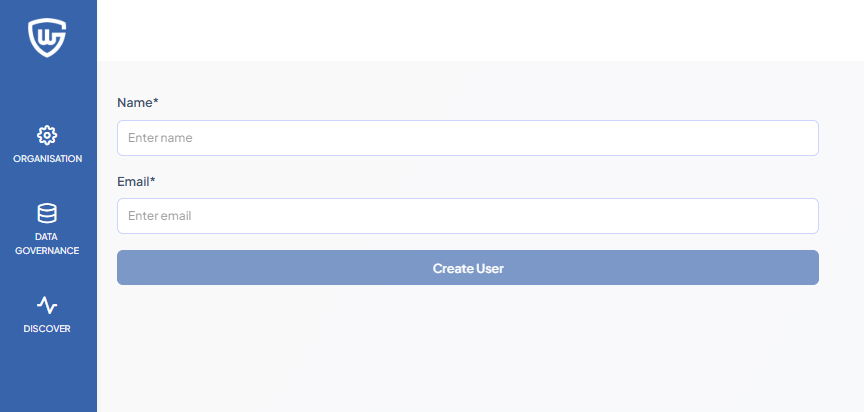
-
Navigate to ORGANISATION and select the newly created organisation.
-
Enter the username in the field.
-
Enter a valid email in the field.
-
Click Create User.
SMTP Configuration
The SMTP Configuration allows organisations to configure their own email server for sending notifications, user invitations, password resets, scan reports, and other system alerts. Configuring SMTP will enable notifications to come from the organisation’s domain, improving trust and brand consistency.
If SMTP is not configured, DISCOVER defaults to GuardWare’s SMTP servers to send notifications, system emails, or alerts. Configuring SMTP is recommended for organisations that require domain-specific email notifications, such as noreply@bank.com instead of noreply@guardware.com.
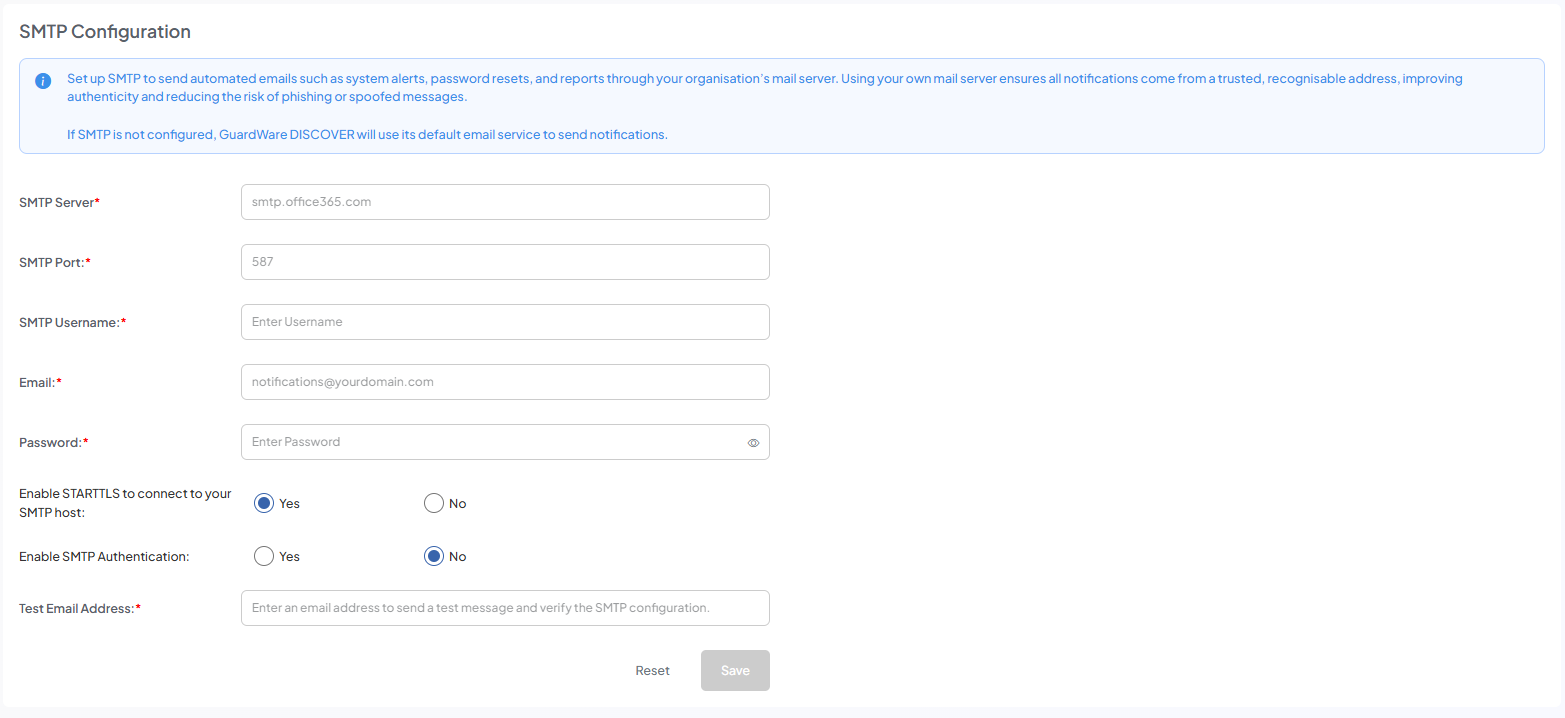
-
Navigate to ORGANISATION > SMTP Configuration.
-
Enter your SMTP Server name to direct the system to the correct email server.
-
Enter SMTP Port used by your mail server (common values: 25, 465, 587) to ensure compatibility with the email server's communication protocol.
-
Enter an SMTP Username.
-
Enter SMTP Email and Password for outgoing alerts.
-
Enable STARTTLS if encryption is required.
-
In Enable SMTP Authentication, select Yes if the server requires credential verification.
-
Enter a Test Email Address to send a test message and confirm that the SMTP configuration is working correctly.
-
Click Save to test and apply the configuration.
Set Up Secure Location
The Secure Location feature allows files identified during scans to be copied or moved to a protected location for investigation or remediation. This ensures sensitive data is stored securely and accessible only to authorised users.
New Secure Location Configuration
Use New Secure Location to set up a secure storage path on a device that has not yet been discovered or configured. This allows sensitive files identified during scans to be safely moved to that device.
This option is suitable for devices not yet on the network, removable drives that can be plugged in for secure storage or remediation, and agent devices, which must be added as a New Secure Location.
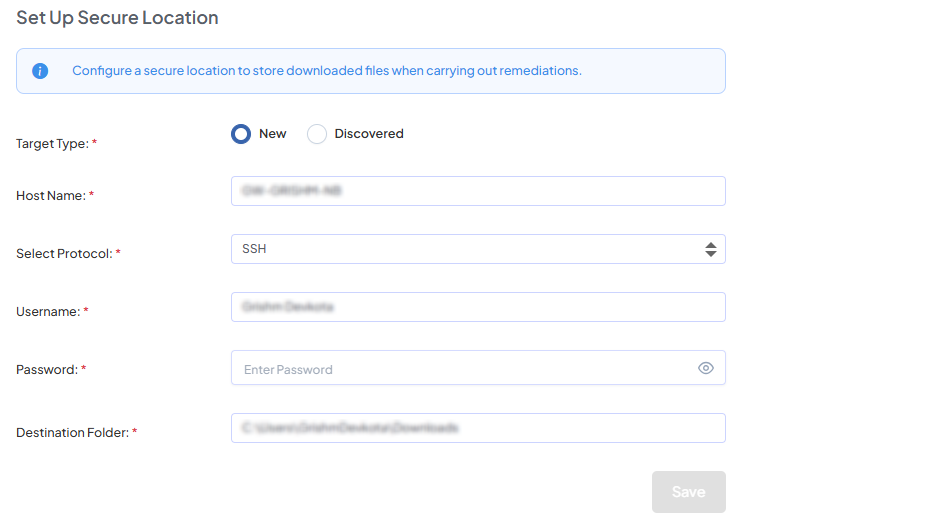
-
Navigate to ORGANISATION > Set Up Secure Location.
-
On Target Type, select New and enter the Host Name of the target. The hostname must be the device's actual name.
-
Select a Protocol by which to connect to the new secure location (File Server, WinRM, or SSH).
-
Enter the host device's Username and Password.
-
Enter the Destination Folder path where the files will be stored,
e.g., C:\Secure Location. -
Click Save to apply the configuration.
Once the secure location is successfully established, a status of Active will display. If you want to change the location of the secure location to another device or another directory, you can do so anytime.
Discovered Secure Location Configuration
Use this feature to register a secure storage path on a previously discovered device, allowing sensitive files to be copied or moved for investigation or remediation. This is intended for devices already on the network, providing a convenient setup for standard endpoints. Agent devices must be added as New, as they cannot appear under Discovered.
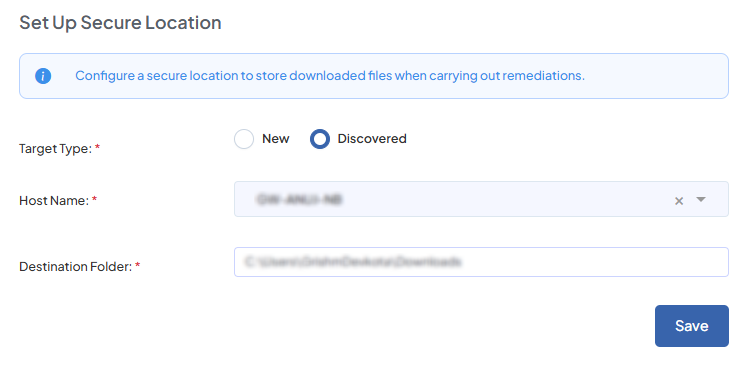
-
Navigate to ORGANISATION > Setup Secure Location.
-
On Target Type, select Discovered.
-
Choose a discovered device from the drop-down.
-
Define a path to store the data,
e.g., C:\Secure Location. -
Click Save.
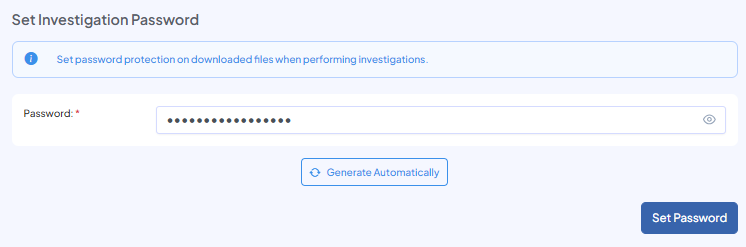
Set Investigation Password
To ensure only authorized users can access downloaded files, administrators must set a secure password. When a file is retrieved through the Investigate function, DISCOVER packages it into a password-protected ZIP before download, providing an additional layer of security.
-
Enter a strong password in the password field (minimum eight characters with a mix of uppercase letters, lowercase letters, numbers, and symbols) or click Generate Automatically to auto-generate a password.
-
Click Set Password. The Investigation password is applied per file.
-
To view or change the currently set password, enter your DISCOVER Management console’s login credentials and click the View (👁) icon.

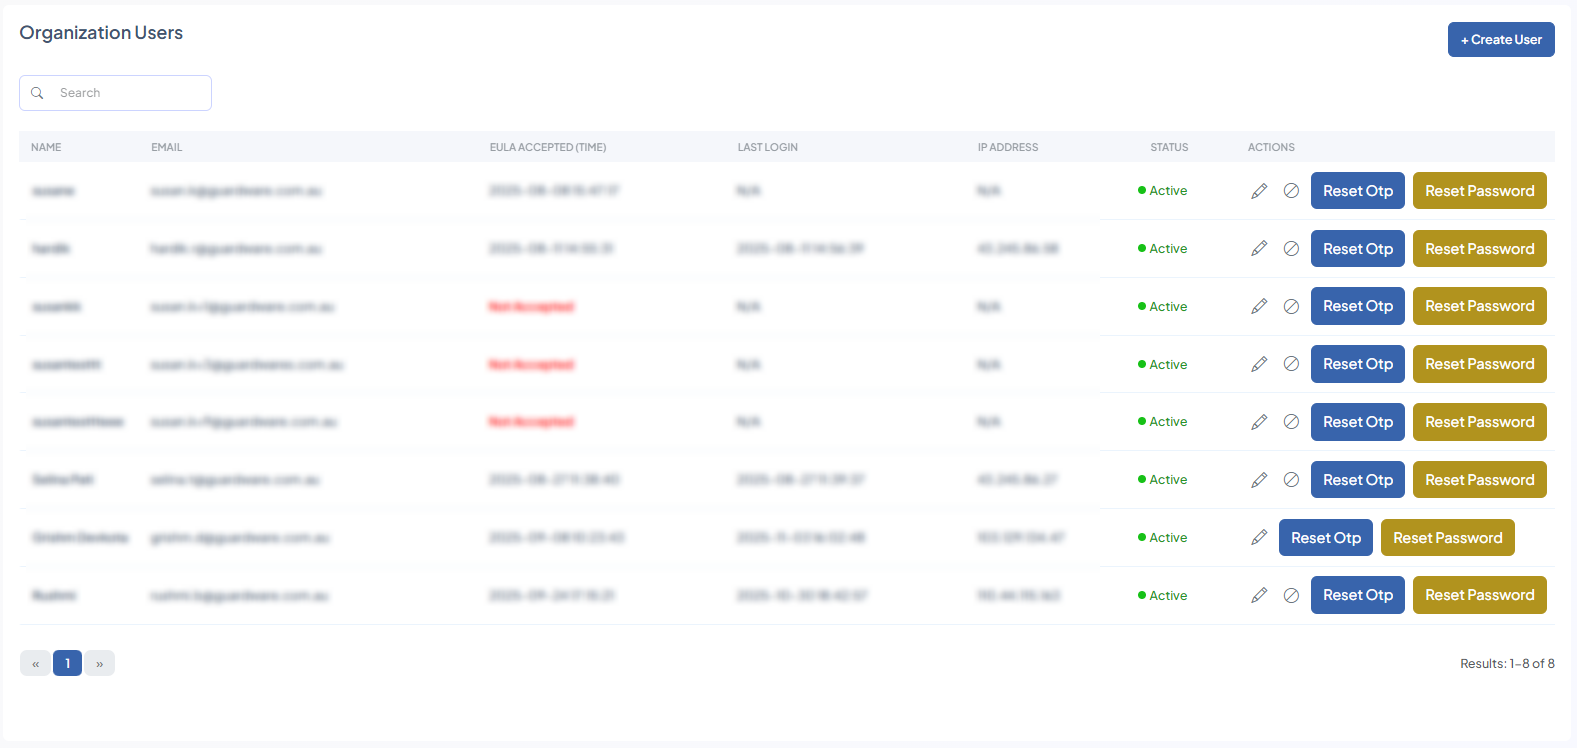
Users
The Users feature allows Super Admins and authorised users to manage accounts that can access the DISCOVER Management Console. From here, administrators can create new users, edit user details, deactivate other user accounts, and reset authentication and login credentials (including OTPs and passwords).
Proper user management ensures that only authorised personnel can access the Management Console and perform operations such as initiating scans, viewing scan results, and managing sensitive data types.
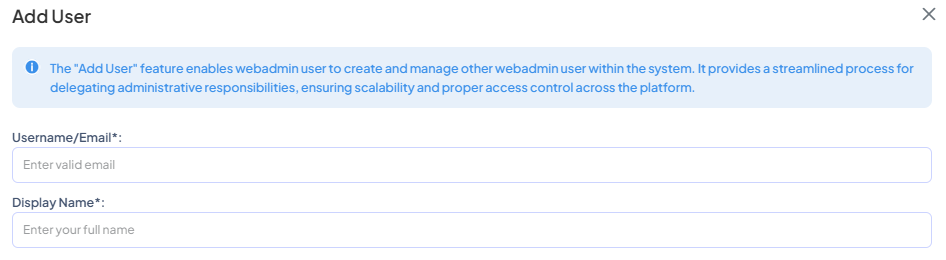
Add New User
When logging in with your Super Admin account for the first time, you will see that no other users exist. Super Admins can add new users, which allows them to run and manage scan jobs, investigate sensitive files, perform remediation, and enroll additional users into the Management Console.
-
Navigate to ORGANISATION > Users and click the +Enroll New User button.
-
Enter a valid email address and give the user a Display Name.
-
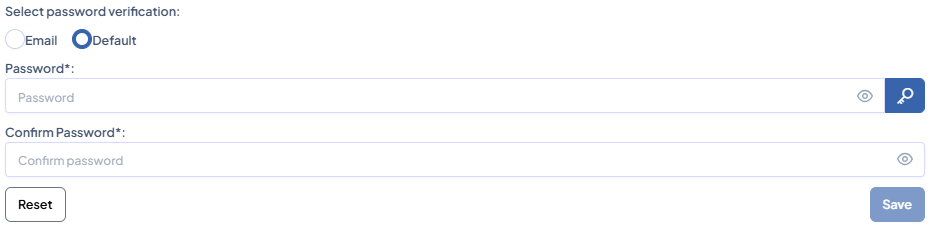
On the Select Password Verification, choose one of the following:
|
|
The newly created user receives a one-time password along with a login link in the email entered in Username/Email field. |
|
Default |
The Super Admin or an added user can set the password manually or generate a new one by clicking the key ( |

-
Click Save to complete the user creation process, or click Reset to start over.
Additional Functionalities
After creating and adding users, you can perform additional functions in the Organisation Users page:
Edit a User
-
Navigate to ORGANISATION > Users.
-
Click the Edit (🖉) icon.
-
Enter a new Display Name and a new Email. Changing the username and email does not make the system treat the account as a new user.
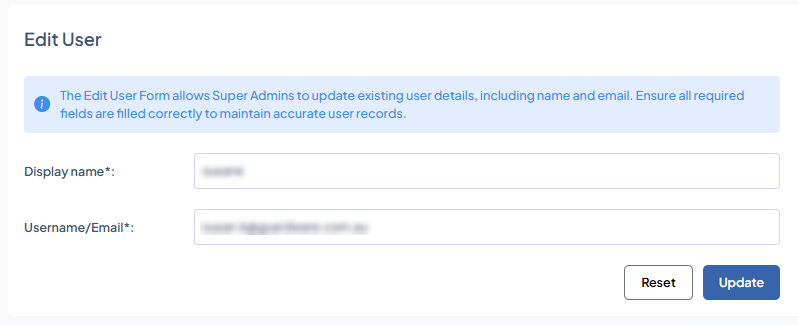
-
Click Update.
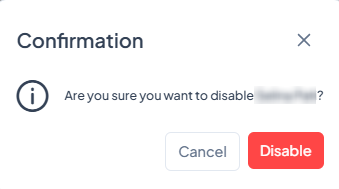
Disable a User
-
Navigate to ORGANISATION > Users.
-
Click the Disable (⊘) icon. This revokes a user’s access to the Management Console. You cannot disable your own account.
-
Click Disable.
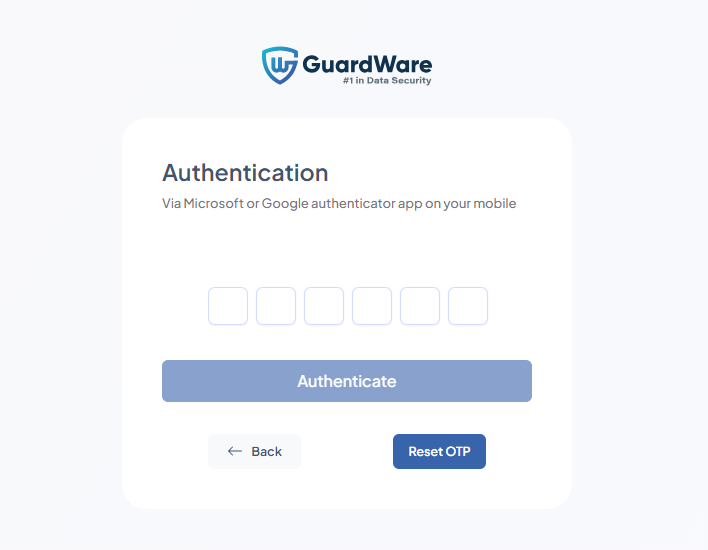
Reset OTP
-
Navigate to ORGANISATION > Users and click Reset OTP.
-
Click Reset. This Forces the user to re-register an existing user’s or their own Management Console account with an authenticator. This generates a new QR code, allowing the user to receive authentication codes if they are not being received on the authenticator.

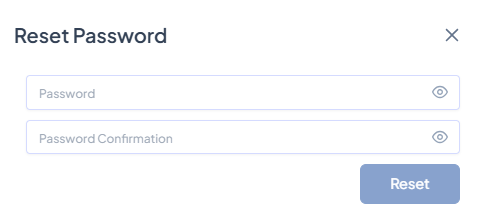
Reset Password
-
Navigate to ORGANISATION > Users and click Reset Password.
-
Enter the new password and re-enter it to confirm.
-
Click Reset. This resets an added user’s login password if they have lost access or forgotten their login credentials.
Agent Configuration
Configure the MSI file so the DISCOVER Agent is prepared for download. After the Agent MSI is downloaded and installed on a device, the target device will be converted into an Agent, allowing it to perform tasks assigned from the Management Console.
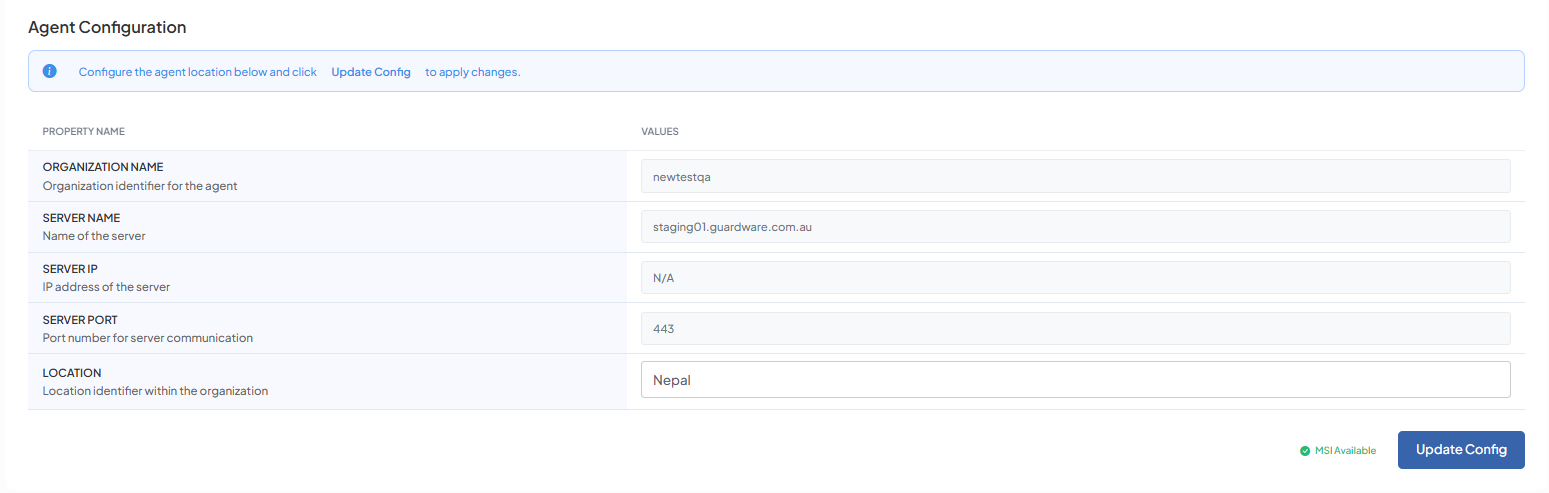
-
Navigate to ORGANISATION> Agent Configuration.
-
Enter the desired LOCATION in the field and click Update MSI.
The MSI installer will be available for download with the updated configurations in the RESOURCES section.
Integrations
You need to be a Global Administrator in your Azure AD tenant to integrate Microsoft 365 services with GuardWare DISCOVER.
Set up Microsoft 365 integration to enable monitoring of Exchange Online, SharePoint, OneDrive, and other Microsoft 365 services. To set up, your organisation must have an active Microsoft 365 subscription.
-
Navigate to ORGANISATION> Integrations.
-
Click Connect Microsoft 365.
-
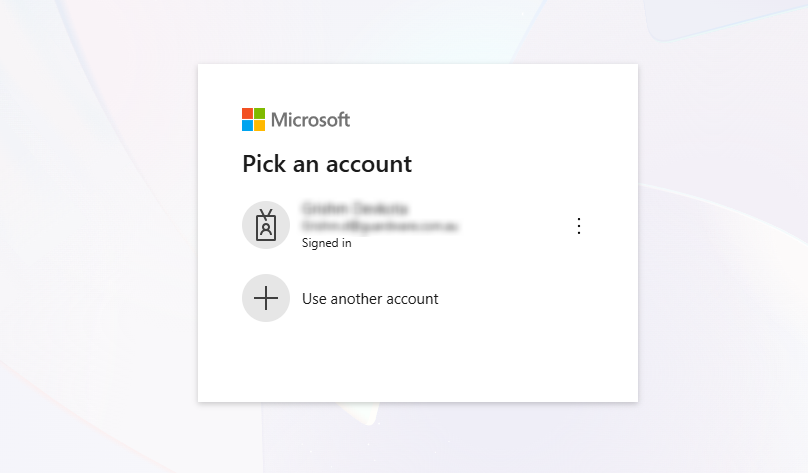
Select an account from the list or click Use another account.
-
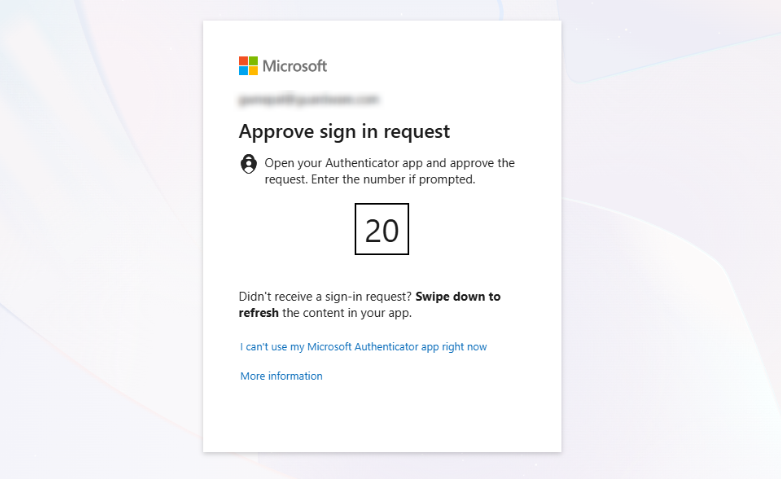
If you choose Use another account, you’ll need to re-enter your account credentials to proceed.
-
Approve the sign-in request if you have registered the account in an authenticator app.
-
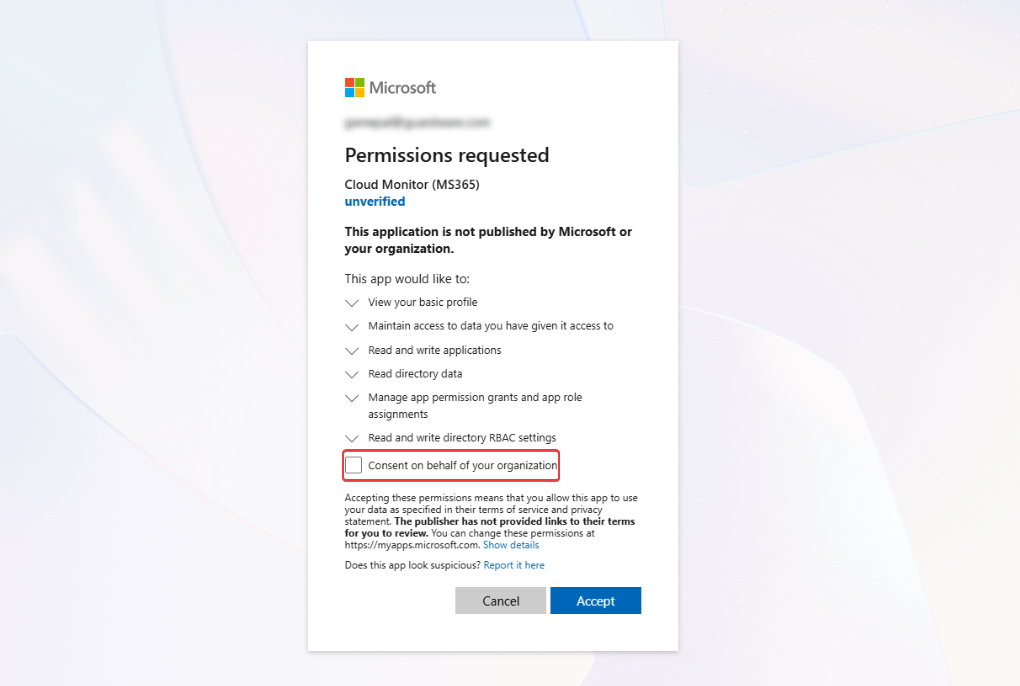
Click Consent on behalf of your organization and click Accept.
-
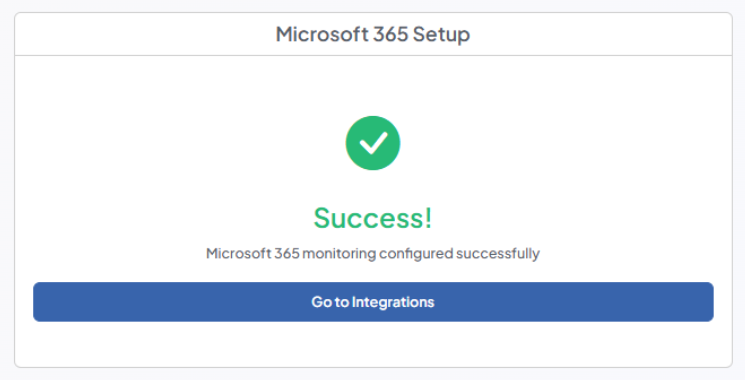
You will receive a confirmation message on the Management Console saying that Microsoft 365 services have been integrated with GuardWare DISCOVER.
DATA GOVERNANCE
The DATA GOVERNANCE section allows administrators to manage how DISCOVER handles sensitive information. Administrators can create and assign data classifications, define data owners for specific data types, and add custom data types or data subtypes to detect organisation-specific sensitive content.
Data Classification
The Data Classification feature allows users to group multiple data types and assign a color label for easy visual identification. DISCOVER automatically assigns a sensitivity level to each classification in the order they are created: the first is level 0, the next is level 1, and so on.
If a document detects multiple data types in a file, DISCOVER automatically assigns the highest sensitivity level among the data types present to the file.
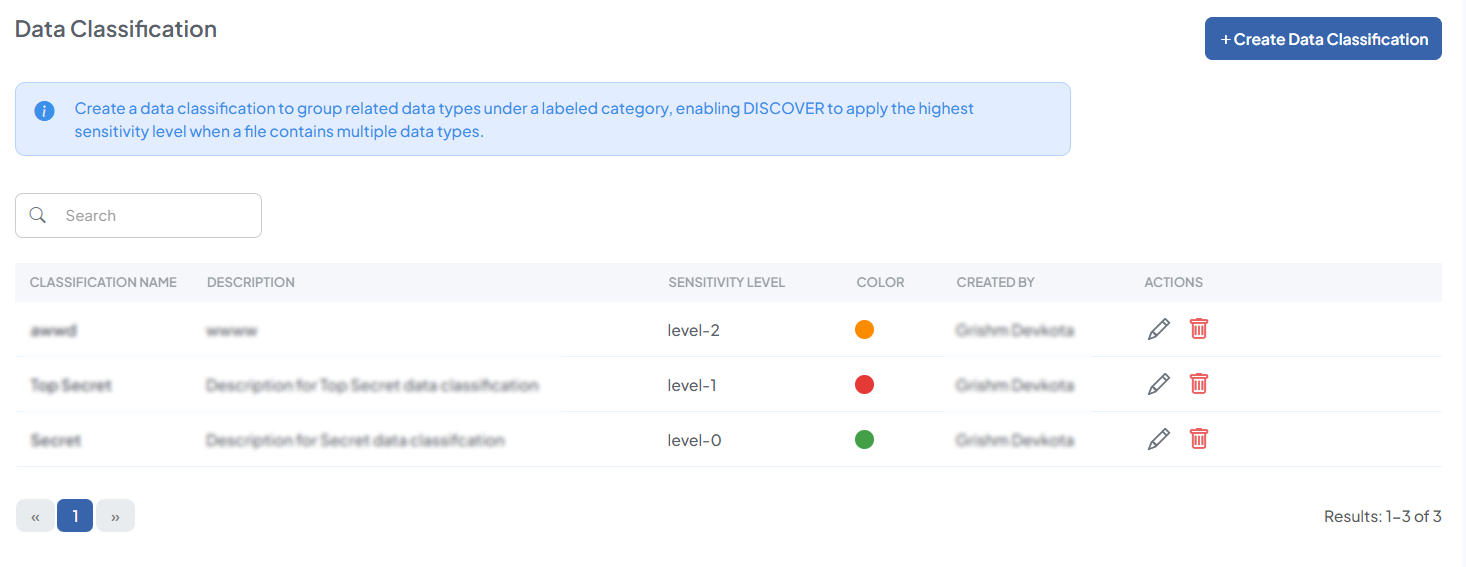
Create Data Classification
When logging in for the first time, no data classifications exist. Administrators can create up to 16 classifications, with sensitivity levels ranging from 0 to 15.
-
Navigate to ORGANISATION > Data Classification > +Create Data Classification.
-
Enter an appropriate and unique Classification Name.
-
Give a Description (optional).
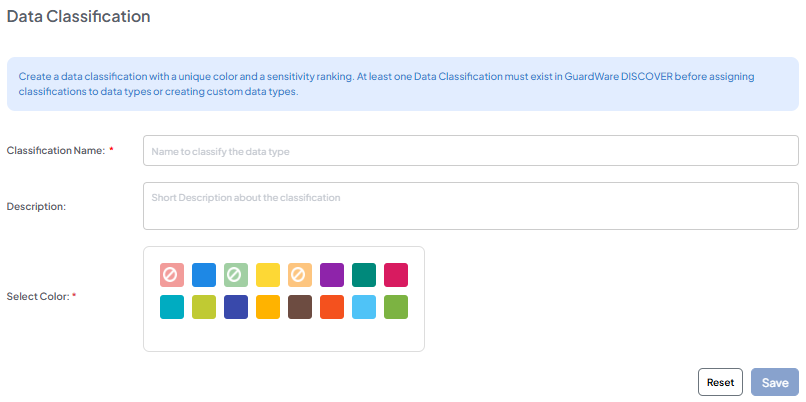
-
Select a Color for each data classification for visual identification.
-
Click Save.
Additional Functionalities
After creating a data classification, you can perform additional functions from the Data Classification page:
Edit Data Classification
-
Navigate to ORGANISATION > Data Classification.
-
Click the Edit (🖉) icon. Edit the data, give a description (optional), and select a unique color.
-
Click Update.
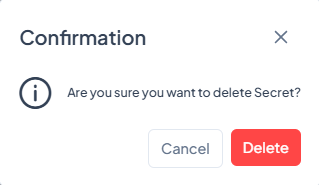
Delete Data Classification
If a data classification is deleted, the classification directly above it moves down to take its sensitivity level. For example, if the classification “Secret” at level 6 is deleted, the “Top Secret” classification, previously at level 7, will now be assigned level 6.
-
Navigate to ORGANISATION > Data Classification.
-
Click the Trash (🗑) icon.
-
Click Delete.
Data Owner
A Data Owner is an individual assigned to one or more data types. Whenever sensitive data associated with the data owner is detected, they receive an alert in their registered email, ensuring timely awareness and accountability.
Assigning a data owner guarantees that notifications are directed to the correct personnel. The Data Owner does not need to be the same person as the device or file owner.
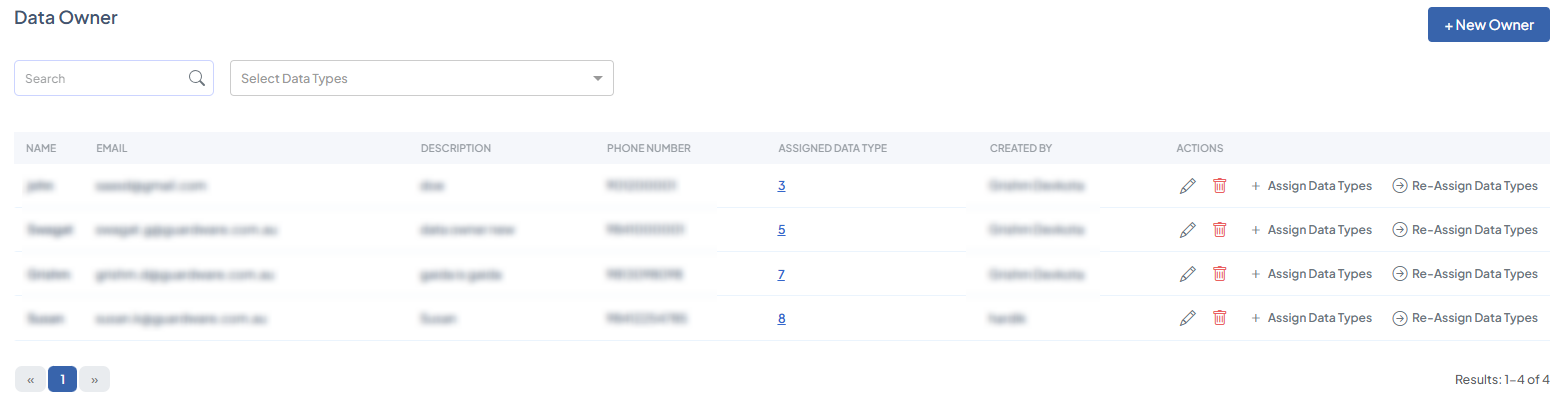
Add Data Owner
When logging in for the first time, you will need to create data owners and assign them specific data types so that they receive alerts whenever sensitive information is detected.
-
Navigate to DATA GOVERNANCE > Data Owner and click +Create Data Owner.
-
Enter the new data owner’s Email and Name
-
Enter a short Description (optional) and Contact number (optional).
-
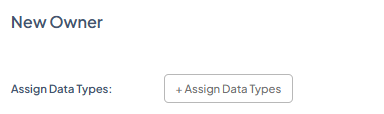
Click the +Assign Data Types button.
-
Select the data types to assign to the data owner. You can also use the search function to locate data types quickly.
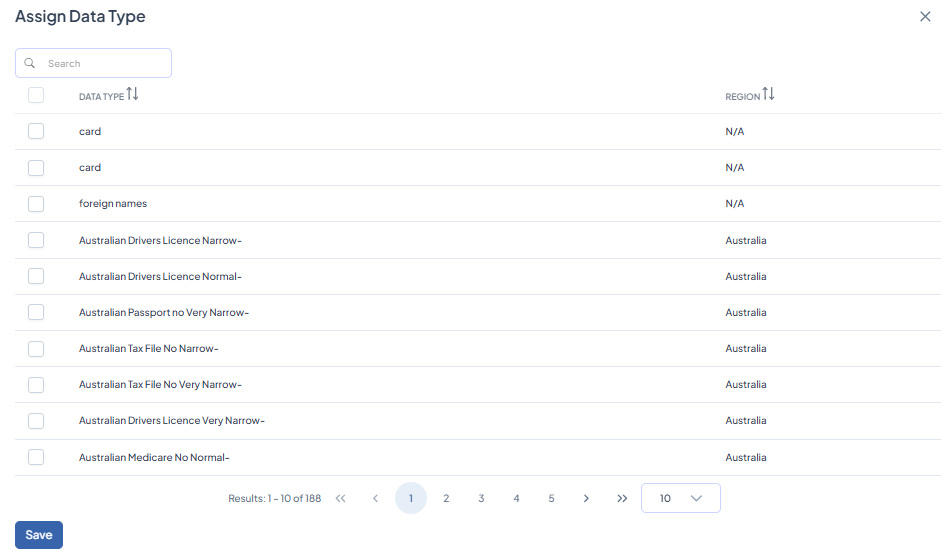
-
Click Save to complete creating and assigning data to a new data owner.
If the datatype you are looking for is not in the list, you will need to create a custom data type and assign it to the related owner.
After adding data owners and assigning data types to them, the following actions are available in the Data Owner table page:
Edit Data Owner
-
Navigate to DATA GOVERNANCE> Data Owner.
-
Click the Edit (🖉) icon.
-
Update the data owner’s credentials.
-
If you wish to reassign datatypes, click +Assign Data Type and click Save.
-
Back on the New Owner page, click Save.
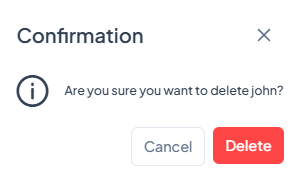
Delete Data Owner
-
Navigate to DATA GOVERNANCE> Data Owner.
-
Click the Trash (🗑) icon. Ensure that all data linked to this user is unlinked or reassigned to a new owner before it is deleted.
-
Click Delete.
Assign Data Types
-
Navigate to DATA GOVERNANCE> Data Owner.
-
Click +Assign Data Types to assign additional data types to the user or unassign existing ones.
-
Select or deselect data types from the list. Use the search box to find specific data types quickly.
-
Click Save.
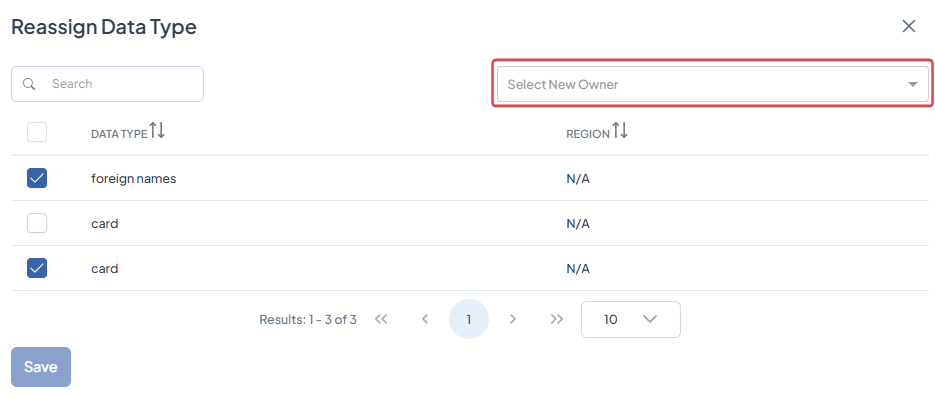
Reassign Data Types
-
Navigate to DATA GOVERNANCE> Data Owner.
-
Click Re-Assign Data Types.
-
Select the data types you want to reassign to a new owner.
-
Choose the new data owner from the Select New Owner drop-down. Use the search box to find specific data types quickly.
-
Click Save.
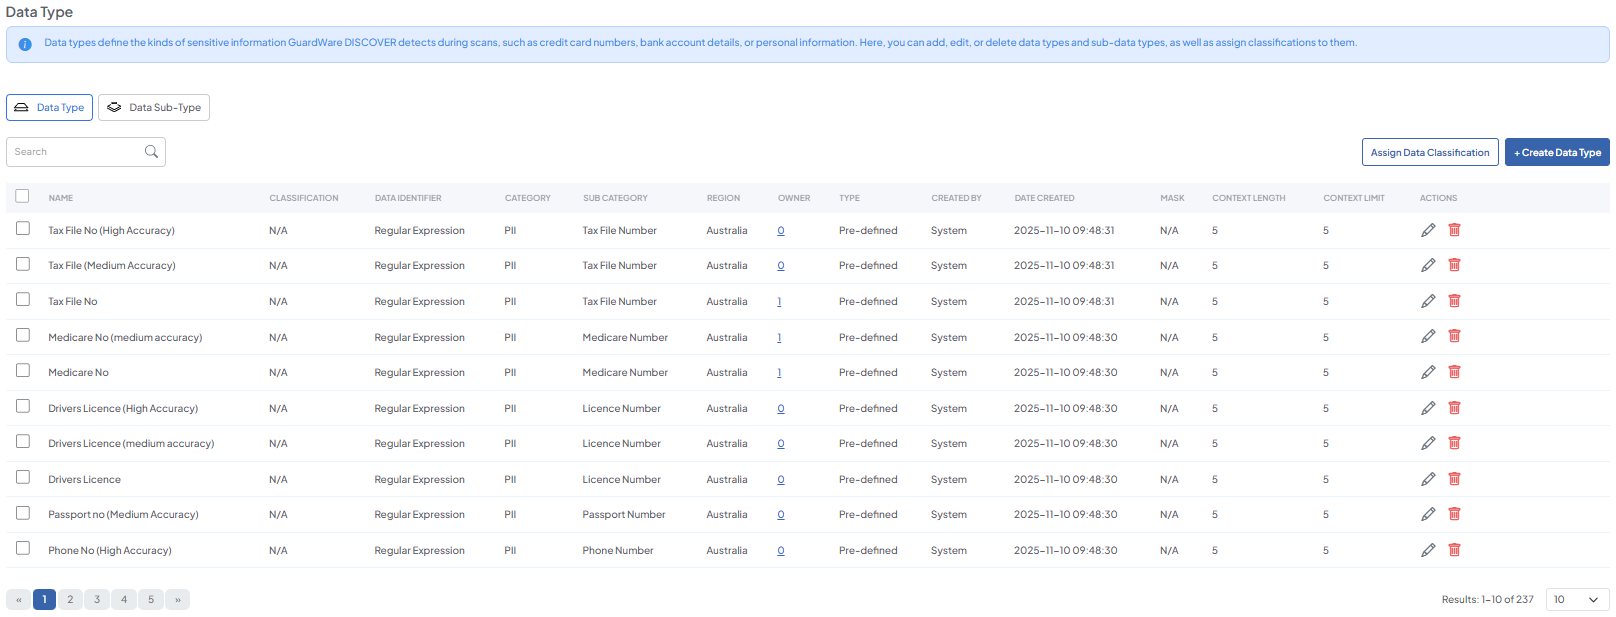
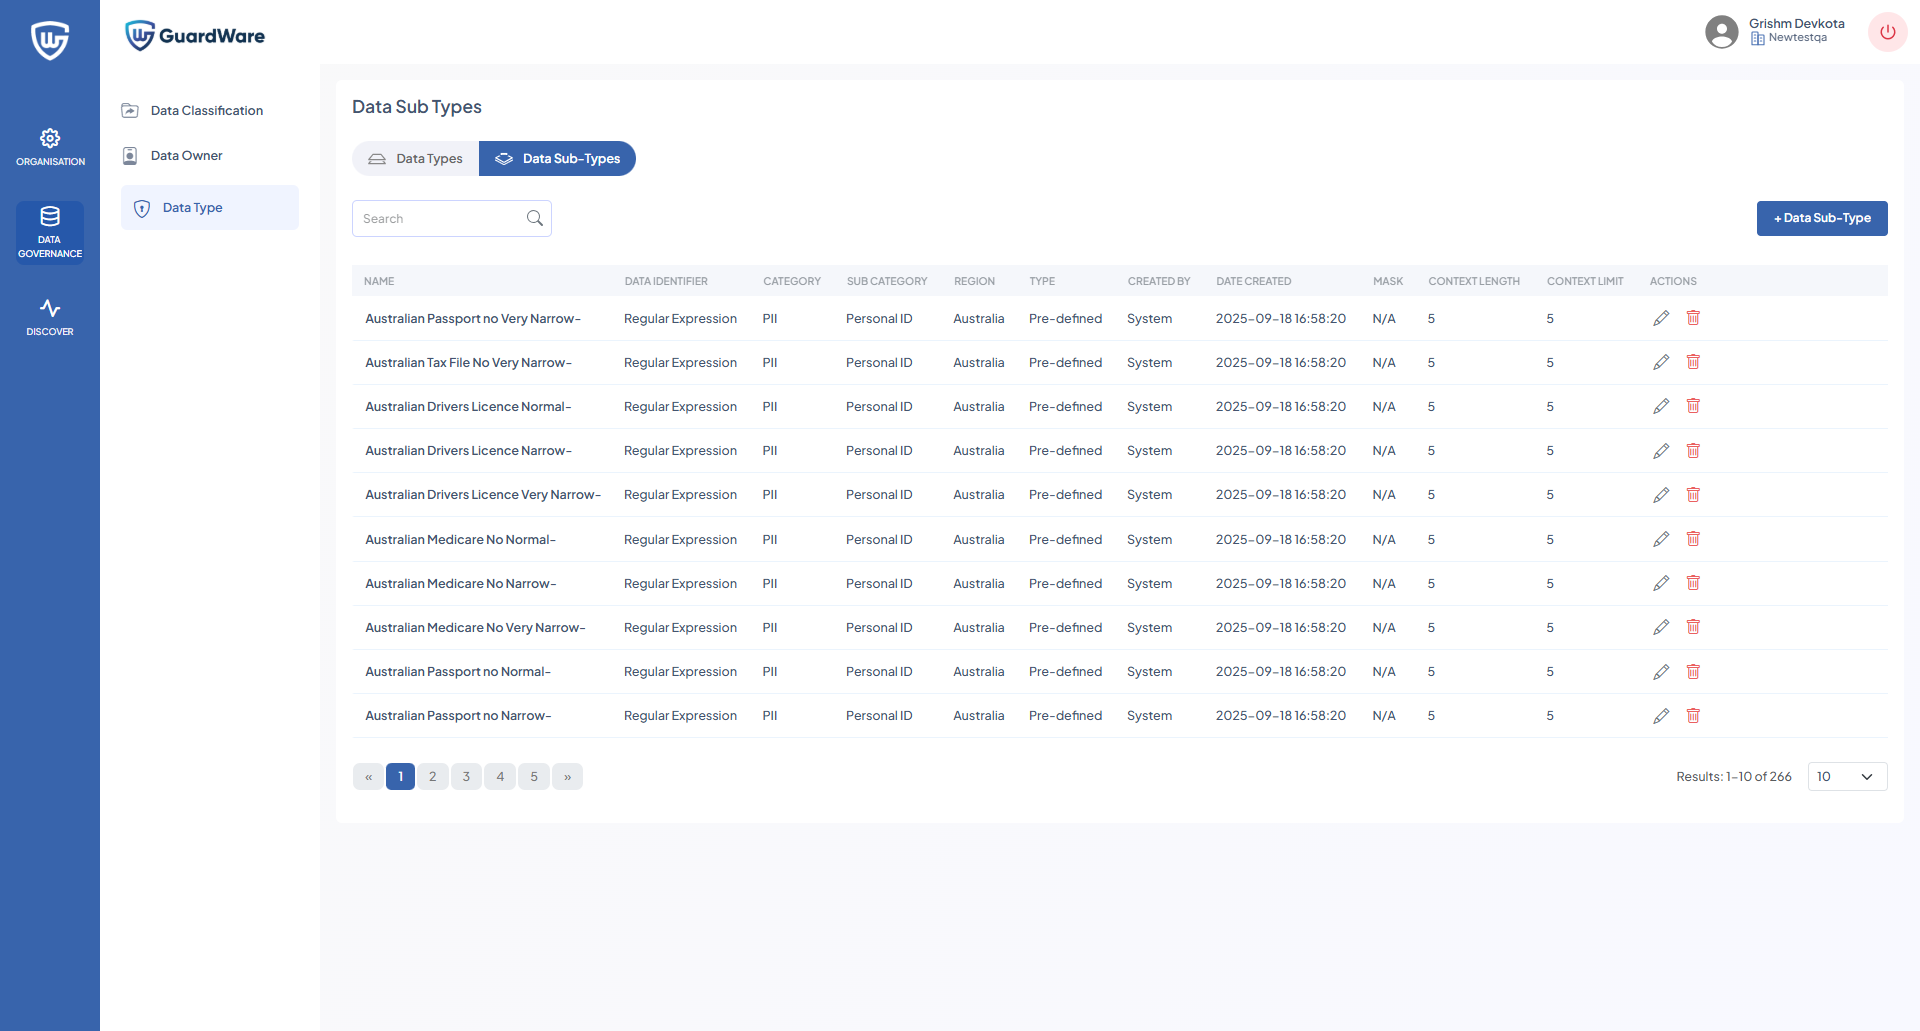
Data Type
Data Types in DISCOVER specify the kinds of information the system looks for during scans. They determine what content is considered sensitive, allowing DISCOVER to flag it correctly. You can use predefined data types from the built-in library, such as PII (e.g., names, national IDs, email addresses), PCI DSS (e.g., credit card numbers, CVV codes, transaction data), or create custom data types for information unique to your organisation (e.g., employee codes or internal project IDs).
Add Data Type
If the data type you want DISCOVER to look for is not in the data type library, you can create custom data types. Custom data types are useful for proprietary information or any other sensitive data that does not fall under standard classifications.
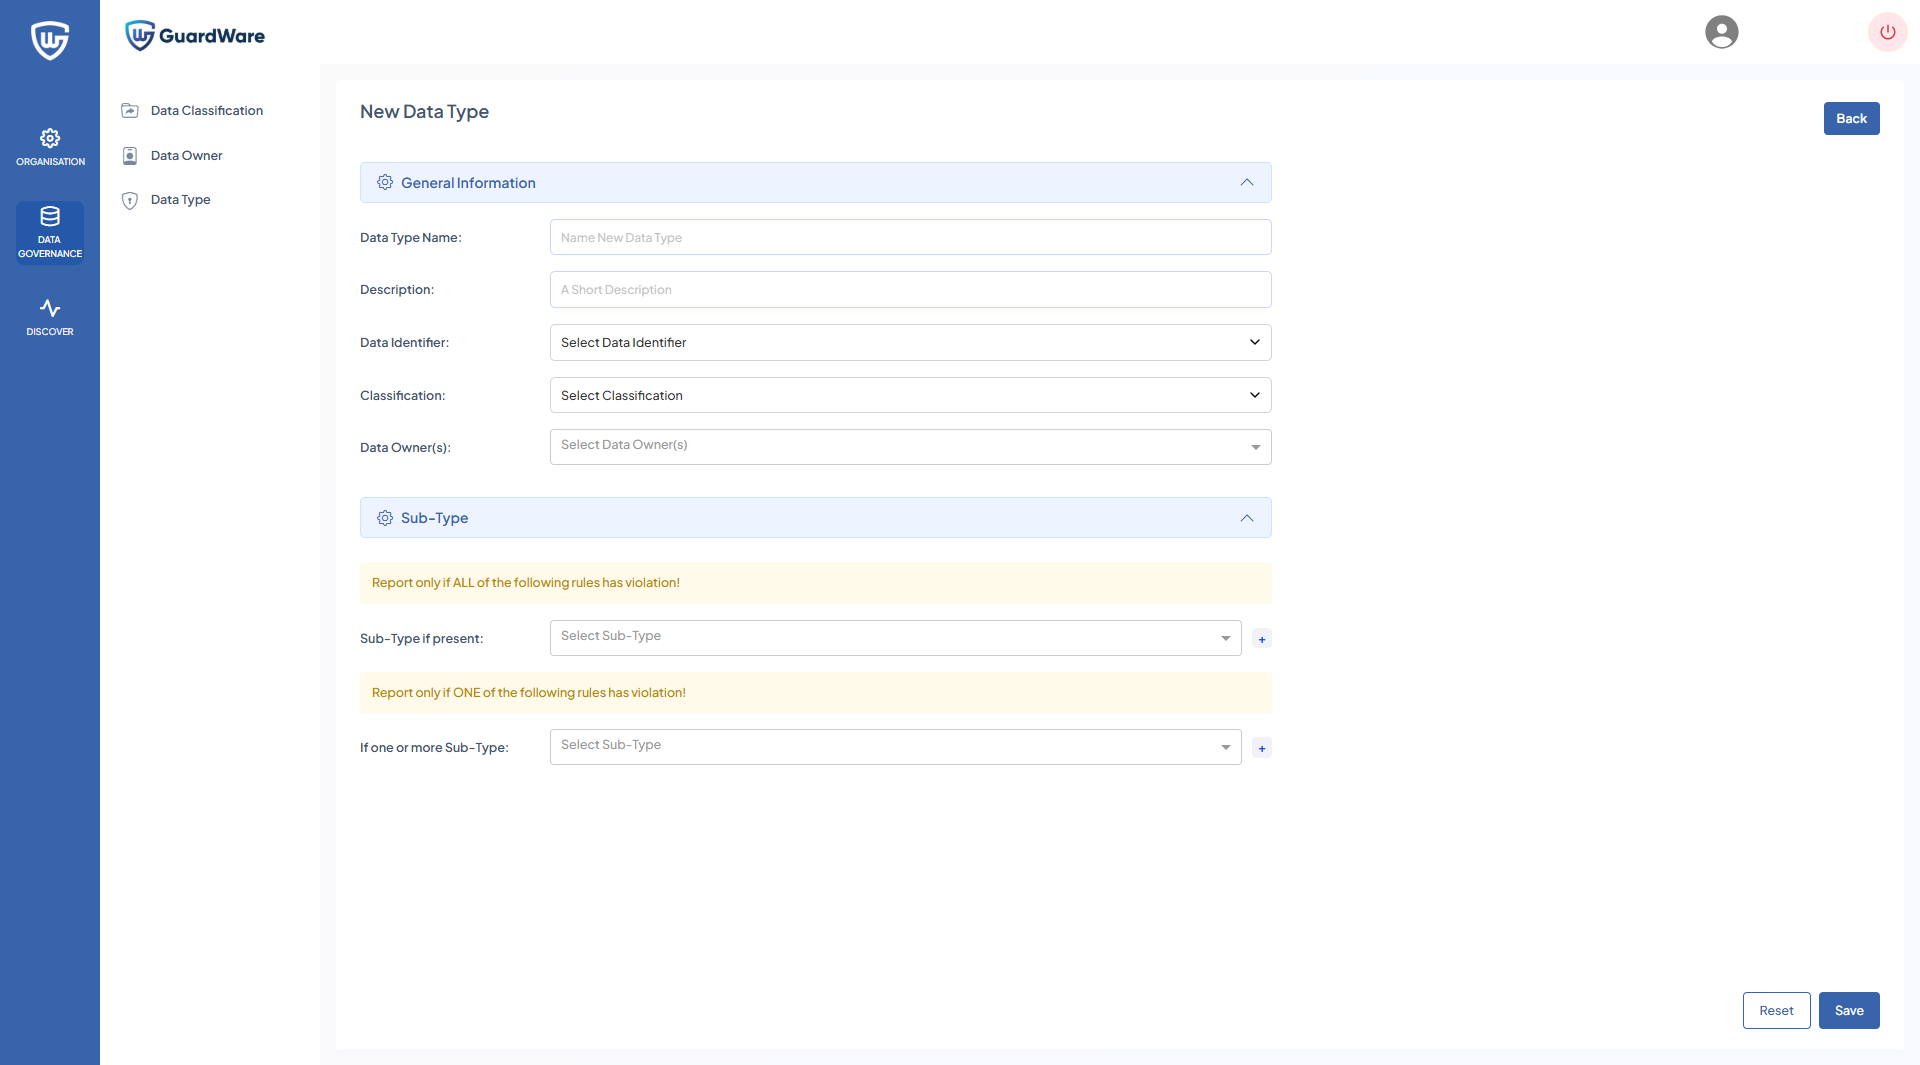
-
Navigate to DATA GOVERNANCE > Data Type and click +Data Type.
-
Enter a Data Type Name and Description (optional).
-
Select a Data Identifier from the drop-down:
-
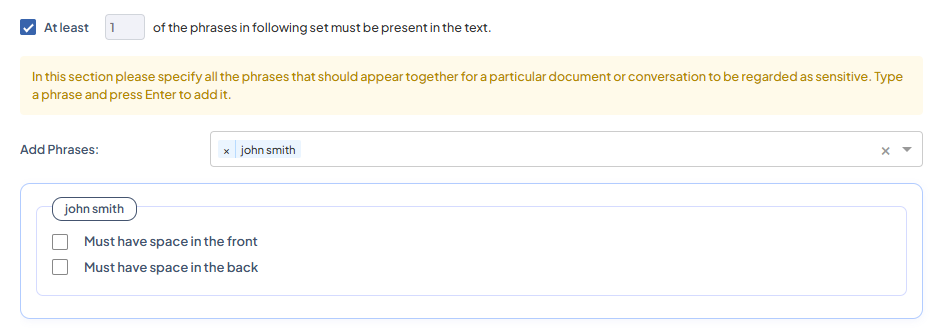
Sensitive Words: Allows you to define phrases used to identify sensitive content during scans.
-
All Phrases Condition: Specify phrases that must all appear together in a document or conversation for it to be classified as sensitive. Type the phrase and press Enter to include it.
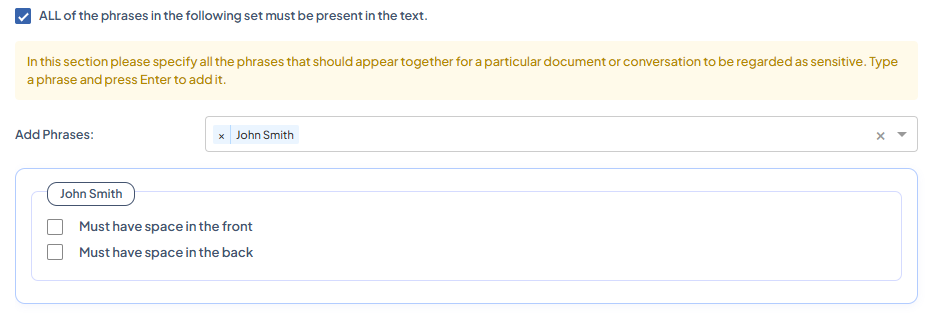
-
At Least (n) Phrases Condition: Define a minimum number of phrases that must be present in the text for it to be flagged as sensitive. Enter each phrase and press Enter to add it. For example, if set to 2, any document containing at least two of the listed phrases will be marked as sensitive.
-
None of the Phrases Condition: Specify phrases that must not appear in the text. If any of these phrases are found, the content will not be considered sensitive.

-
Context Parameters
-
Context Length: Defines how many words before and after the detected sensitive word should be captured.
For example, if context length is set to 3, the results will look like:
His name is John Smith, and he is...If the sensitive word is 'John Smith'.
This helps administrators review the surrounding text to determine whether the information is genuinely sensitive or a false positive.
-
Number of Hits: Specifies how many times a sensitive word must appear in a document before it is shown in the results. Adjusting this value allows administrators to fine-tune the detection sensitivity and reduce unnecessary alerts in the final report.
For example, if the number of hits is set to 5, clicking View Result will only show five or fewer instances where the sensitive data was found.

-
-
-
Regular Expressions: Defines a specific search pattern used to identify sensitive data based on custom text patterns. You can enforce additional conditions, such as requiring a space before and/or after the matched expression to reduce false positives.

-
Test Text: Validate the regular expression by entering a sample string and checking if the pattern correctly identifies the intended data. Click +Validate to test the configuration.

-
Checksum (Luhn): Enables Luhn validation for patterns like credit card numbers. When selected, DISCOVER verifies that the detected numbers follow a valid checksum.

-
Context Parameters
-
Masking: Determines how much of the detected sensitive data is concealed in reports and dashboards. Available masking levels include:
-
None: No masking applied; complete data is visible.
-
1/4 Mask (Quarter Masking): 25% of the data is hidden.
-
1/2 Mask (Half Masking): 50% of the data is hidden.
-
3/4 Mask (Three-Quarter Masking): 75% of the data is hidden.
-
-
-
-
Filename Expressions: Define file name patterns to include or exclude during scans. Wildcards can be used to match multiple files or file types efficiently.
-
Add Expression: Use this option to type or select a filename pattern to include in the rule.
Type a filename expression in the Add Expression field and click (+) to add.
-
-
|
|
Matches all files. |
|---|---|
|
|
Matches all Microsoft Word documents. |
|
|
Matches all Excel files starting with “Tender”. |
|
|
Scans all files within the specified shared folder path. |
-
Choose a Classification from the drop-down.
-
Select Data Owner(s) from the drop-down to assign to the new data type.
Include Sub-Type
For each new data type created, you can assign subtypes to it.
-
Select or type the existing data subtype from the drop-down and press Enter to assign it to the data type. In the Sub-Type, If Present, reports will only be generated if all the selected subtypes are found in the file.

-
Select or type the existing data subtype from the drop-down and press Enter to assign it to the data type. In the If One or More Subtype, reports will be generated even if only one of the selected subtypes is found in the file.
Data Subtypes
Data Subtypes are linked to data types, helping refine and narrow scan results. When configured, they help minimize false positives by ensuring DISCOVER accurately identifies specific categories of sensitive information across target devices.
Incorrectly configuring data subtypes can lead to inaccurate scan results. For example, suppose the MasterCard Card is set as a data subtype under the VISA Card, in that case, the scan will return matches for both MasterCard and VISA data, inflating the results instead of providing precise findings.
As a rule of thumb, ensure each data subtype correctly corresponds to its parent data type; for instance, Visa Card Australia (Very Narrow) or Visa Card Global (Narrow) are valid subtypes under VISA Card.
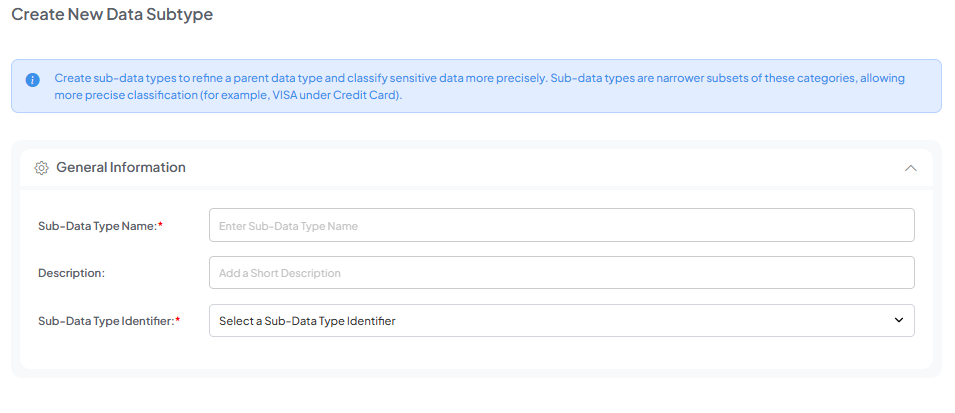
Add Data Subtype
If the data subtype you want DISCOVER to look for is not in the library, you can create custom data subtypes. For example, within the Phone number data type, you could create subtypes for mobile or landline numbers or separate phone numbers based on geographical location.
Custom data subtypes are useful for refining results of proprietary information or any other sensitive data that does not fall under standard classifications.
-
Navigate to DATA GOVERNANCE > Data Type and click the Data Subtype button.
-
Click +Data Subtype.
-
Enter an appropriate Data Subtype Name and give a short Description (optional).
-
Select one Data Subtype Identifier by clicking the drop-down(Sensitive Words, Regular Expressions, or Filename Expressions).
-
Set a Context Parameter (Sensitive Words and Regular Expressions), and click Save.
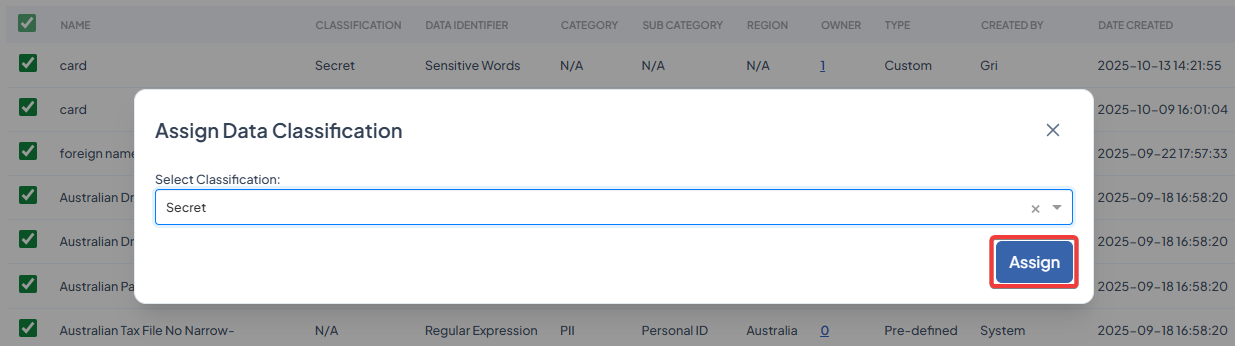
Assign Classification
The Assign Classification feature allows you to link one or more existing data types to a classification.
-
Navigate to DATA GOVERNANCE > Data Type.
-
Select at least one or multiple data types and click Assign Data Classification.
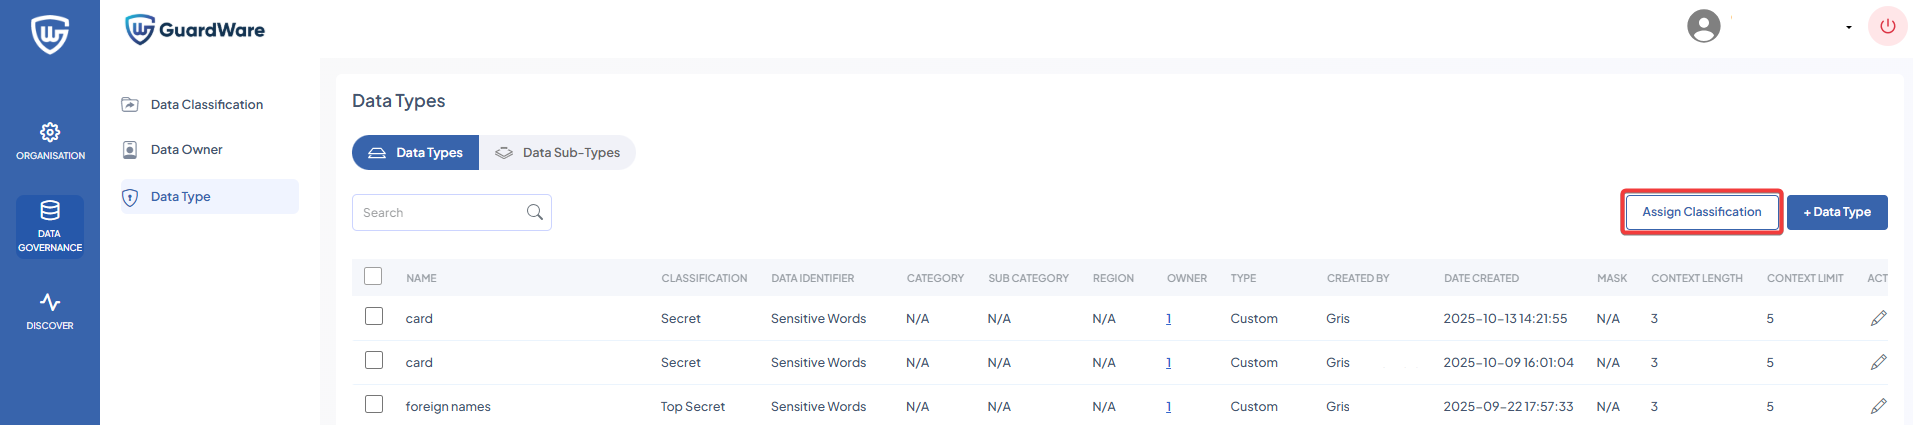
-
Select a classification from the drop-down and click Assign.
DISCOVER
The DISCOVER section allows administrators to manage agents, search for target devices and services, configure scans, run scans, and review scan results. You can define scan schedules, investigate sensitive files, and apply remediation actions such as delete, encrypt, move, or alert the end user/device owner or the data owner via email.
Dashboard
The Dashboard provides a summary of all scanning, investigation, and remediation activity across your environment. It highlights overall system activity, identifies potentially sensitive files, and displays remediation outcomes at a glance.
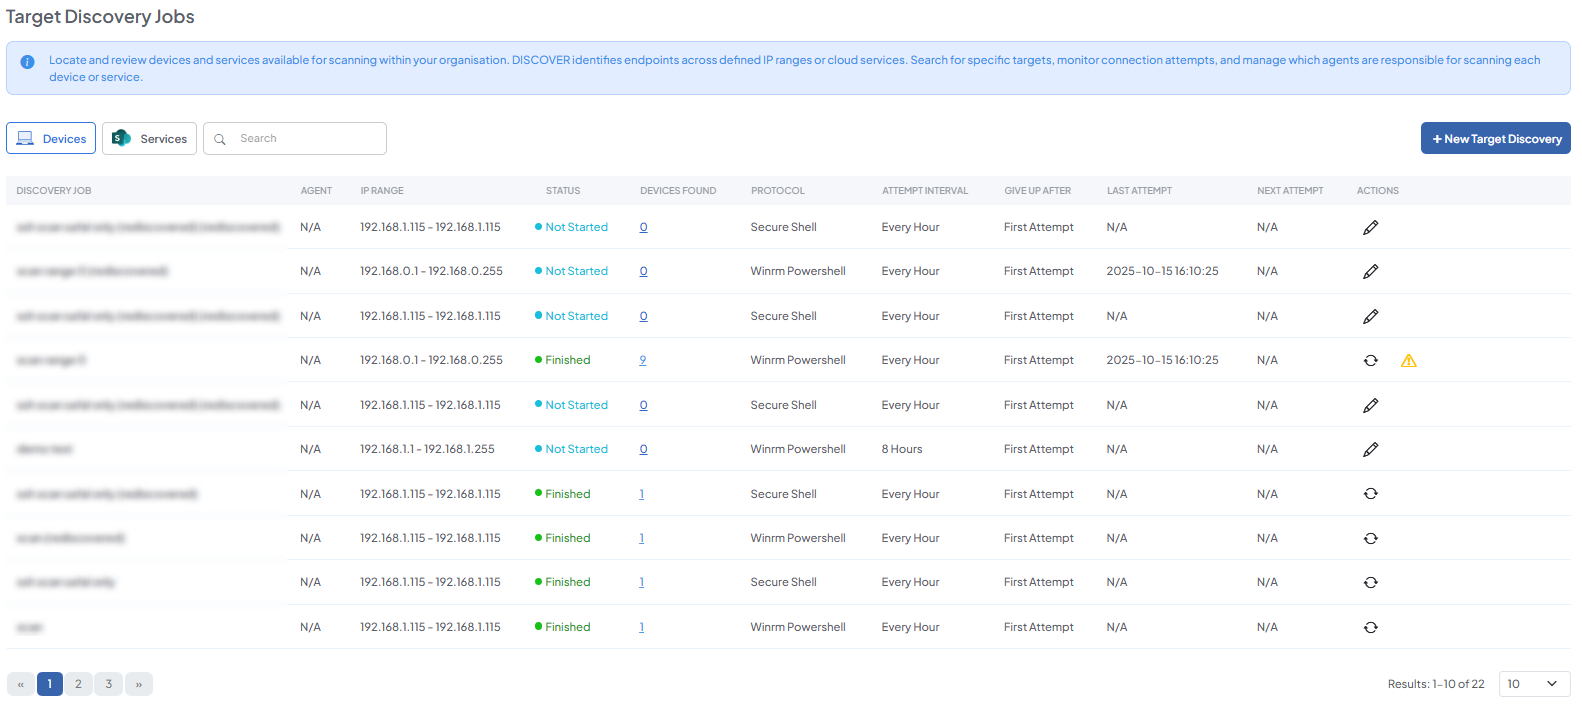
Target Discovery
Target Discovery identifies devices and services available for scanning. DISCOVER finds targets within defined IP ranges and network locations using protocols such as WinRM, SSH, or file server access. You can choose which agent performs the discovery, and the discovered devices can then be included in future scans.
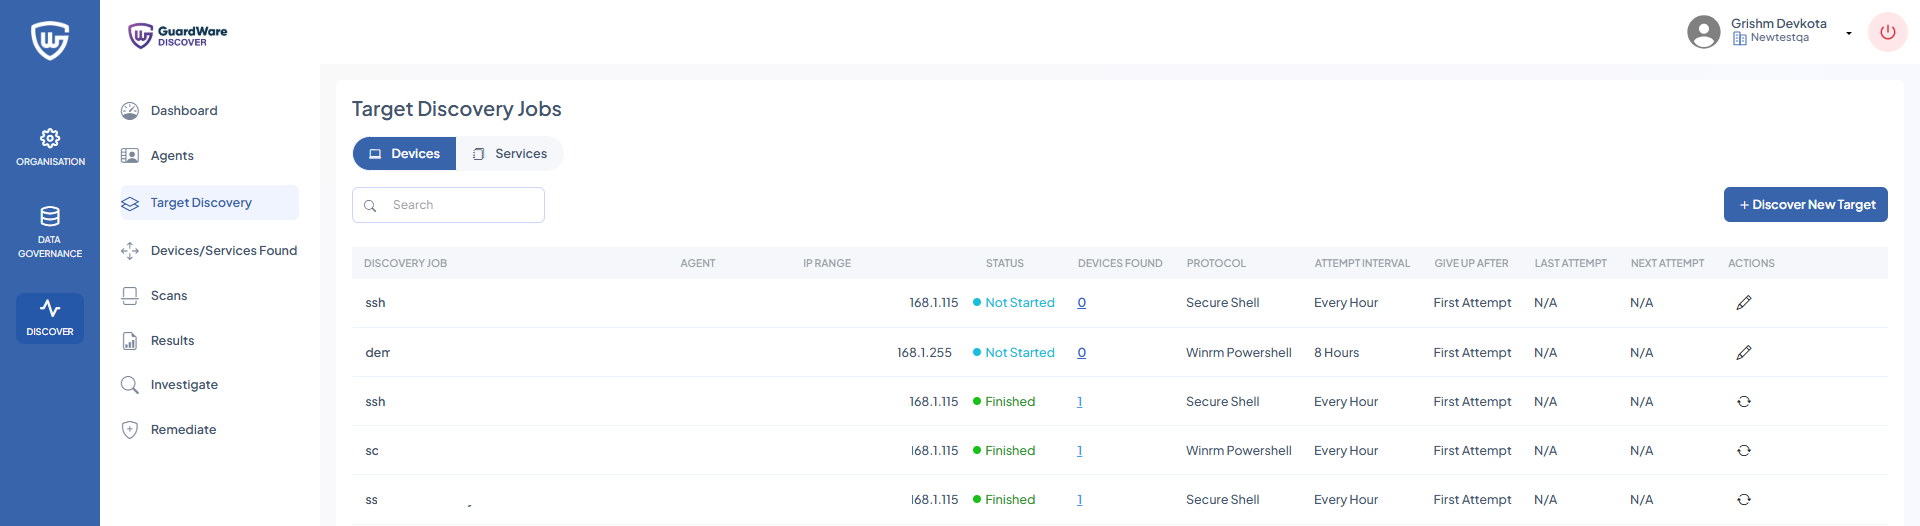
View/Add Devices
Devices are the endpoints that DISCOVER scans, either locally or remotely using SSH or WinRM. These endpoints represent the targets where sensitive data may exist.
-
Navigate to DISCOVER > Target Discovery > Devices and click +Discover New Target.
-
In the Discovery Job Name, enter a name for the scan.
-
In Target IP Range, define the IP segment in which DISCOVER should search for devices.
The DISCOVER Agent and target systems must be within the same IP address segment (subnet) to enable direct communication for scanning. For example, if the target devices are in the IP segment 192.168.1.x, the Agent should also be in the 192.168.1.x range with the same subnet mask, such as 255.255.255.0.
If the agent and targets are on different subnets, network configurations such as routing, firewall rules, and port accessibility must be correctly set up to allow the agent to reach and scan the target systems.
-
Set the Location to filter the list of agents by their assigned location.
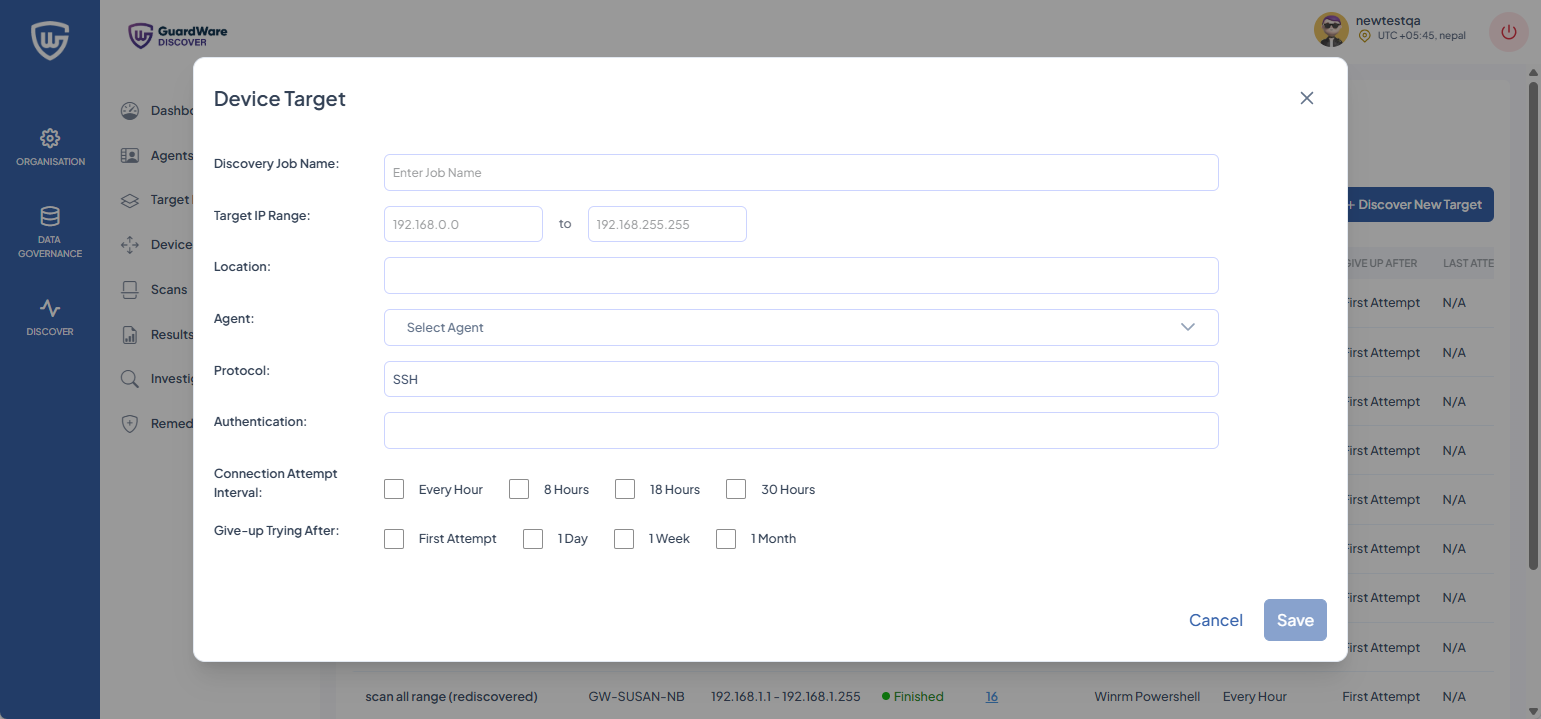
-
Select a Protocol from the drop-down.
-
For WinRM and SSH Protocol, the Username and Password of
-
Local accounts of the target device(s).
-
Azure AD (Entra ID) accounts for Azure AD-joined device(s).
-
Domain accounts (e.g.,
DOMAIN\username) for AD-joined device(s).
-
-
For the File Server, the Username, Password, and SMB Server of
-
An account with access to the target share (use
DOMAIN\usernamefor domain accounts where required). -
The SMB server name and the path to the share or folder (for example,
fileserver01\share\folder).
-
-
In Connection Attempt Interval, select how frequently DISCOVER will try to connect to a target.
-
In Give-up Trying After, select the maximum duration DISCOVER will continue attempting to connect before abandoning.
-
Click Save.
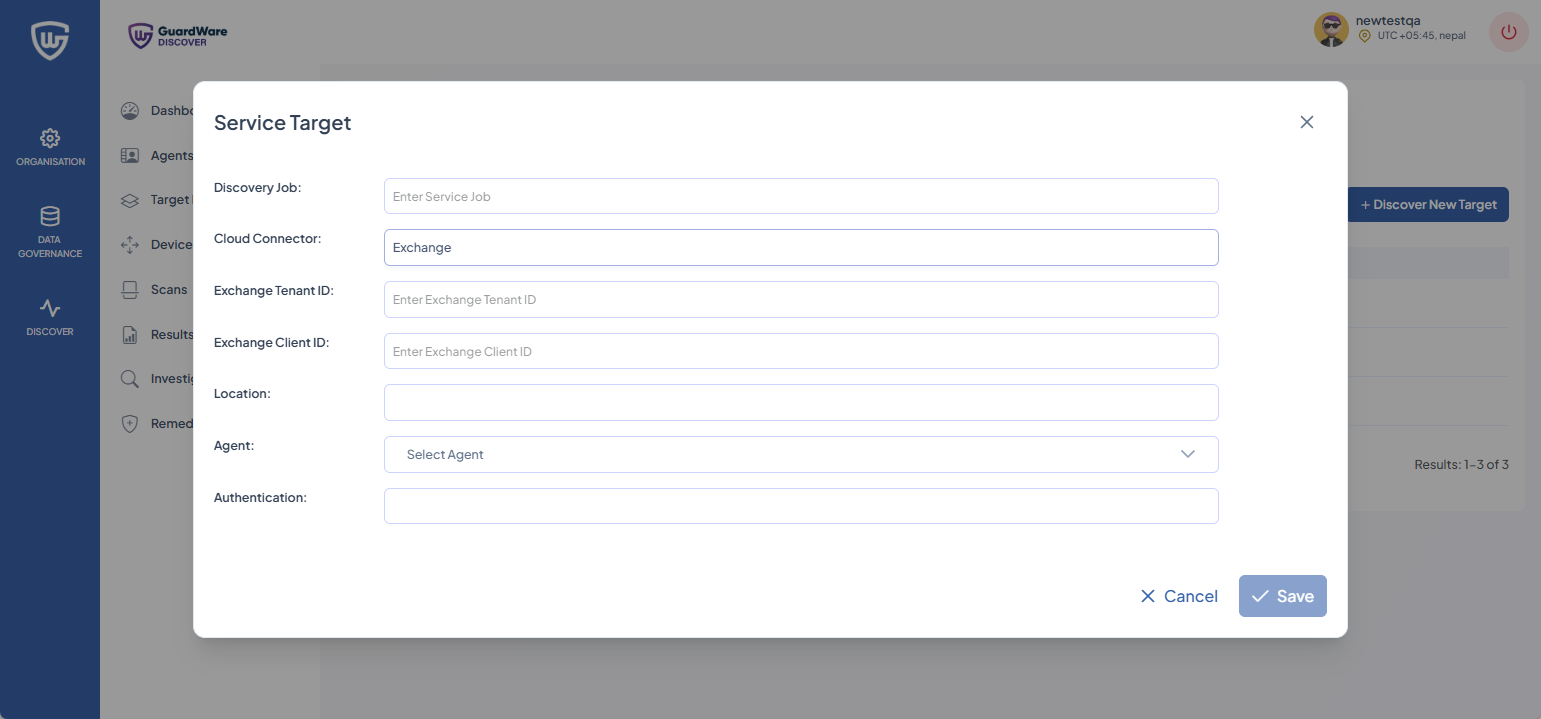
View/Add Services
Services represent cloud-based endpoints that DISCOVER can access and scan for sensitive data. These include Microsoft 365 services such as Exchange Online and SharePoint Online. DISCOVER accesses these services using Microsoft’s Graph API using OAuth 2.0 authentication.
-
Navigate to Target Discovery > Services and click +Discover New Target.
-
In the Discovery Job name, enter a name for the scan
-
In Cloud Connector, select the service type (Microsoft Exchange or SharePoint). Depending on the selected connector, you will need to enter credentials for:
-
Exchange:
-
Exchange Tenant ID: Found in the Azure portal under the Exchange application registration.
-
Exchange Client ID: The Application (Client) ID from the registered Exchange app in Azure AD.
-
-
SharePoint:
-
SharePoint Organisation: Your organisation name used in SharePoint Online.
-
SharePoint Tenant ID: Located in the Azure portal under the SharePoint application registration.
-
SharePoint Client ID: The Application (Client) ID from the registered SharePoint app in Azure AD.
-
-
Set the Location to filter the list of agents by their assigned location.
-
You have two methods by which you can authenticate, depending on the cloud connector chosen:
|
Service |
Authentication Type |
Description |
|---|---|---|
|
Exchange
|
Client Secret |
Use the secret generated for the registered Exchange application in Azure AD. |
|
Client Certificate |
Use a certificate associated with the Exchange application for certificate-based authentication. |
|
|
SharePoint
|
Client Secret |
Use the secret generated for the registered SharePoint application in Azure AD. |
|
Client Certificate |
Use a certificate associated with the SharePoint application for certificate-based authentication. |
-
In Connection Attempt Interval, select how frequently DISCOVER will try to connect to a target.
-
In Give-up Trying After, select the maximum duration DISCOVER will continue attempting to connect before abandoning.
-
Click Save.
Additional Functionalities
After initiating a discovery job, you have access to the following additional features in the Target Discovery page:
Edit Target Discovery
-
Navigate to DISCOVER > Target Discovery.
-
Click the Edit (🖉) icon.
-
Make the necessary changes as explained in the +Discover New Target section.
-
Click Save.
Re-Discover Targets
-
Navigate to DISCOVER > Target Discovery.
-
Click the Re-discover (🔄) icon.
-
The operation will reinitiate.
Devices/Services Found
The Devices/Services Found section displays all endpoints and services identified by DISCOVER Agents. You can search and filter targets based on their connection type, including local devices, remote devices, Exchange Online, or SharePoint Online.
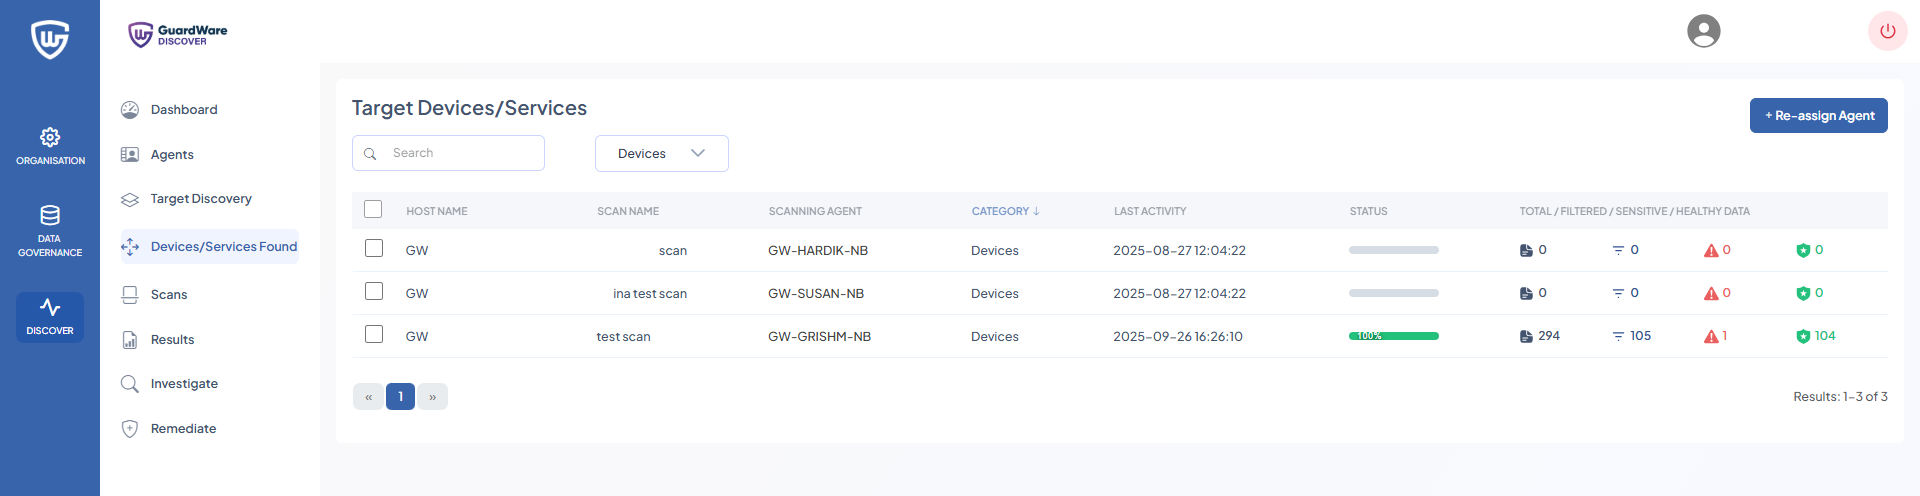
Reassign Agent
The Reassign Agent feature allows administrators to change the agent responsible for managing or scanning a specific target device or service. This ensures flexibility in assigning scanning tasks and enables other agents to take over management or scanning duties without being limited to the agent that initially discovered the target.
-
Navigate to Discover > Devices/Services Found.
-
Select the devices you want to reassign to a different Agent and click +Re-assign Agent.
-
Select the new Agent and click Save.
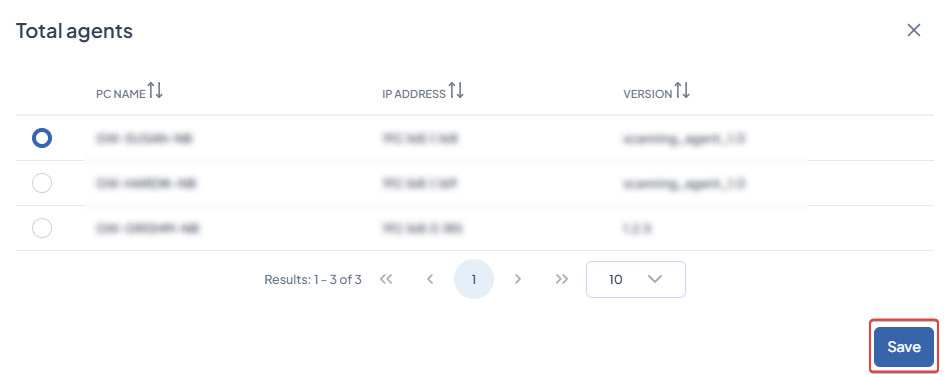
Ensure that the devices being reassigned are not already assigned to the selected agent. Multiple devices from multiple agents can be reassigned at once; any device already assigned to the chosen agent, when reassigning agent, will be skipped.
Scans
The Scans feature examines target devices, servers, or cloud storage to identify sensitive data. Scans can be one-time (non-recurring) or ongoing (recurring) and are categorised based on whether the scan runs directly on the host device (application-based) or remotely across the network (agentless). However, both scan types rely on the DISCOVER Application to execute the scanning logic.
This section explains how to initiate scans in DISCOVER to detect sensitive data across devices, servers, and cloud services.

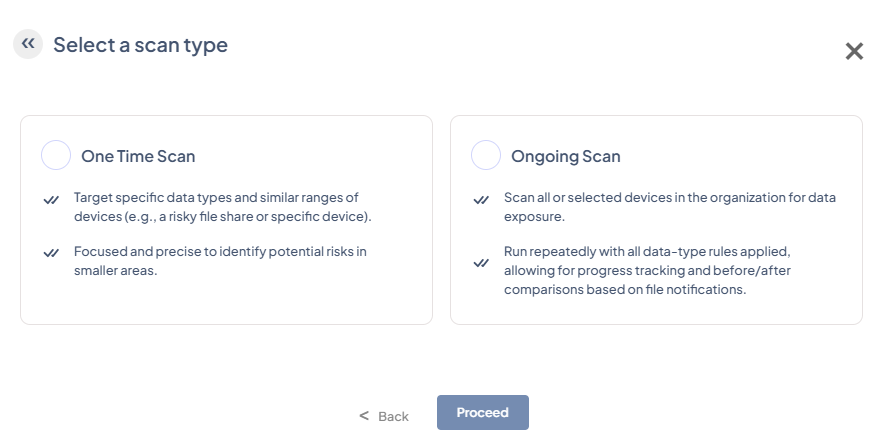
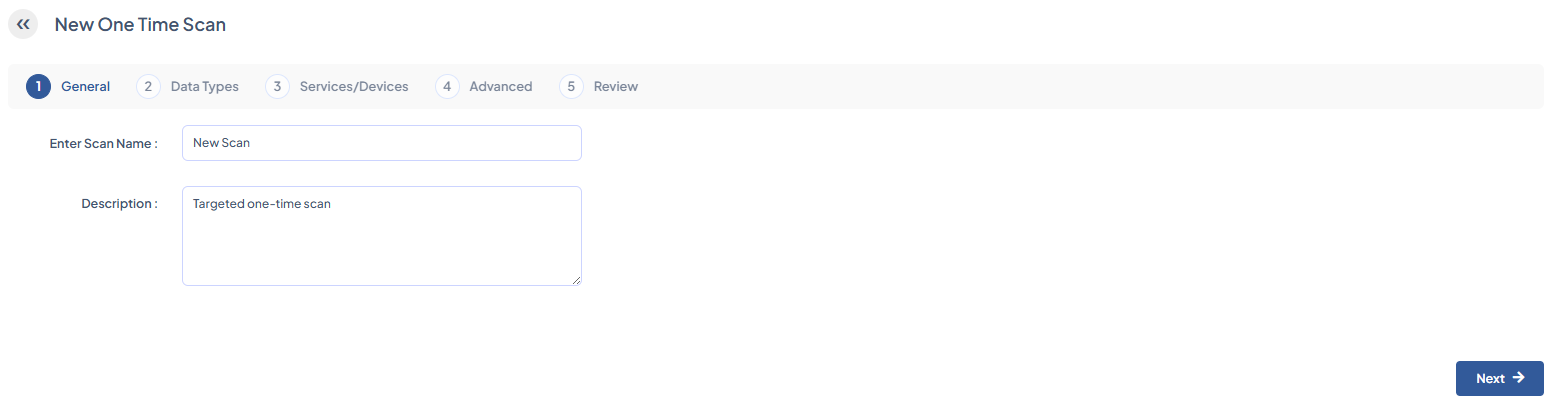
One Time Scan
The One-Time Scan feature enables administrators to run a single, non-recurring scan on specific data types and select devices or locations, such as a particular file share. This enables focused detection of sensitive information in specific areas, providing precise results without scanning the entire environment.
-
Navigate to DISCOVER > Scans and click +New Scan.
-
Select One Time Scan and click Proceed.
-
Enter a Scan Name and an optional Description, then click Next.
-
Select the Data Types to scan and click Next. You can also use the search box to search for specific data types quickly.
-
Select the Targets / Services to scan (Exchange, Devices, and SharePoint), and click Next. You can also use the search box to find specific targets or services quickly.
-
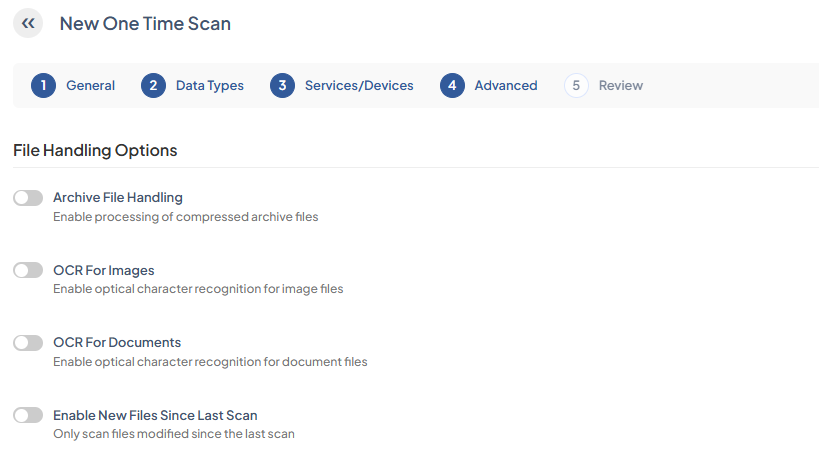
Configure File Handling Options:
|
Archive File Handling |
Enable processing of compressed archive files. |
|---|---|
|
OCR For Images |
Enable optical character recognition for image files. |
|
OCR For Documents |
Enable optical character recognition for documents. |
|
Enable New Files Since Last Scan |
Only scan files modified since the last scan. |
|
Select Exchange Date |
Scan all emails starting from the specified date. |
-
Specify the file types and locations that DISCOVER should include or exclude during scans and click Next. You have the option to:
|
Scan only the selected folders and file types. |
Scan all content except the selected folders and file types. |
|
Include all system directory folder paths. |
Exclude all system directory folder paths. |
|
Include specific system directory folder path. |
Exclude specific system directory folder path. |
|
Include a custom folder path only. |
Exclude a custom folder path. |
|
Include all file types. |
Exclude all file types. |
|
Include a specific file extension only. |
Exclude a specific file extension. |
|
Include a specific file extension not listed under Include all file types. |
Exclude a specific file extension not listed under Exclude all file types. |
If you choose to skip this configuration, the scan job will search all directories and file types for sensitive data.
-
Review the scan configurations and click Save Scan. The scan will initiate automatically.
Ongoing Scan
Ongoing Scan scans all or selected devices across the organisation for sensitive data. Runs on a recurring schedule with all data-type rules, enabling tracking of changes and comparing results over time.
Navigate to DISCOVER > Scans and click +New Scan.
-
Select Ongoing Scan and click Proceed.
-
Select the Data Types to scan and click Next. You can also use the search box to quickly search for specific data types.
-
Select the Targets / Services to scan (Exchange, Devices, and SharePoint), and click Next. You can also use the search box to search for specific targets/services quickly.
-
Configure File Handling Options:
|
Archive File Handling |
Enable processing of compressed archive files. |
|---|---|
|
OCR For Images |
Enable optical character recognition for image files. |
|
OCR For Documents |
Enable optical character recognition for document files. |
|
Auto Scan Newly Discovered Device |
Enable optional auto scanning of newly discovered devices and files. |
|
Enable New Files Since Last Scan |
Only scan files modified since the last scan. |
|
Select Exchange Date |
Scan all emails starting from the specified date |
-
Specify the file types and locations that DISCOVER should include or exclude during scans and click Next.
|
Scan only the selected folders and file types. |
Scan all content except the selected folders and file types. |
|
Include all system directory folder paths. |
Exclude all system directory folder paths. |
|
Include specific system directory folder path. |
Exclude specific system directory folder path. |
|
Include a custom folder path only. |
Exclude a custom folder path. |
|
Include all file types. |
Exclude all file types. |
|
Include a specific file extension only. |
Exclude a specific file extension. |
|
Include a specific file extension not listed under Include all file types. |
Exclude a specific file extension not listed under Exclude all file types. |
-
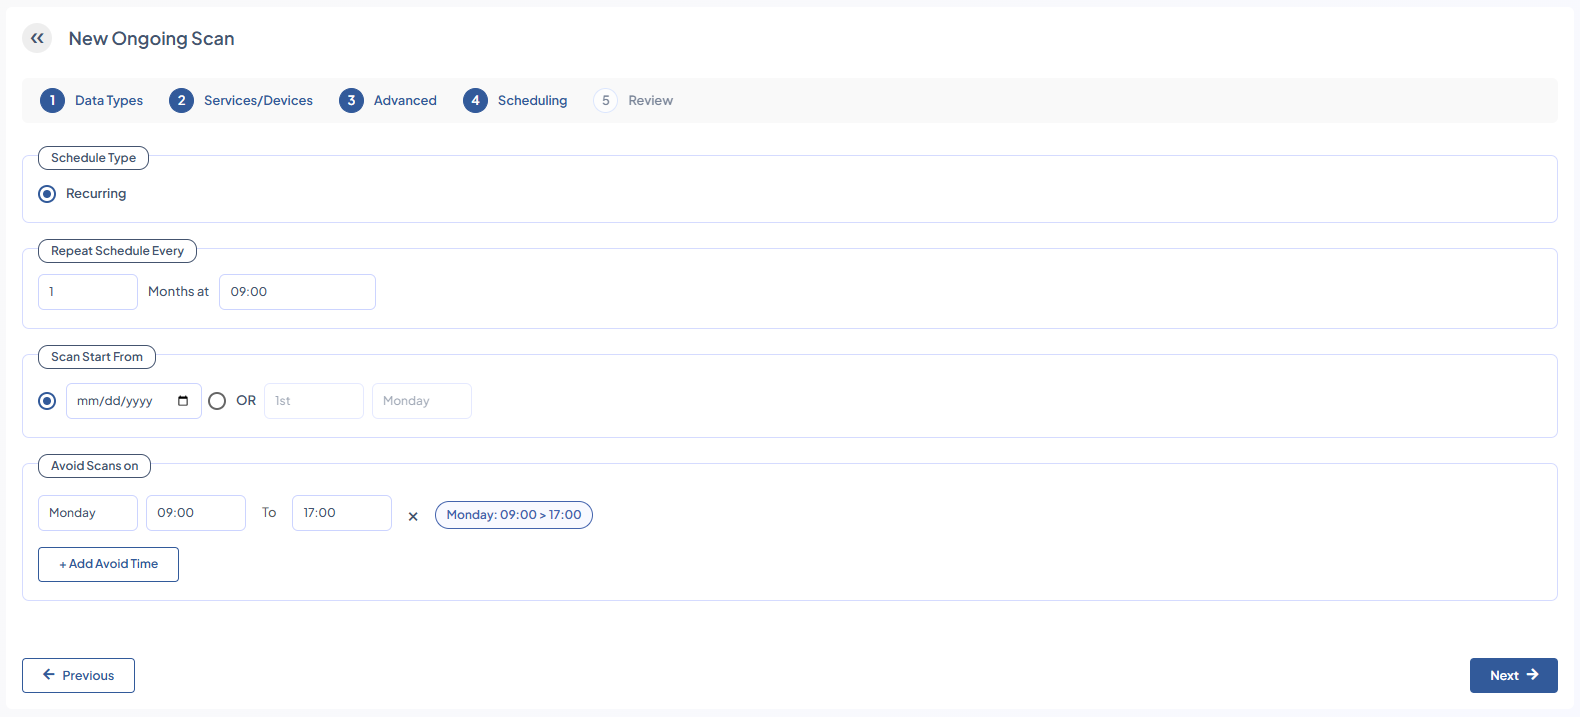
Set a schedule for the scan and click Next. You have the option to:
|
Repeat Schedule Everly |
Schedule a time and frequency (in months) to repeat ongoing scans. |
|---|---|
|
Scan Start From |
Select a specific date or day of the week to start scans. |
|
Avoid Scans on |
Because ongoing scans are resource-intensive, schedule them during off hours and use the +Avoid Time option to skip business hours. Select the day and time range to prevent scans from running during specified times. You can add multiple +Avoid Time to suit your needs. |
-
Review the scan configurations and click Save Scan. The scan will automatically initiate.
Additional Functionalities
After initiating scans, you have access to the following additional features in the Current Scans page:
|
Data Types |
Data types that the selected scan searched for in target devices. |
|
Targets |
Devices included in the current scans.
|
View Result
-
Navigate to DISCOVER> Scans.
-
Check the scan findings by clicking View Result.
View Scan Details
-
Navigate to DISCOVER> Scans.
-
Check the scan configurations by clicking the View (👁) icon.
Delete Scan
-
Navigate to DISCOVER> Scans.
-
Delete the selected scan by clicking the Trash (🗑) icon.
-
Click OK to confirm. You can only delete an Ongoing or a Not Started scan.
Pause Scan
-
Navigate to DISCOVER> Scans.
-
Pause an ongoing scan by clicking the Pause (⏸) icon. You can only pause an Ongoing scan.
Resume Scan
-
Navigate to DISCOVER> Scans.
-
Resume a paused scan by clicking the Play (▷) icon. You can only resume an Ongoing scan.
Terminate Scan
-
Navigate to DISCOVER> Scans.
-
Terminate an ongoing scan by clicking the Stop (ⓧ) icon.
-
Click Terminate to confirm. You can only terminate an ongoing scan.
Results
The Results page provides a comprehensive view of sensitive data detected across scanned endpoints, SharePoint sites, and email mailboxes, along with actionable options. From this page, administrators can initiate investigations for further analysis, perform remediation actions (move, copy, delete, or notify), and download detailed reports in Excel format.
Devices
For devices, you can view the scanned file details, including filename, file path, size, creation and modification dates, owner information, and operating system details. Detected data types and the number of hits are shown in a clickable format, allowing you to review sensitive content quickly. The classification of each file is displayed, and any remediation actions, such as move, copy, delete, or notifications, are tracked.
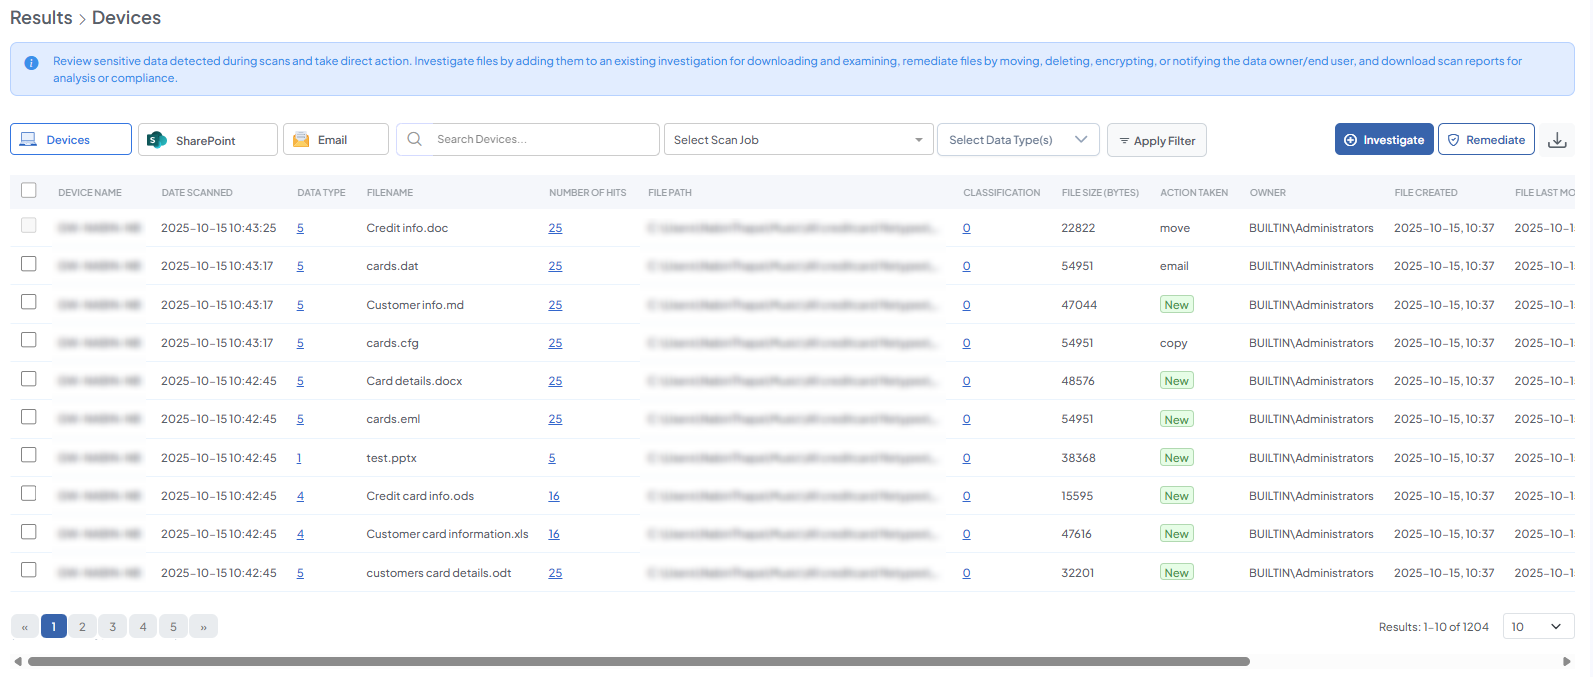
To view,
-
Navigate to DISCOVER> Results.
-
Click on Devices.
|
Field Group |
Field |
Description / Details |
|---|---|---|
|
Device / Endpoint |
Device Name |
Name of the device where the scanned file resides. |
|
Scan Details |
Date Scanned |
Date when the scan was executed. |
|
File Details |
Filename |
Name of the file containing sensitive data. |
|
|
File Path |
Full path of the file on the device. |
|
|
File Size (BYTES) |
Size of the file in bytes. |
|
|
File Created |
Timestamp when the file was created. |
|
|
File Last Modified |
Timestamp of the file’s last modification. |
|
Detection Results |
Data Type |
Clickable list of sensitive data types detected in the file. |
|
|
Number of Hits |
Clickable count showing how many instances of each data type were found in the file. If the number of hits is below the configured upper limit, all results are displayed. If it exceeds the limit, only results up to the upper limit are shown. |
|
Classification & Security |
Classification |
Clickable field showing which classification the file belongs to. |
|
Action / Remediation |
Action Taken |
Status of any remediation actions applied to the file (move, copy, delete, notify file/device owner). |
|
Ownership & System Info |
Owner |
Name of the file owner. |
|
|
IP Address |
IP address of the device where the file resides. |
|
|
OS Version |
Operating system version of the device. |
SharePoint
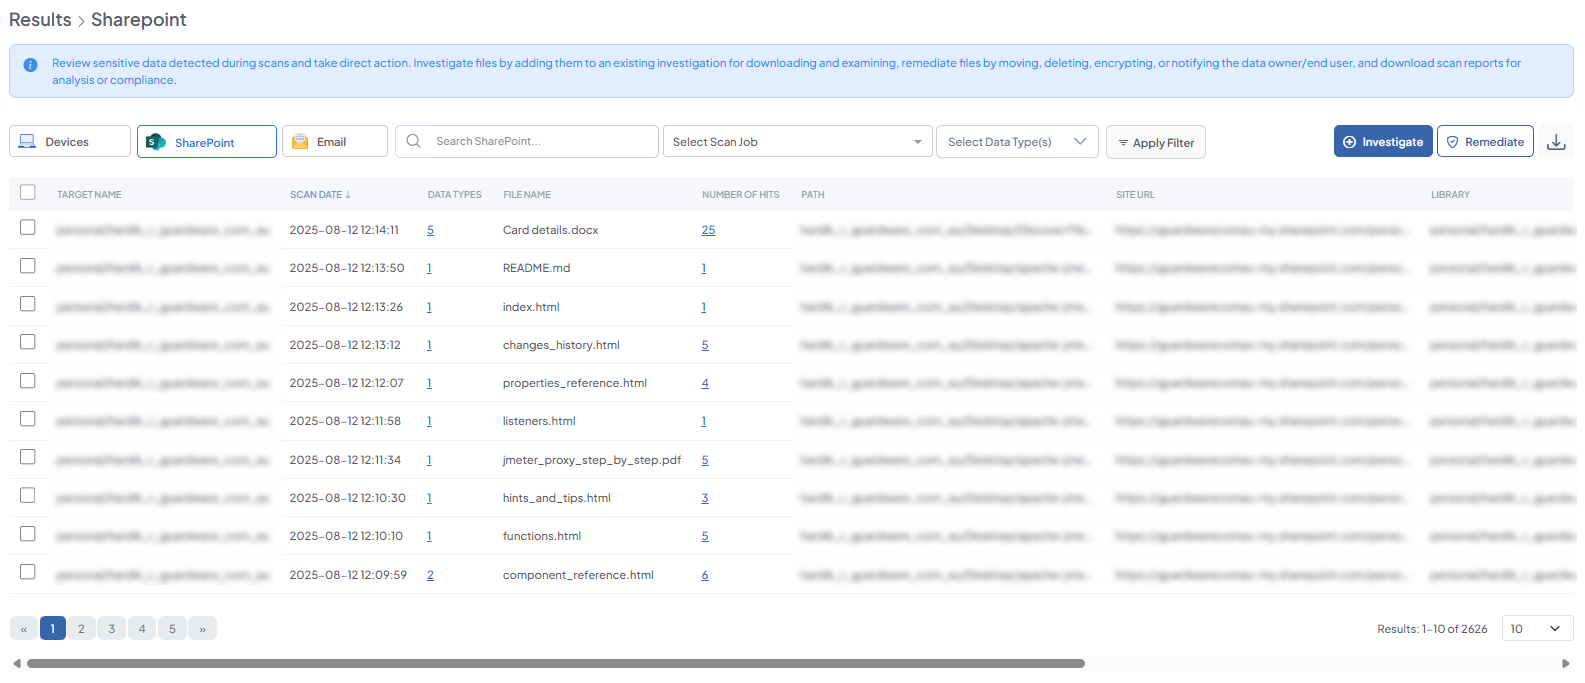
For SharePoint, the Results page shows details of scanned documents, including the document name, library, path, site URL, owner, and size. Detected sensitive data types and the number of hits are clickable, providing additional details. Additionally, the status of any remediation actions performed is recorded.
To view,
-
Navigate to DISCOVER> Results.
-
Click on SharePoint.
|
Field Group |
Field |
Description / Details |
|---|---|---|
|
Target / Site |
Target Name |
Name of the SharePoint site or specific device/user where the scan was executed. |
|
Scan Details |
Scan Date |
Date when the SharePoint scan was executed. |
|
File / Document Details |
File Name |
Name of the document where sensitive data was found. |
|
Path |
Path of the document within SharePoint. |
|
|
Site URL |
URL of the SharePoint site. |
|
|
Library |
SharePoint library where the document resides. |
|
|
Owner |
Name of the document owner. |
|
|
Size (in bytes) |
Size of the document in bytes. |
|
|
Detection Results |
Data Types |
Clickable list of sensitive data types detected in the document. |
|
Number of Hits |
Clickable count showing how many instances of each data type were found. If below the configured upper limit, all results are shown; if above, only results up to the upper limit are displayed. |
|
|
Classification & Security |
Classification |
Clickable field showing the classification of the document. |
|
Action / Remediation |
Action Taken |
Status of any remediation actions applied to the document (move, copy, delete, notify file/device owner). |
Email
For email results, the page provides metadata for each scanned email, including sender, recipients (To, CC, BCC), subject, sent date, and mailbox folder. Detected sensitive data types, number of hits, and the specific location of the data (body, attachment, or subject) are clickable for detailed review. The classification of the email or its contents is shown, and the status of any remediation actions is tracked.
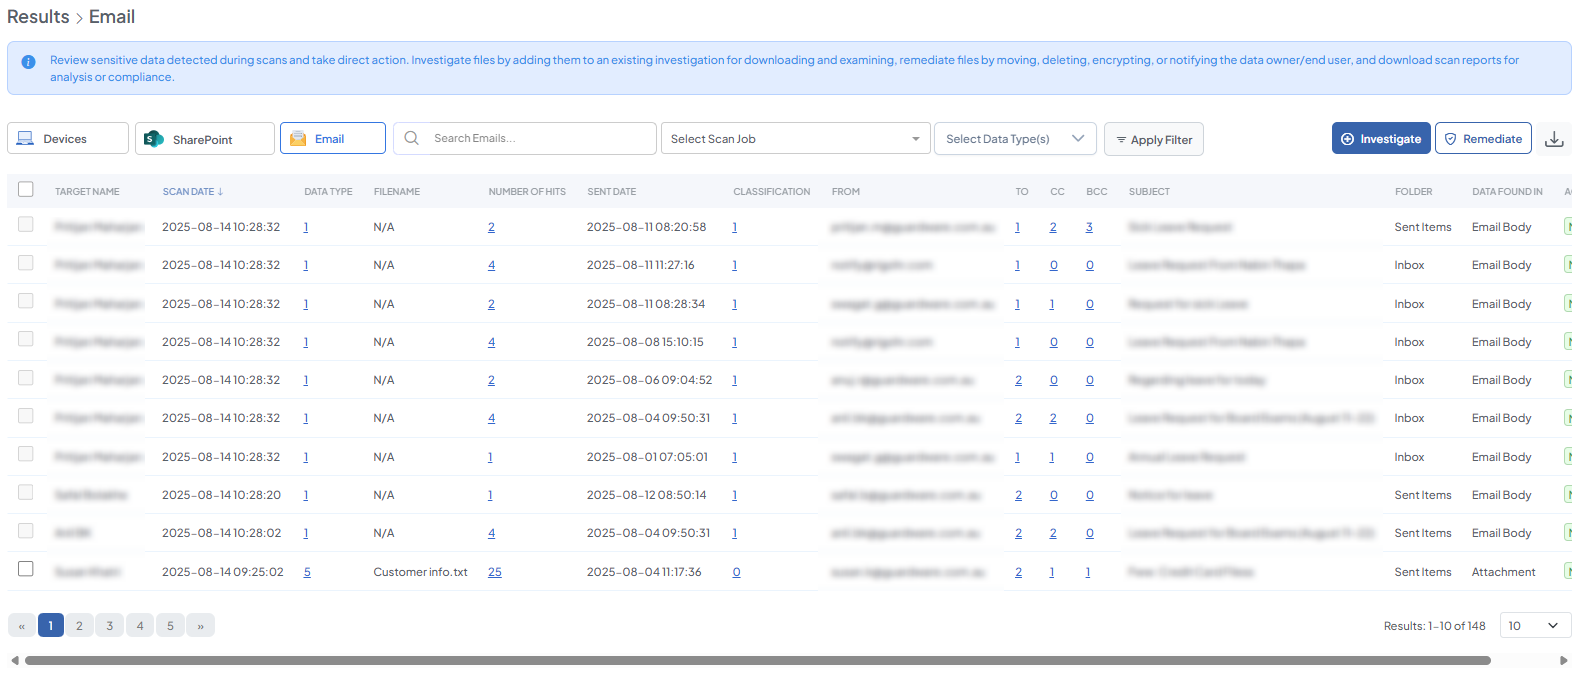
To view,
-
Navigate to DISCOVER> Results.
-
Click on Email.
|
Field Group |
Field |
Description / Details |
|---|---|---|
|
Target / Mailbox |
Target Name |
Name of the device or user mailbox where the email resides. |
|
Scan Details |
Scan Date |
Date when the email scan was executed. |
|
Email Metadata |
From |
Sender of the email. |
|
To |
Primary recipients of the email. Clickable to view details. |
|
|
CC |
CC recipients. Clickable to view details. |
|
|
BCC |
BCC recipients. Clickable to view details. |
|
|
Subject |
Subject of the email. |
|
|
Sent Date |
Date the email was sent. |
|
|
Folder |
Mailbox folder containing the email. |
|
|
Detection Results |
Data Type |
Clickable list of sensitive data types detected in the email. |
|
Number of Hits |
Clickable count showing instances of each data type found. Applies upper limit if configured. |
|
|
Data Found In |
Indicates where the sensitive data was detected (body, attachment, subject, etc.). |
|
|
Classification & Security |
Classification |
Clickable field showing the classification of the email or its contents. |
|
Action / Remediation |
Action Taken |
Status of any remediation actions applied to the email (move, copy, delete, notify file/device owner). |
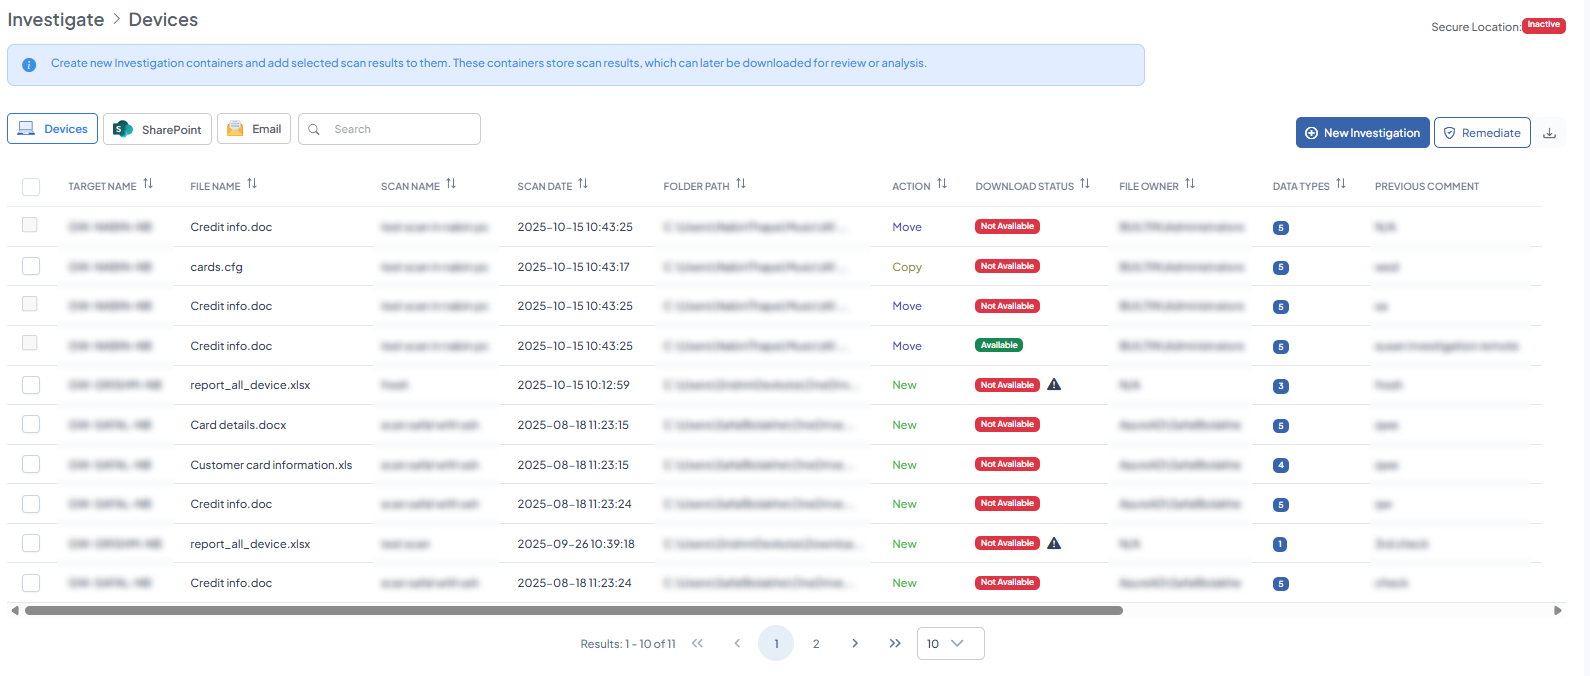
Investigate
The Investigate function allows administrators to retrieve scanned files for further inspection. This is useful for checking whether scan configurations are working as intended or for examining unexpected results after scans, for example, a sensitive file appearing on a device that should not contain it. Select an existing investigation to download the file for analysis.
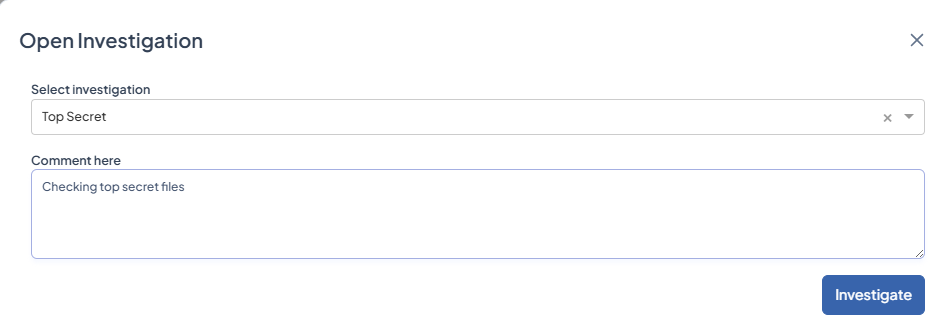
Create investigations beforehand if none exist. (See Investigation)
-
Navigate to DISCOVER > Results.
-
Select one or more files to investigate. SharePoint and Email scan results can be selected by clicking the associated button under Results at the top and then selecting files from the table.
-
Click Investigate.
-
From the Select Investigation drop-down, choose an existing investigation to associate the files with and enter a comment.
-
Click Investigate to begin the download process.
Remediate
The Remediate function executes remediation actions (move, delete, or encrypt) on files identified during a scan or investigation. Unlike the Remediation section, which provides a status view of remediated files, this function performs the actual operational steps to secure, remove, or notify relevant parties about sensitive files.
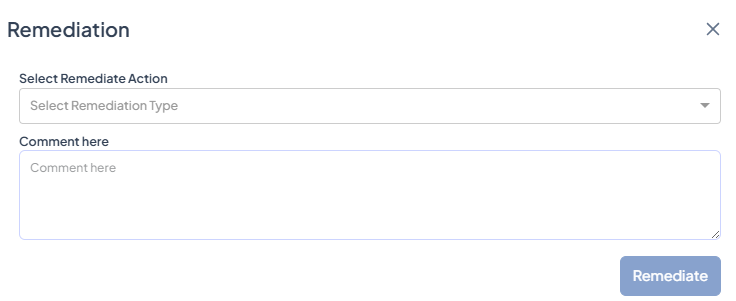
-
Go to DISCOVER > Results > Remediate or DISCOVER > Investigation > Remediate
-
Select one or more files and click Remediate.
-
Choose a remediation action from the drop-down.
|
Action |
Function |
|---|---|
|
Move |
Relocates the file to a secure location. |
|
Delete |
Permanently removes the file. |
|
Copy |
Creates a copy of the file to a secure or alternate location. |
|
Send email to Data Owner |
Notifies the assigned data owner with an email. |
|
Send email to End User |
Notifies the file owner or user who has the device in their possession. |
-
Add a comment (optional) to provide context or notes for the task.
-
Click Remediate to execute the selected action.
Download Reports: Save a local copy of scan results for further analysis or compliance records.
Investigation
The Investigation section allows administrators to create investigations within DISCOVER. These serve to group files that require further review.
Once created, the Investigation page displays detailed information about each file and provides actionable options. You can view device and file details, examine detected sensitive data types, review previous comments, and take actions such as downloading files for manual review or performing remediation steps:
|
Field Group |
Field |
Description / Details |
|---|---|---|
|
Scan Details |
Scan Name |
Name of the scan job. |
|
Scan Date |
Date the scan job was executed. |
|
|
File Details |
File Name |
Name of the file where sensitive data was found. |
|
Folder Path |
Path of the file that contains the sensitive data. |
|
|
File Owner |
Name of the file owner. |
|
|
Endpoint / Data Source |
Target Name |
Device or service name where the scan was executed. Endpoint and data source are the same in this context. |
|
Scan Results |
Data Types |
List of sensitive data types found by the scan job. Click to view details. |
|
Remediation Action |
Action |
Action performed on the file (e.g., move, copy, delete, or notify device/file owner). |
|
Download / Investigation |
Download Status |
Status indicating whether the file is available for download: -
|
|
Investigation |
Action to make the file available for download for manual examination of sensitive data. |
|
|
Investigated By |
Name of the user who performed the investigation. |
|
|
Investigated At |
Timestamp when the investigation was initiated. |
|
|
Investigation Available At |
Timestamp when the file became available for download. Always later than Investigated At. |
|
|
Previous Comment |
Comments from previous investigations. |
Create New Investigation
Before performing any file-level investigation from the Results section, you must first create an Investigation.
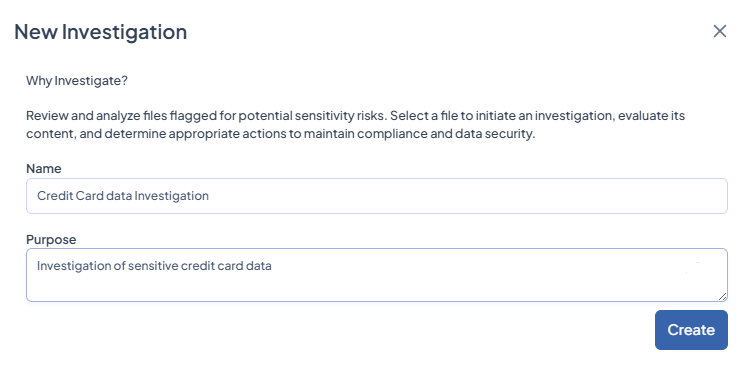
-
Navigate to DISCOVER > Investigation > +Investigation.
-
Enter a unique Name and add a short Purpose.
-
Click Create.
Remediation
The Remediation section allows administrators to monitor and track actions applied to sensitive data. After files are selected and remediation actions are initiated, this section provides a clear overview of their status and history.
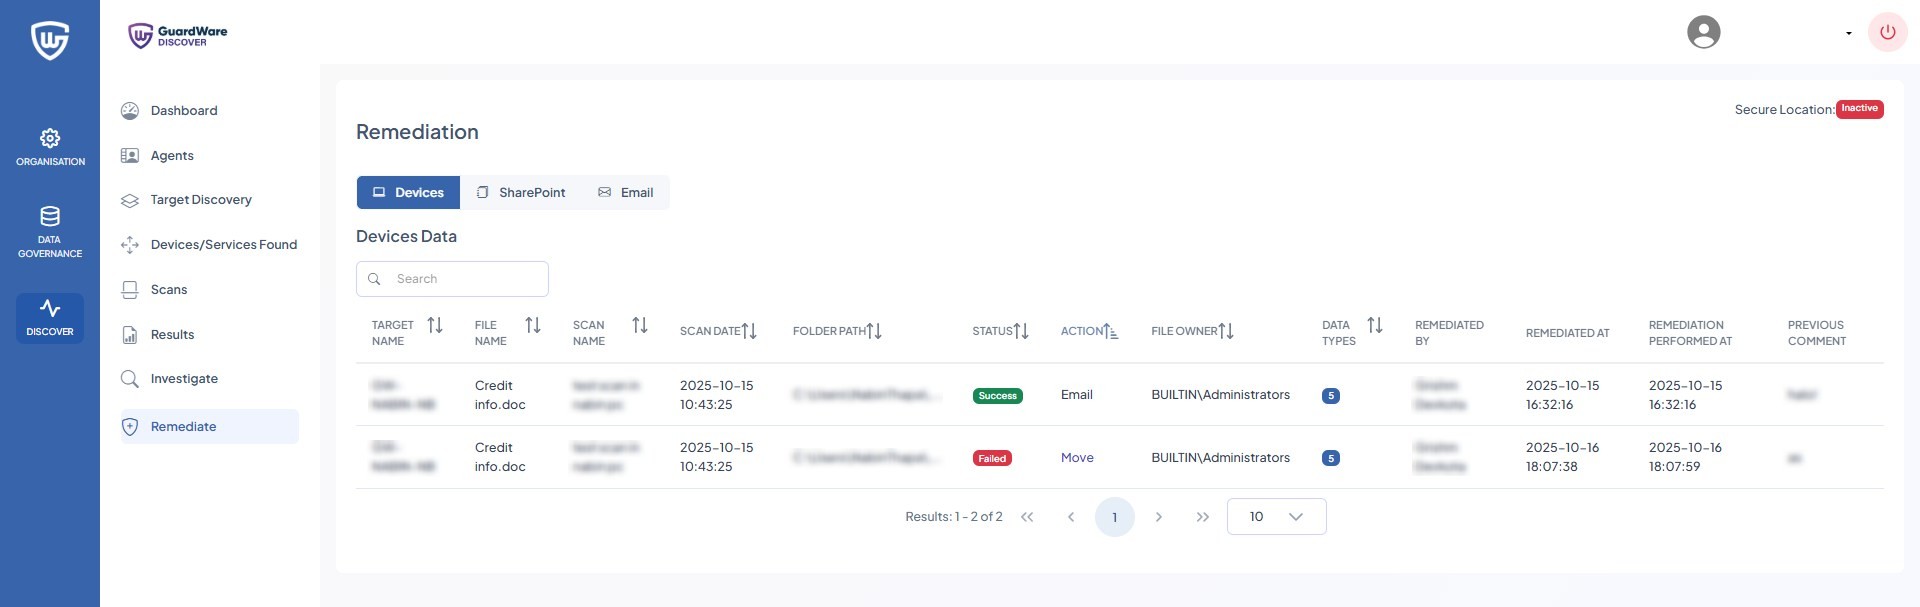
After carrying out remediations, you can see the following information on the Remediation page:
|
Field Group |
Field |
Description / Details |
|---|---|---|
|
Scan Details |
Scan Name |
Name of the scan job that was run. |
|
Scan Date |
Date and time when the scan job was initiated. |
|
|
File Details |
File Name |
Name of the file where sensitive data was detected. |
|
Folder Path |
Path of the file on the device. |
|
|
File Owner |
Owner of the file on the endpoint/data source. |
|
|
Endpoint / Data Source |
Target Name |
Name of the device where the file resides. Endpoint and data source are the same in this context. |
|
Scan Results |
Data Types |
Clickable field showing the sensitive data types detected during the scan. For example, if Visa card data is configured to be scanned, this shows how many instances were found. An upper limit can be configured, e.g., only 5 results will be displayed if the limit is set to 5. |
|
Remediation Details |
Status |
Current status of the file (e.g., Remediated, Pending, Investigating). |
|
Action |
Action performed on the file or available actions. |
|
|
Remediated By |
Name of the user who performed the remediation. |
|
|
Remediated At |
Date and time when remediation was performed. |
|
|
Remediation Performed At |
Timestamp of the remediation activity (similar to Remediated At, can reflect exact system logging). |
|
|
Previous Comment |
Any comment added during prior remediation or investigation steps. |
AGENTS
A DISCOVER Agent is an endpoint device that sits between the Management Console and target devices to carry out actions dictated by the console. Each Agent has the DISCOVER Agent application installed and connects to local or remote target devices and services to perform tasks such as scanning for sensitive data and executing remediation actions.
Agents collect detailed information on discovered data, including its type, location, and associated metadata, and report the results back to the Management Console. Multiple Agents can be deployed across a network, working in parallel to perform scans and remediation tasks, ensuring comprehensive coverage and faster processing of sensitive data across the environment.

Here you can monitor resource usage and track devices and services assigned to a listed agent:
-
Devices: Details on the devices currently associated with the particular agent.
-
Service Targets: Details on the services currently associated with the particular agent.
RESOURCES
The Resources section allows you to download the Agent MSI for installation and configuration on target devices. It also provides access to help guides and documentation for operating the Management Console.

-
Navigate to RESOURCES> Agent Download.
-
Click Download MSI.
The MSI installer will be saved to the directory specified in your browser’s download settings.