Introduction
GuardWare PROTECT encrypts and secures all types of files, including MS Office documents, PDFs, images, videos, and AutoCAD files. It ensures files remain protected from unauthorised use and theft, whether stored locally or shared externally via USB, cloud drives, email, or other methods. Only authorised users and applications can open protected files. These users and applications are configured in the GuardWare PROTECT Management Console by administrators.
End users interact with GuardWare PROTECT Client through the Windows Explorer right-click menu. From there, they can protect sensitive files by applying classifications, restricting access to specific Security Groups, limiting file circulation, adding an expiry date, and so on.
This guide provides instructions on using the GuardWare PROTECT Management Console and is intended for administrators. The GuardWare PROTECT Management Console provides administrators with a central place to configure, monitor, and manage encryption, security groups, users, user policies, user access, authorised applications and websites, key management, and view reports.
PROTECT Management Console Login/Logout
Requirements
Before you begin, ensure you have:
-
A supported web browser (Google Chrome, Microsoft Edge, Brave Browser).
-
The PROTECT Management Console URL provided during the Server setup.
-
Your login credentials:
-
Super Admin: Credentials created during the PROTECT Server setup.
-
Organisation User: Username and one-time password shared by the Super Admin.
-
-
A mobile device with Google Authenticator or Microsoft Authenticator installed for 2FA.
Super Admin Login
The Super Admin is a user account created during the PROTECT Server setup. This account has full administrative access to the Management Console.
-
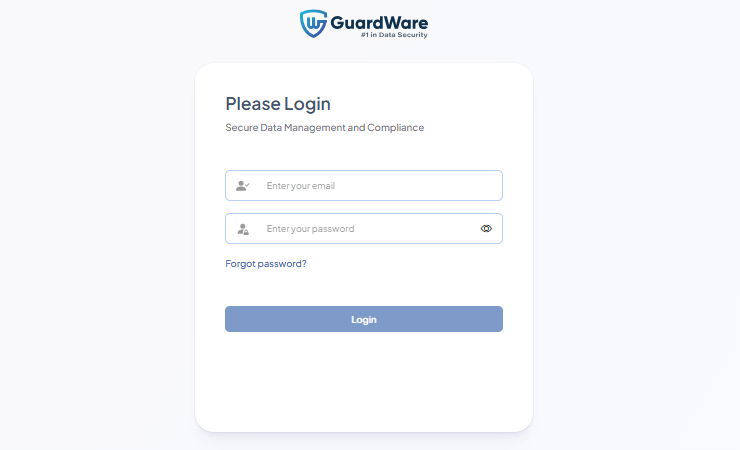
Open PROTECT Management Console in your web browser.
-
Log in using the Super Admin credentials created during the Server setup.
-
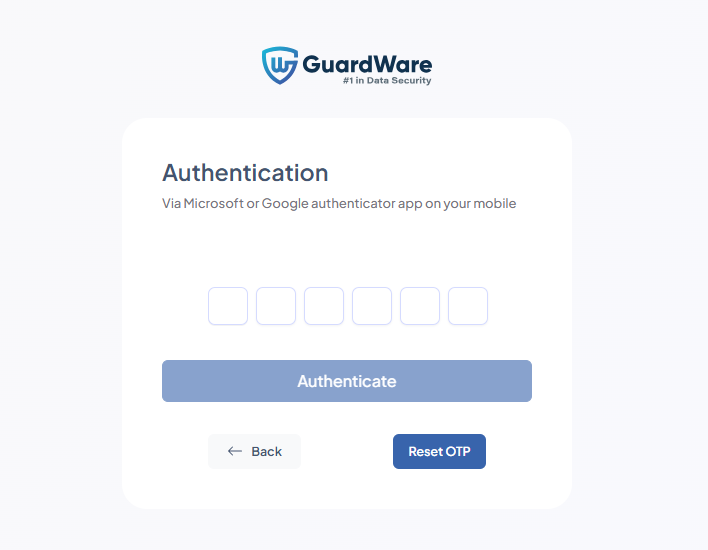
When prompted, set up two-factor authentication (2FA):
-
Open your Authenticator app.
-
Scan the QR code displayed on the screen.
-
Enter the verification code from the app.
-
-
Read and accept the End User Licence Agreement (EULA).
-
You will now be prompted to create a new password. Enter and confirm the new password.
-
Once the password is updated, you’ll again be asked to enter the verification code from the Authenticator app.
-
Enter the latest verification code again to complete the login. You are then redirected to the GuardWare PROTECT Management Console landing page.
New Organisation User Login
A new organisation user is an account created by a Super Admin. This account grants the new user access to the GuardWare PROTECT Management Console for the organisation in question.
-
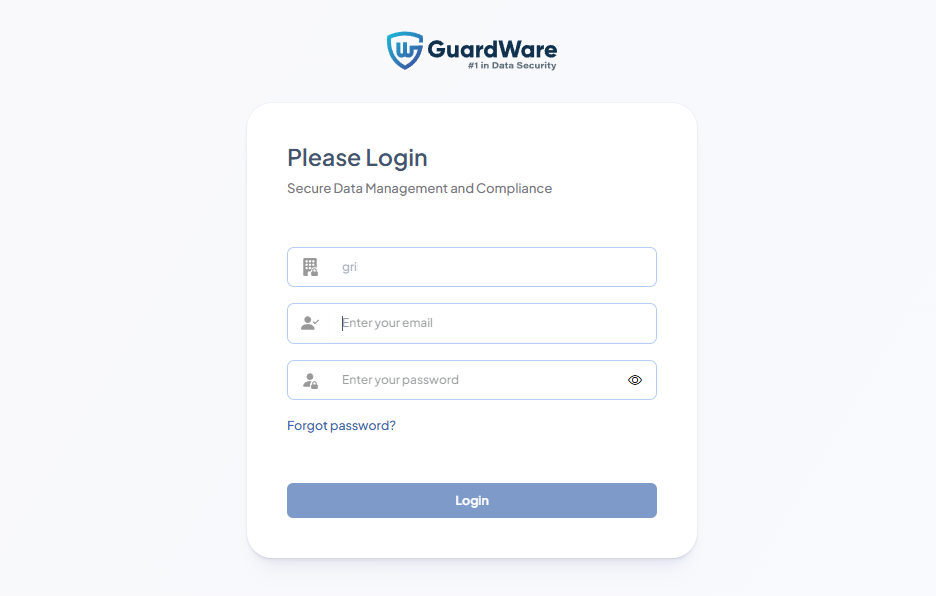
Open PROTECT Management Console in your web browser.
-
Enter your username (email address) and one-time password received via email or sent by your Super Admin.
-
Scan the QR code using the Google or Microsoft Authenticator app on your mobile device.
-
Enter the 2FA verification code in the Authentication field and click Authenticate.
-
Create a new password when prompted, then click Login to access the console.
Log Out
To log out, click the Power (⏻) icon in the top-right corner of the console.
ORGANISATION
The ORGANISATION section lets you manage users and configure the organisation-level settings used in GuardWare PROTECT. This includes creating organisations, adding users, configuring SMTP for email notifications, and defining the organisation’s identity settings.
These configurations ensure that notifications, reports, and alerts are sent from the correct email domain, user accounts are managed securely, and organisation-specific information is applied consistently across the PROTECT platform.
Create an Organisation
Super Admins can create and manage multiple organisations in the Management Console. Each organisation maintains its own users, settings, and data, ensuring clear separation between environments.
To create an organisation:
-
Go to ORGANISATION and click +Create New.

-
Enter a Name for the new organisation.
-
Enter the Location.
-
The Database Name is generated automatically.
-
Select the appropriate Time Zone.
-
Upload the Organisation logo. Supported file types are
.jpg,.jpeg, and.png.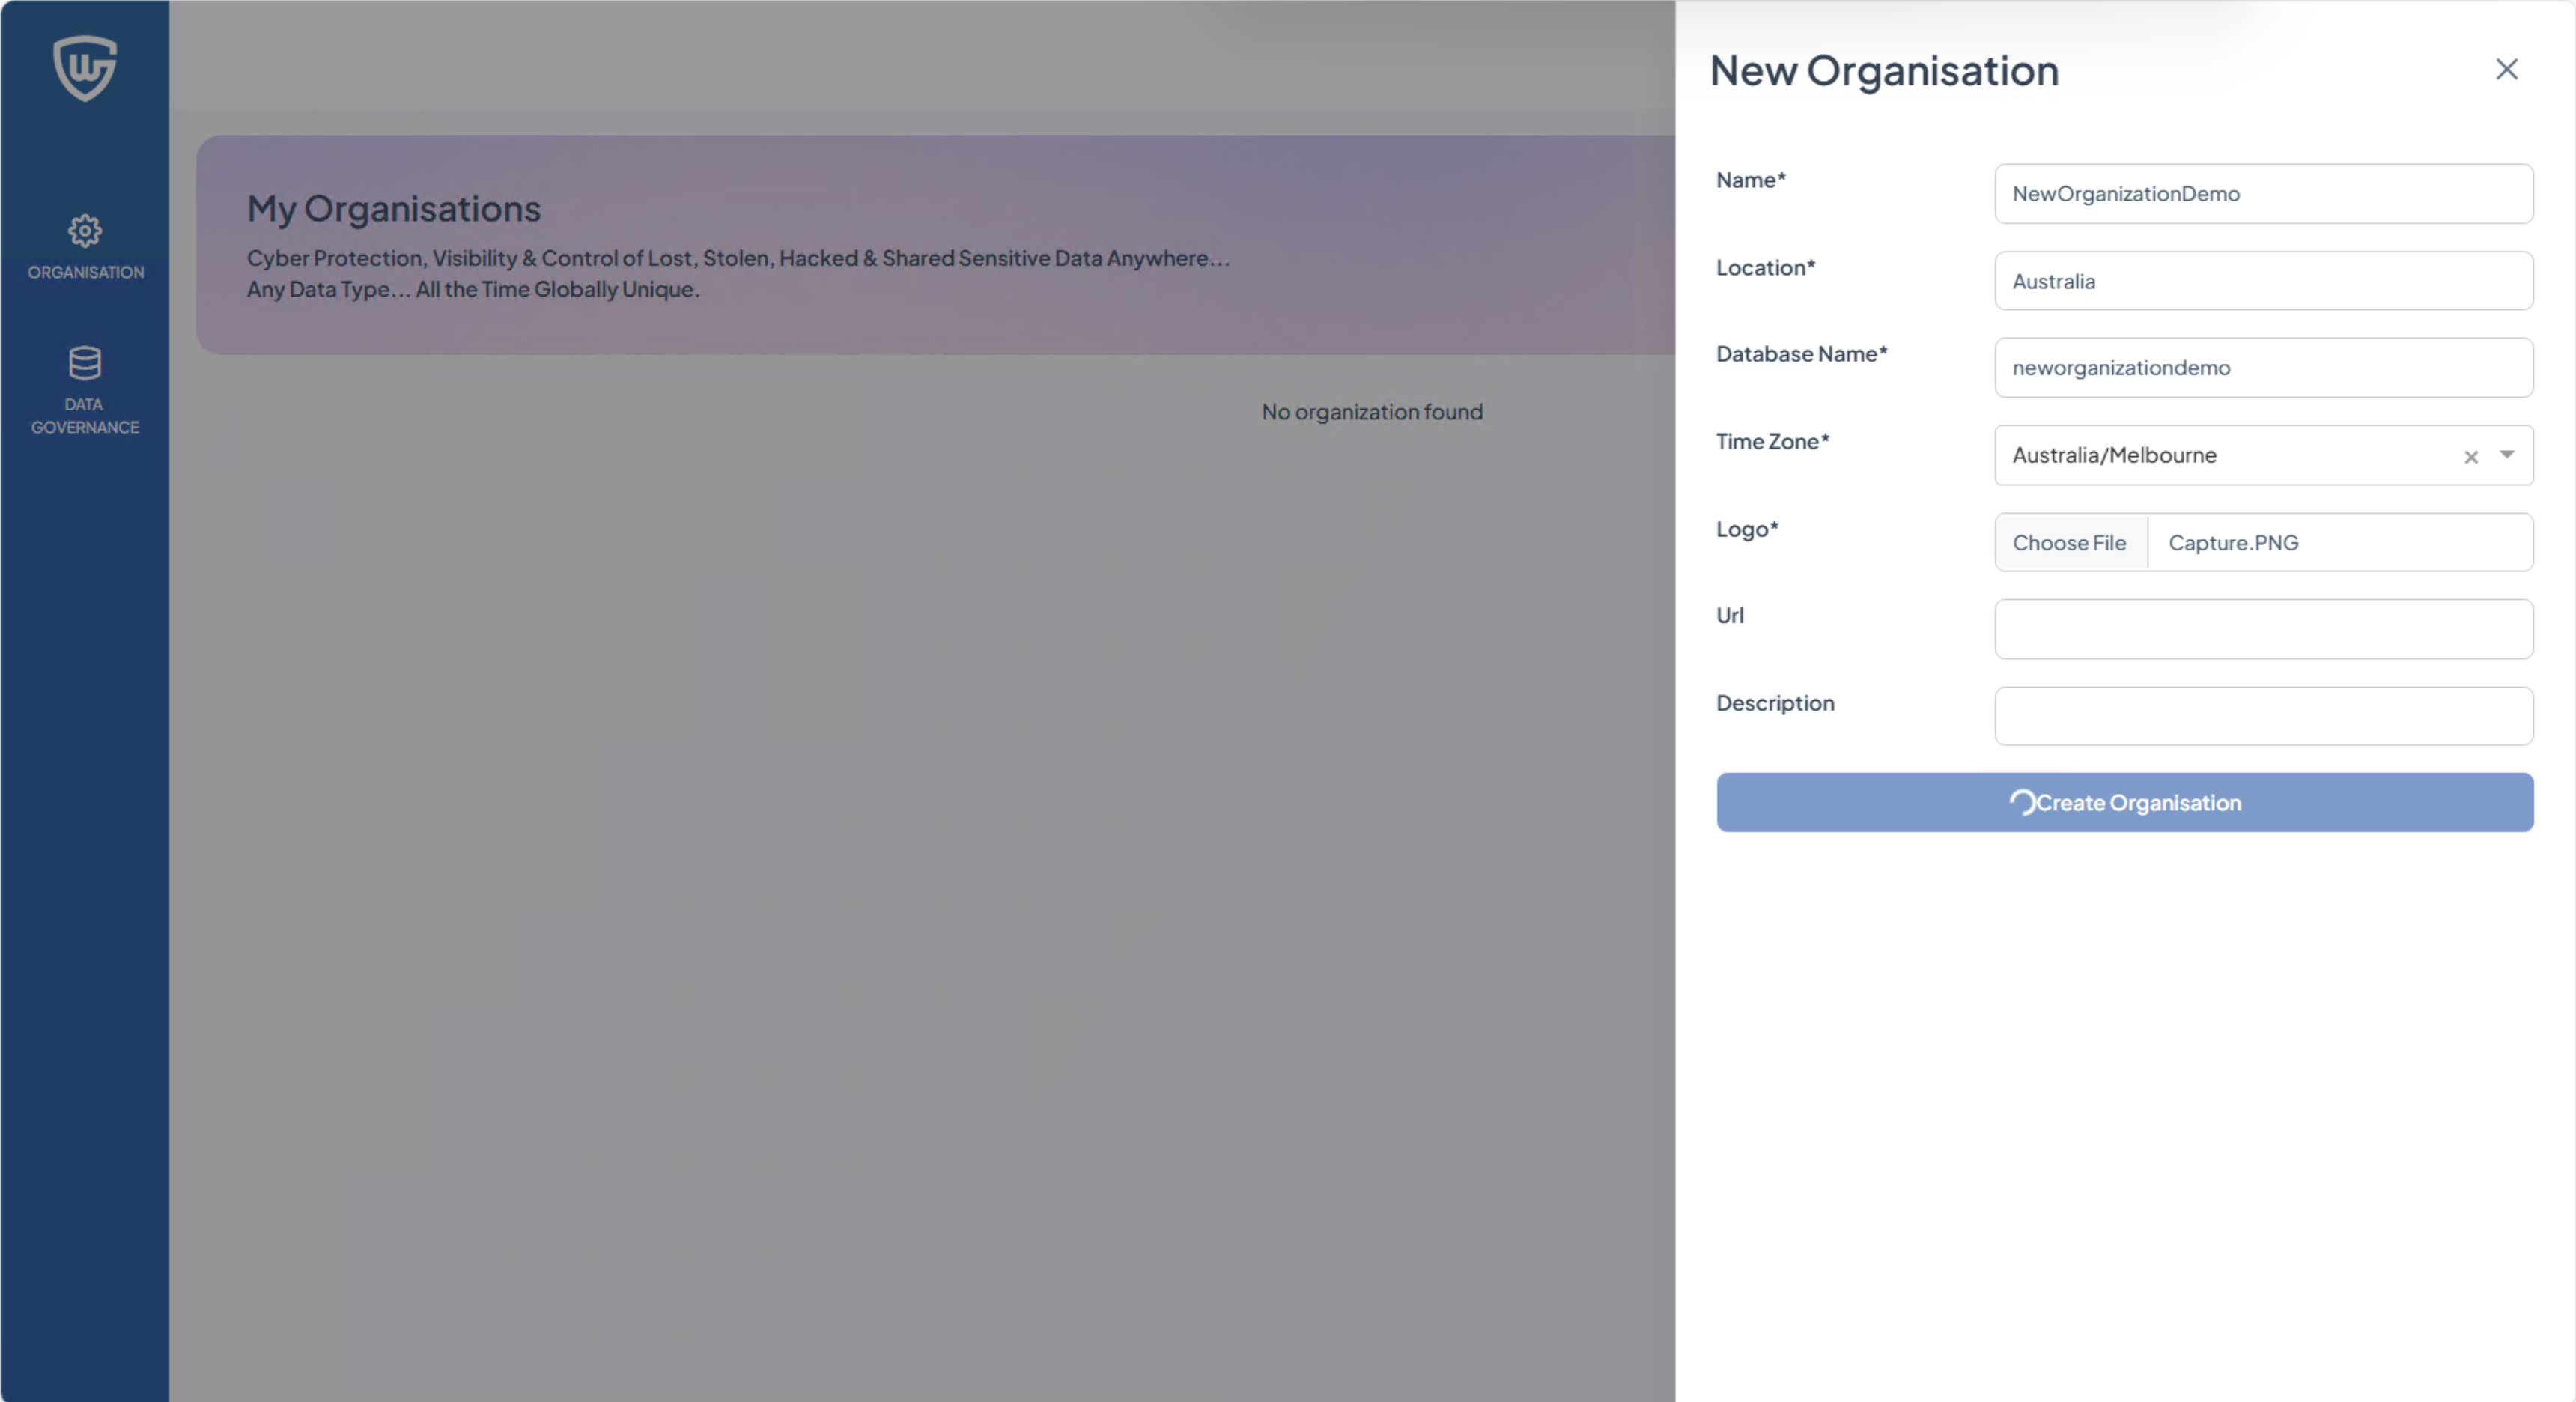
-
(Optional) Enter the URL and Description.
-
Click Create Organisation.
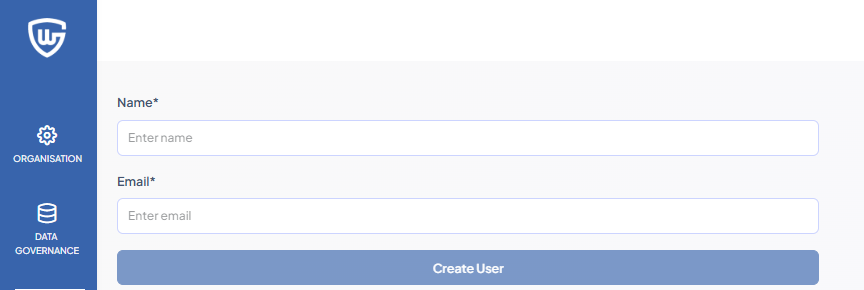
Adding a User to an Organisation
After creating an organisation, Super Admin must add at least one user to begin. This interface is visible only to Super Admins.
To add a user:
-
Go to ORGANISATION and select the organisation you created.
-
Enter the Name and a valid Email address of the user.
-
Click Create User.
SMTP Connection
The SMTP Connection section allows you to configure SMTP settings so the system can send emails, such as invitations, password resets, alerts, and reports, using your own mail server and domain.
If SMTP is not configured, GuardWare’s default SMTP server is used. Configuring SMTP is recommended for organisations that require domain-specific email notifications, such as noreply@bank.com instead of noreply@guardware.com.
To configure SMTP:
-
Go to ORGANISATION > SMTP Connection.
-
In SMTP Host, enter the server address that should be used to send emails.
-
In SMTP Port, enter the port number used by your mail server (commonly 25, 465, or 587).
-
In SMTP Username, enter the username required to authenticate with your mail server.

-
In SMTP Email, enter the email address that will appear as the sender of email notifications.
-
In SMTP Password, enter the password associated with the SMTP email account.
-
In Use STARTTLS to connect to SMTP Host, select Yes if your mail server requires encrypted communication.
-
In SMTP Authentication, select Yes if your server requires login credentials.
-
In Test Email Address, enter an email address to validate the SMTP connection.
-
Click Save to apply the SMTP configuration.
Users
The Users section allows admins to manage accounts that can access the PROTECT Management Console. From here, you can create new users, edit user details, disable accounts, and reset a user’s password or two-factor authentication (2FA) setup.
Add a New User
To add a new user to the organisation:
-
Go to ORGANISATION > Users and click +Create User.
-
In Username / Email, enter the user’s email address.
-
In Display Name, enter the name that will appear in the console.
-
In Select password verification, select one of the following:
-
Email: The system sends a one-time password and login link to the email entered.
-
Default: Manually enter a password or generate one using the key icon, then share it with the user.

-
-
Click Save to create the user or Reset to clear the form.
Edit a User
-
Go to ORGANISATION > Users and search for the user to edit.
-
Click the Edit icon in the ACTIONS column.

-
Update the required information and click Update to save the changes.
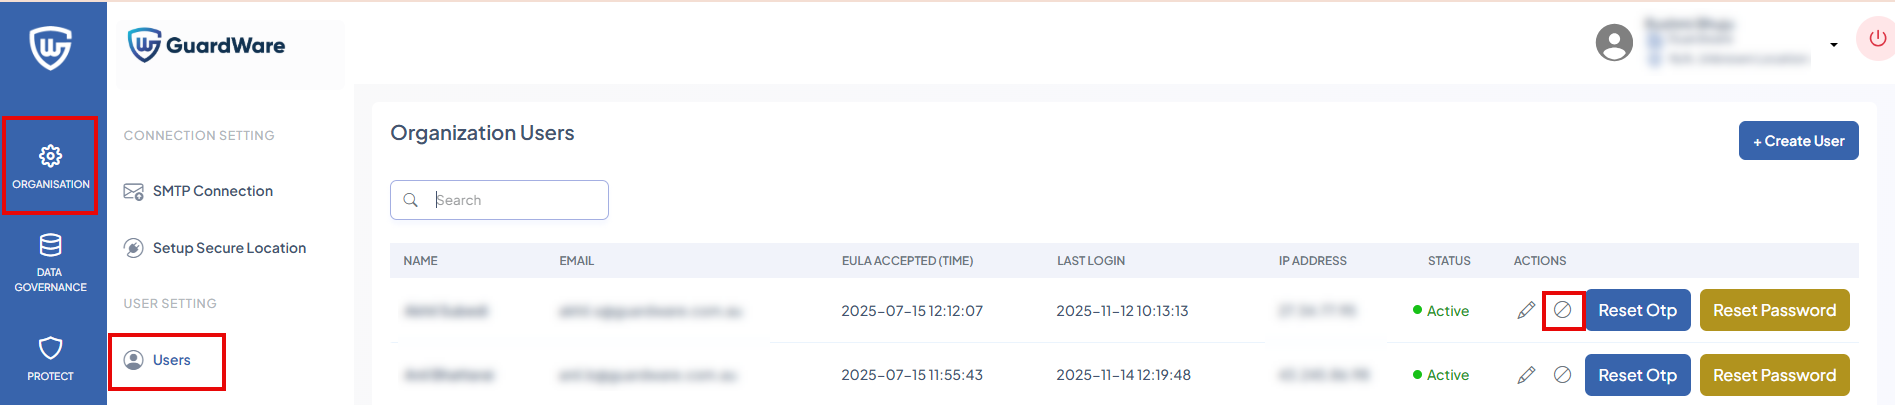
Disable a User
-
Go to ORGANISATION > Users and search for the user to disable.
-
Click the Disable icon in the ACTIONS column. You cannot disable your own account.
-
Click Disable in the Confirmation alert.
Reset OTP
-
Go to ORGANISATION > Users and search for the user whose OTP you want to reset.
-
Click Reset OTP in the ACTIONS column.

-
Click Reset in the Confirmation alert to force the user to re-register their 2FA device.
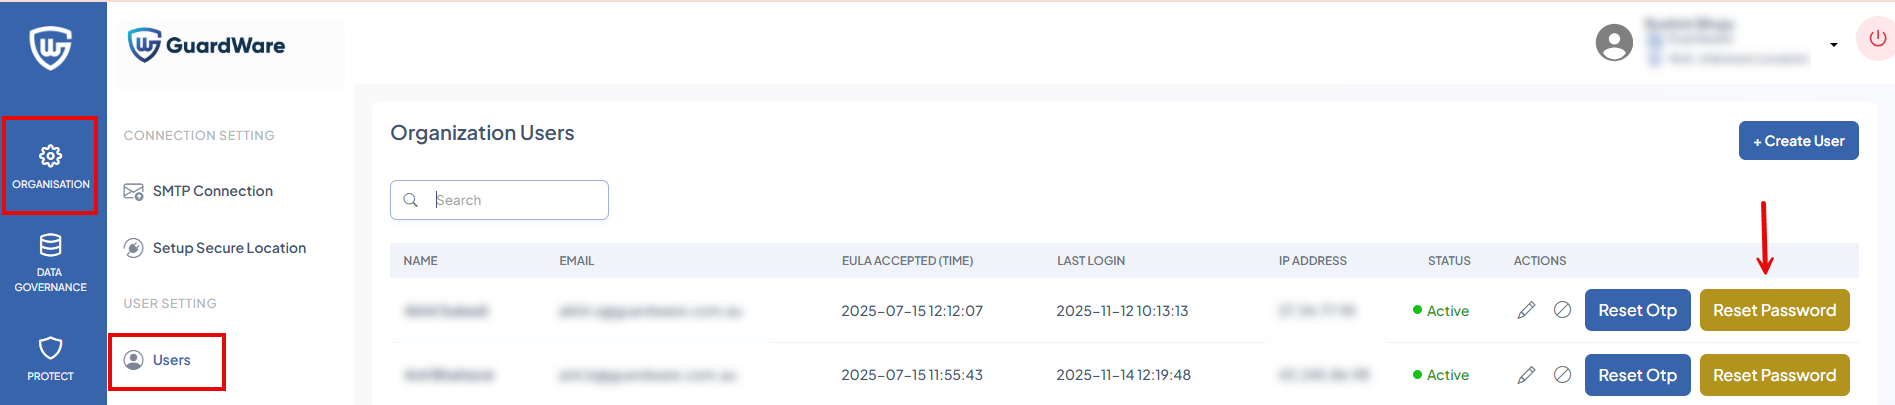
Reset Password
-
Go to ORGANISATION > Users and search for the user whose password you want to reset.
-
Click Reset Password in the ACTIONS column.
-
In New Password, enter the new password.
-
In Confirm Password, re-enter the password to match.
-
Click Reset to apply the new password.
DATA GOVERNANCE
The DATA GOVERNANCE section defines how PROTECT identifies and handles sensitive information. Administrators can create and manage data classifications and control how classifications apply when multiple Data Types appear within a file.
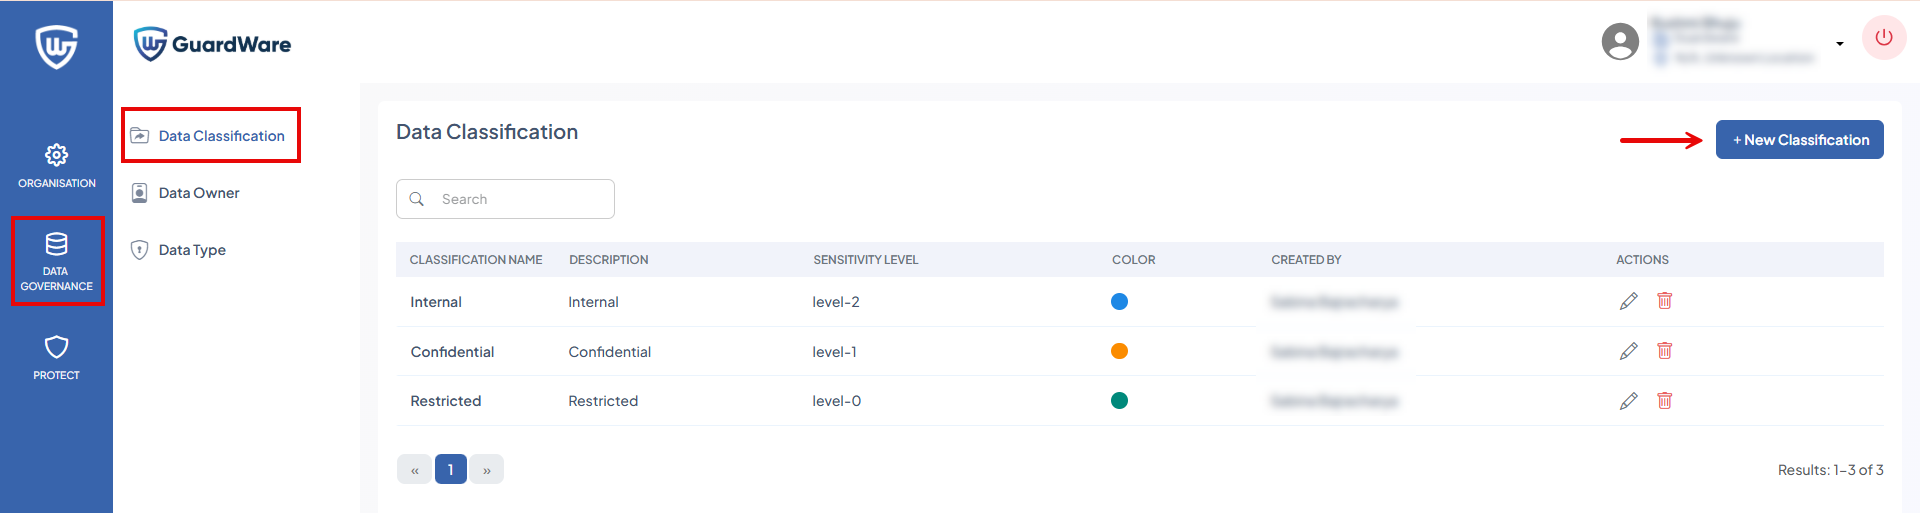
Data Classification
Data Classification allows you to group multiple Data Types and assign a colour label for quick visual reference. PROTECT automatically assigns each classification a sensitivity level based on the order it was created (starting from level 0).
If a file contains multiple classified Data Types, PROTECT applies the highest sensitivity level detected to ensure the document receives the strictest classification.
Add Data Classification
You can create up to 16 classifications (levels 0–15).
-
Go to ORGANISATION > Data Classification and click +New Classification.
-
Enter a unique Classification Name and Description.
-
Select a unique colour that will be used to visually identify this classification.
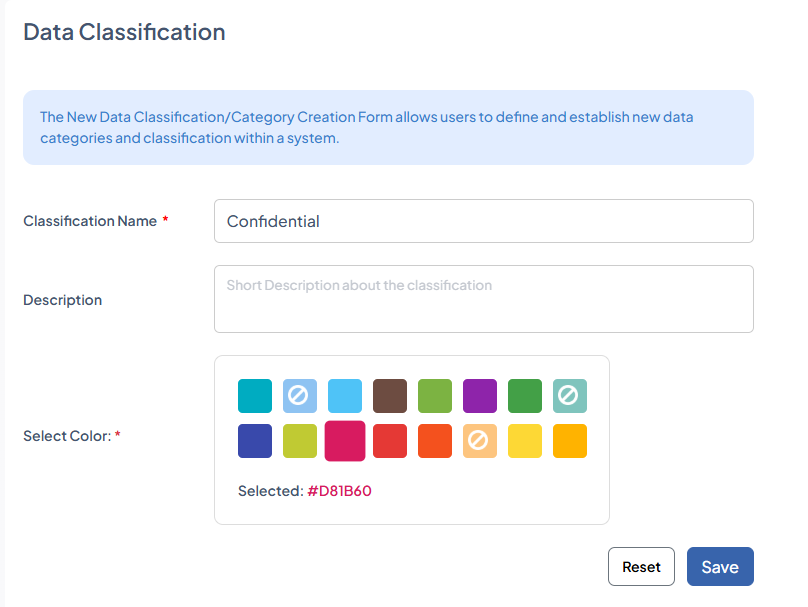
-
Click Save.
Edit Data Classification
-
Go to ORGANISATION > Data Classification.
-
Search for the classification to edit and click the Edit icon in the ACTIONS column.
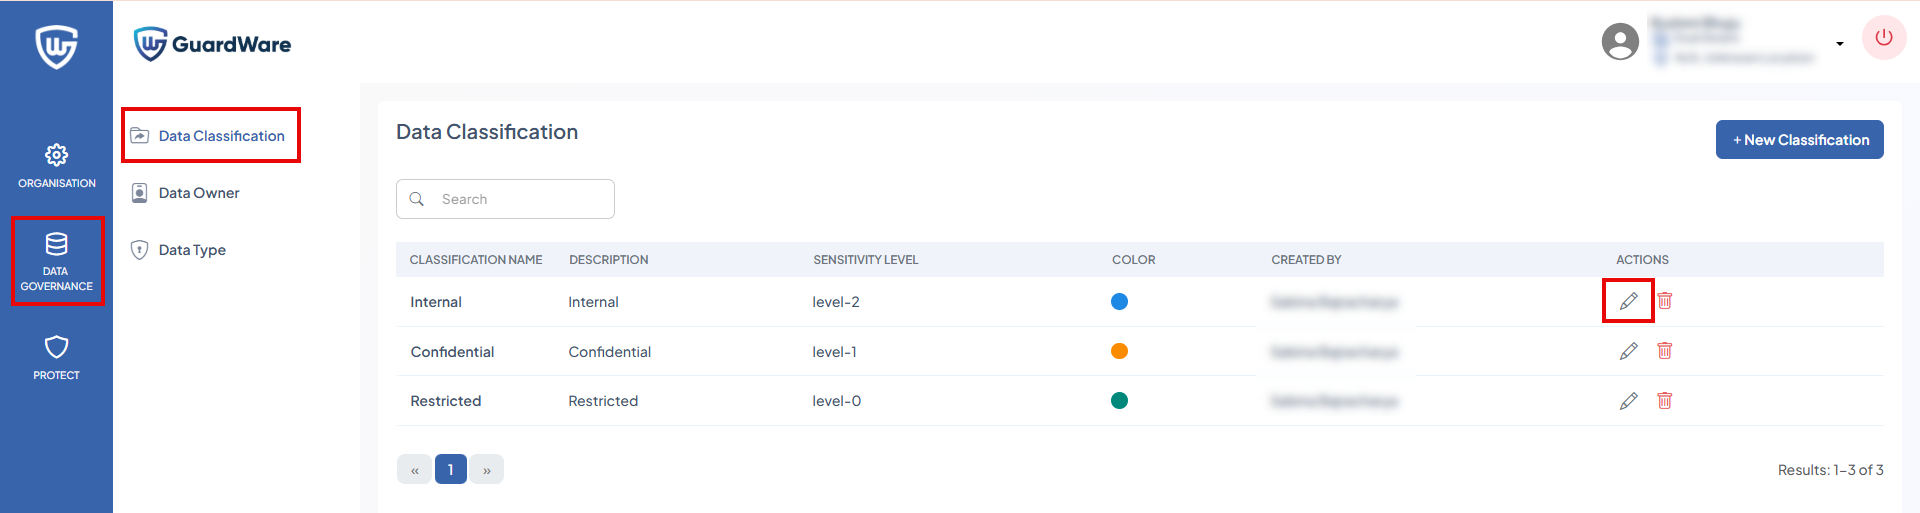
-
Update the required information and click Update.
Delete Data Classification
-
Go to ORGANISATION > Data Classification.
-
Search for the classification to delete and click the Delete icon in the ACTIONS column.

-
Click Delete in the Confirmation alert.
When a classification is deleted, higher levels shift down by one. For example, deleting Level 6 moves the previous Level 7 to Level 6.
Data Owner
A Data Owner is an individual responsible for one or more Data Types. When sensitive information associated with a Data Type assigned to a Data Owner is detected, the system sends a summary alert to their registered email, covering all incidents that occurred within the configured time period.
Assigning a Data Owner ensures alerts are routed to the correct person responsible for that Data Type. The Data Owner does not need to be the same person who owns the device or the file where the data was found.
Add Data Owner
-
Go to DATA GOVERNANCE > Data Owner and click +New Owner.
-
Click +Assign Data Types. For details on Data Types, see Data Type.
-
Search and select the Data Type to assign and click Save. You can skip assigning the Data Type if you want to create the Data Type later.
-
Enter the Email address, Name, Description, and Contact number of the Data Owner.

-
Click Save.
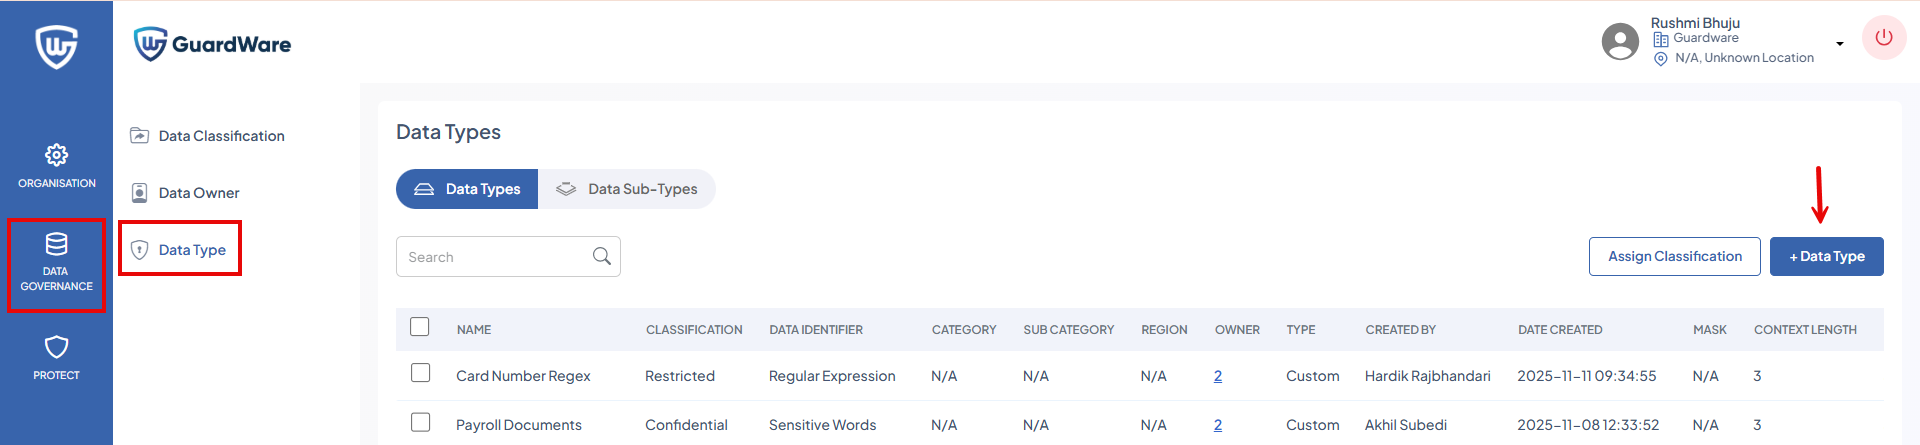
Data Type
Data Type defines the kind of information that PROTECT detects and protects during file operations. Each Data Type represents a rule, pattern, or phrase used to identify sensitive content within files before encryption and protection are applied.
You can use built-in Data Types (e.g., PII, PCI DSS) or create custom Data Types to detect organisation-specific information such as employee codes, internal document IDs, or project references.
Create a Data Type
-
Go to DATA GOVERNANCE > Data Type and click +Data Type.
-
Enter a unique Data Type Name and Description.
-
In Data Identifier, select how PROTECT should identify this Data Type.
-
Sensitive Words
Select Sensitive Words if the Data Type should be detected based on specific terms or phrases.
Choose one of the following detection rules:-
Sensitive Words
-
ALL of the phrases in the following set must be present in the text.
Specify phrases that must all appear together in a file for it to be classified as sensitive.
For example, if you specify phrases"credit card"and"cardholder", any file containing these two phrases will be marked as sensitive. If only one phrase is present, the file will not be marked sensitive.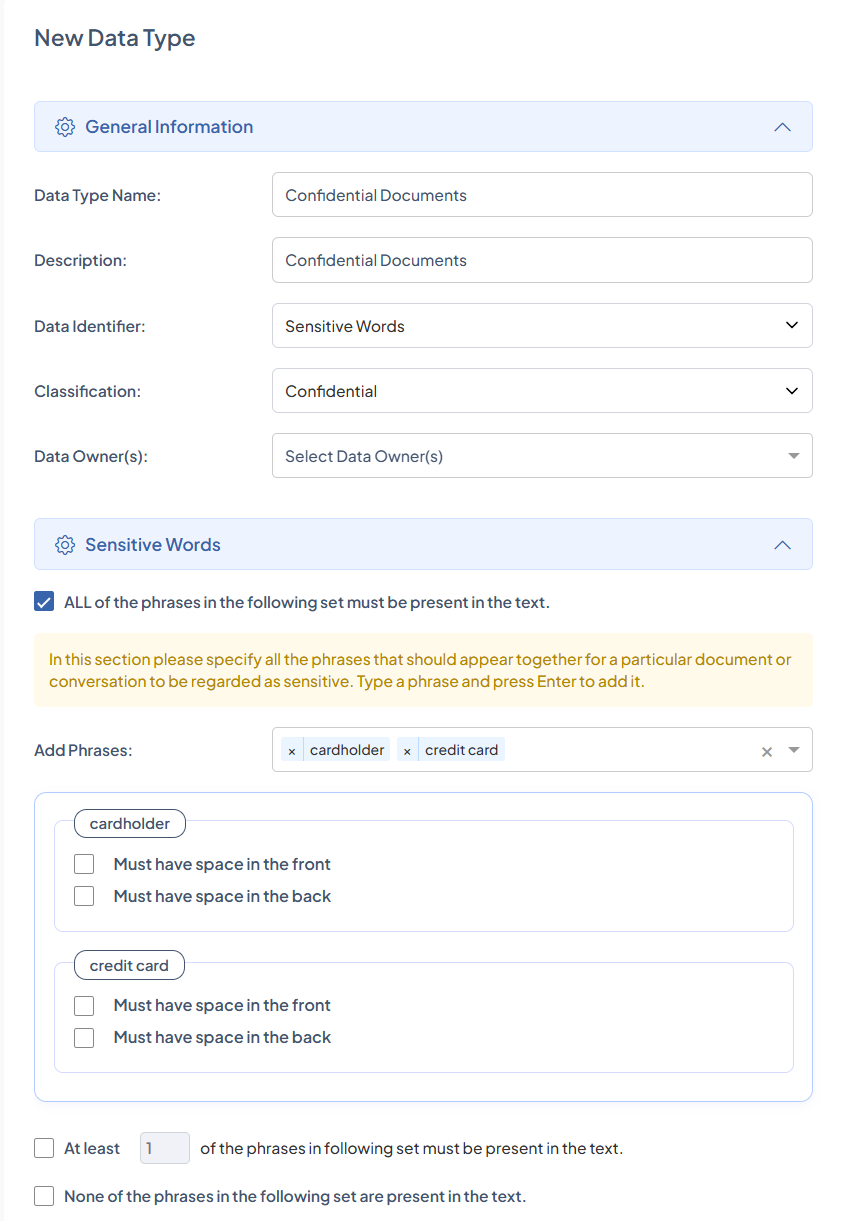
-
Must have space in the front: When enabled, PROTECT only matches the phrase if there is a space immediately before it.
This helps prevent false positives where the phrase appears as part of another word.
Example: It will match"My cardholder"but not"Mycardholder". -
Must have space in the back: When enabled, PROTECT only matches the phrase if there is a space immediately after it.
This ensures the phrase is detected as a standalone term.
Example: It will match"cardholder name"but not"cardholderName123".
-
-
At Least (n) of the phrases in following set must be present in the text
Specify a minimum number of matching phrases required for detection.
For example, if you set the value to 1 and add phrases"Credit Card Number"and"Cardholder", any file containing at least one of these phrases will be marked as sensitive.%20of%20the%20phrases.png?cb=86dcafcc926c49d3157371aec9313747)
-
Must have space in the front: When enabled, PROTECT only matches the phrase if there is a space immediately before it.
This helps prevent false positives where the phrase appears as part of another word.
Example:It will match"My Cardholder"but not"MyCardholder". -
Must have space in the back: When enabled, PROTECT only matches the phrase if there is a space immediately after it.
This ensures the phrase is detected as a standalone term.
Example:It will match"Cardholder Name"but not"CardholderName123".
-
-
None of the phrases in the following set are present in the text
Specify phrases that must not appear in the file. If any of these phrases are found, the file will not be marked sensitive.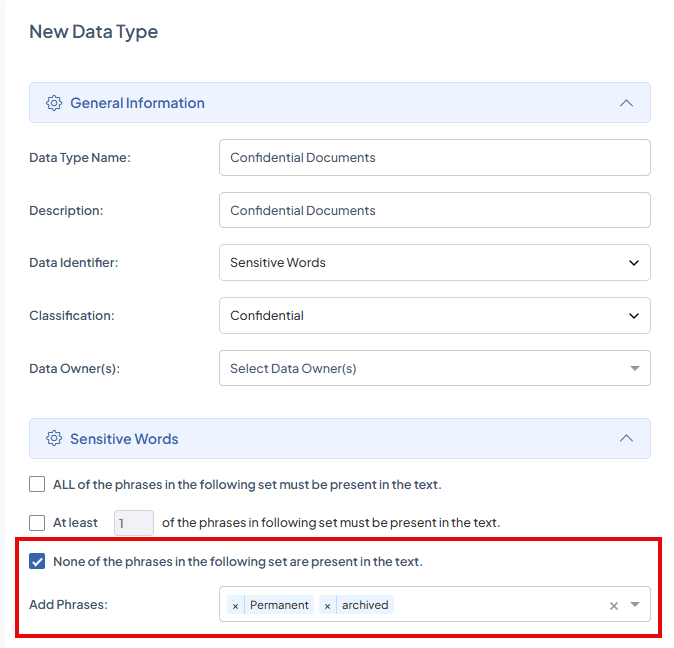
-
-
Sub-type
Select the Data Sub-types to assign to the new Data Type to refine how PROTECT classifies content. For details on creating, see Data Sub-type.-
Sub-type if present: Content is flagged as sensitive only when all selected Data Sub-types are detected in the file.
-
If one or more Sub-type: Content is flagged as sensitive when any one of the selected Data Sub-types is detected in the file.
-
-
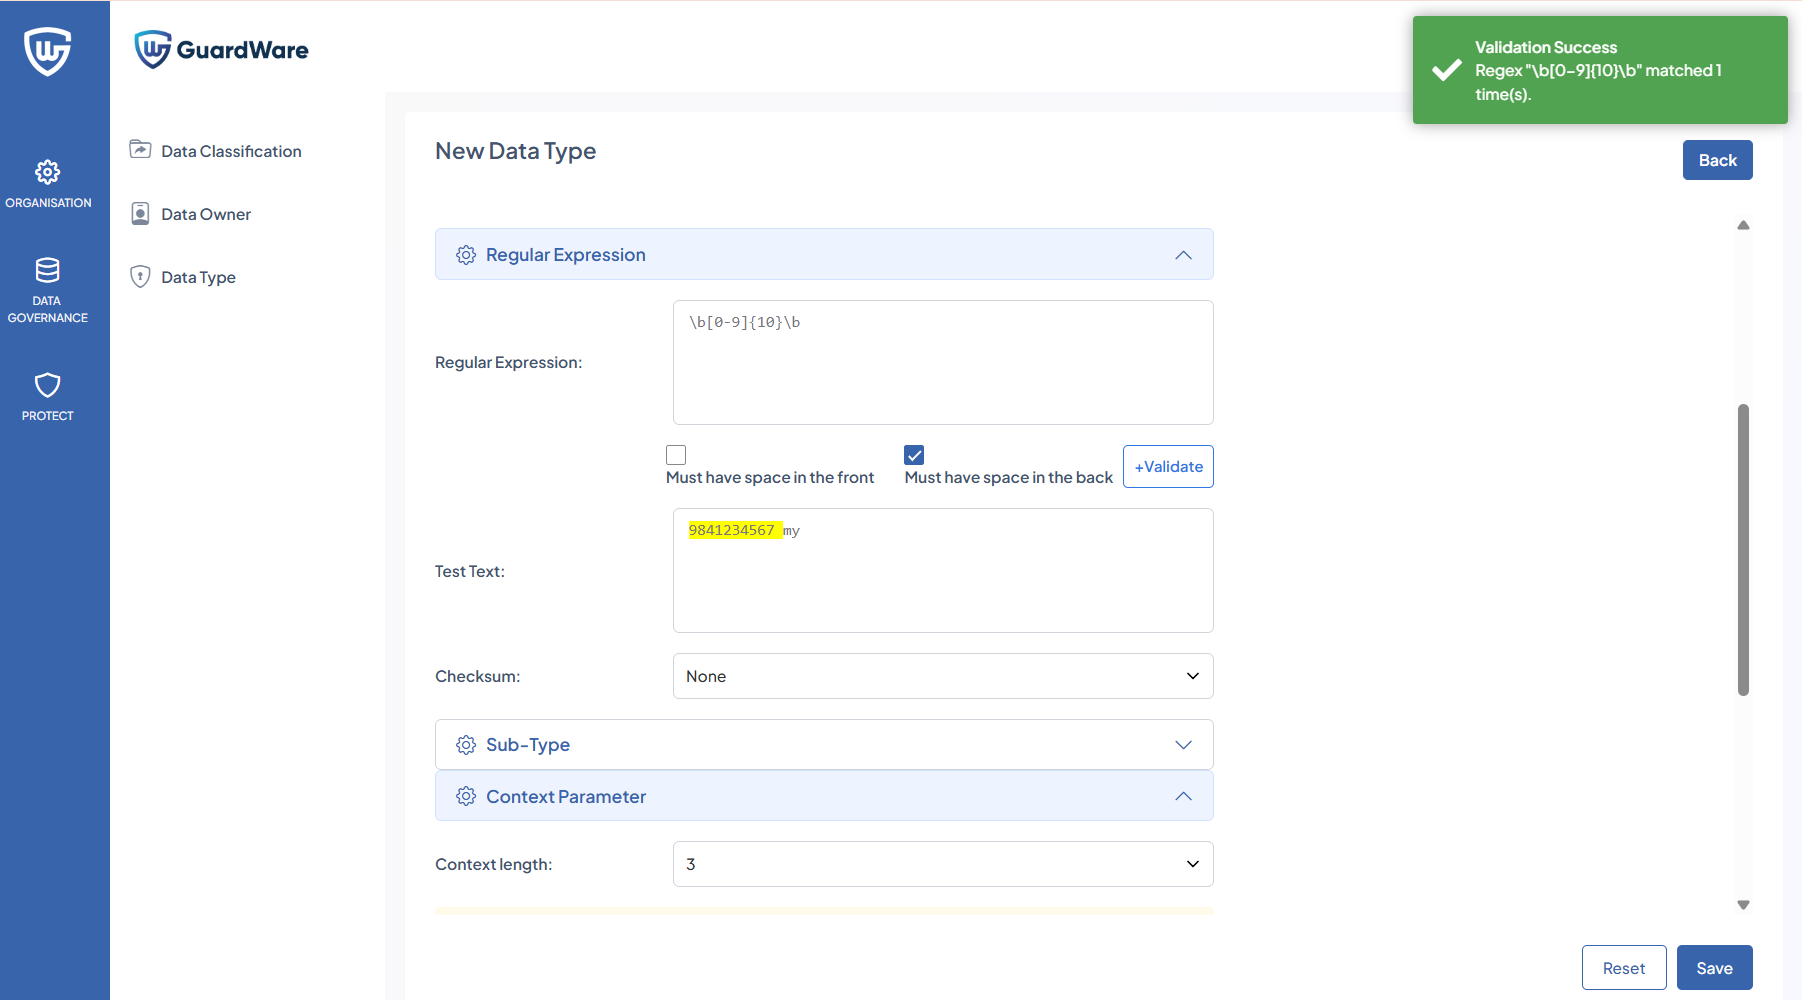
Context Parameters
-
Context Length: Define how many words before and after the detected sensitive term should be displayed in the results.
For example, if the context length is set to 3 and the sensitive word is “cardholder”, the result will show three words on either side of the matched term. This helps administrators understand the surrounding text and determine whether the detection is valid or a false positive.For example, if the context length is set to 3 and the sensitive word is “cardholder”, and the original text is:
“The customer details were reviewed by the cardholder before submission of the form.”
The captured result will appear as:
“reviewed by the cardholder before submission of”
This helps administrators review the surrounding text to determine whether the information is genuinely sensitive or a false positive.
-
Number of Hits: Specify the minimum number of times a sensitive word must appear in a document before it is flagged as sensitive. Adjust this value to control detection sensitivity and reduce unnecessary alerts.

-
-
-
Regular Expressions
Use Regular Expressions to define custom text patterns that PROTECT should detect as sensitive. This is useful for identifying structured data such as IDs, codes, or formatted strings.-
Regular Expression
Example: Detecting a 10-Digit Phone NumberRegex:
\b[0-9]{10}\bThis pattern detects a standalone 10-digit phone number (for example,
9841234567).-
Must have space in the front: Enable this option if the detected value must have a space immediately before it.
Example:It will match" My 9841234567"but not"My9841234567"."This helps ensure the phone number is captured as a separate token rather than embedded in another string.
-
Must have space in the back: Enable this option if the detected value must have a space immediately after it.
Example:It will match"9841234567 abc"but not"9841234567abc".This ensures the detected number appears as a standalone value.
-
Test Text: Use the Test Text field to check whether your regular expression works as intended. Enter sample text and click +Validate to confirm that the pattern correctly detects the target data before saving your configuration.
-
Checksum (Luhn): Select Luhn if the pattern represents number formats that must pass Luhn checksum validation, such as credit card numbers.
When enabled, PROTECT verifies that the detected number satisfies the Luhn algorithm.
-
-
Sub-type
Select the Data Sub-types to assign to the new Data Type to refine how PROTECT classifies content. For details on creating, see Data Sub-type.-
Sub-type if present: Content is flagged as sensitive only when all selected Data Sub-types are detected in the file.
-
If one or more Sub-type: Content is flagged as sensitive when any one of the selected Data Sub-types is detected in the file.
-
-
Context Parameters
-
Context Length: Define how many words before and after the detected sensitive word should be displayed.
-
Number of Hits: Specify the minimum number of times a sensitive word must appear in a document before it is flagged as sensitive. Adjust this value to control detection sensitivity and reduce unnecessary alerts.
-
Hide rule from Rule Violation screen (Mask): Determine how much of the detected sensitive data is hidden. Available masking levels include:
-
None: No masking applied; complete data is visible.
-
1/4 Mask (Quarter Masking): 25% of the data is hidden.
-
1/2 Mask (Half Masking): 50% of the data is hidden.
-
3/4 Mask (Three-Quarter Masking): 75% of the data is hidden.
-
-
-
-
Filename Expressions: Specify file name patterns or folder paths to define a Data Type. If a file matches either a folder-level expression or a file-level naming pattern, PROTECT automatically identifies it as belonging to that Data Type.
For example:
If you add the expressionC:\Users\*\Downloads\*.*and give it a name “Internal files”, any file saved in the Downloads folder will be classified as the Data Type “Internal files”.
-
-
After selecting the data identifier and its corresponding detection rules, select a Data Classification from the drop-down.
-
Select Data Owner(s) from the drop-down to assign to the new Data Type.
Data Sub-types
Data Sub-types refine parent Data Types to provide more precise and controlled detection. They help reduce false positives by ensuring PROTECT accurately identifies specific categories of sensitive information.
Correct configuration is important.
For example:
If MasterCard is mistakenly added as a Data Sub-type under VISA Card, PROTECT will treat MasterCard data as part of the VISA Card category. This inflates results and prevents accurate reporting.
As a guideline, ensure Data Sub-types align with their parent Data Type.
For example:
Parent Data Type: VISA Card
Data Sub-types: Visa Card Australia, Visa Card Global
These maintain a clear and accurate hierarchy.
Add Data Sub-type
-
Go to DATA GOVERNANCE > Data Type and click the Data Sub-types tab.
-
Click +Data Sub-type.
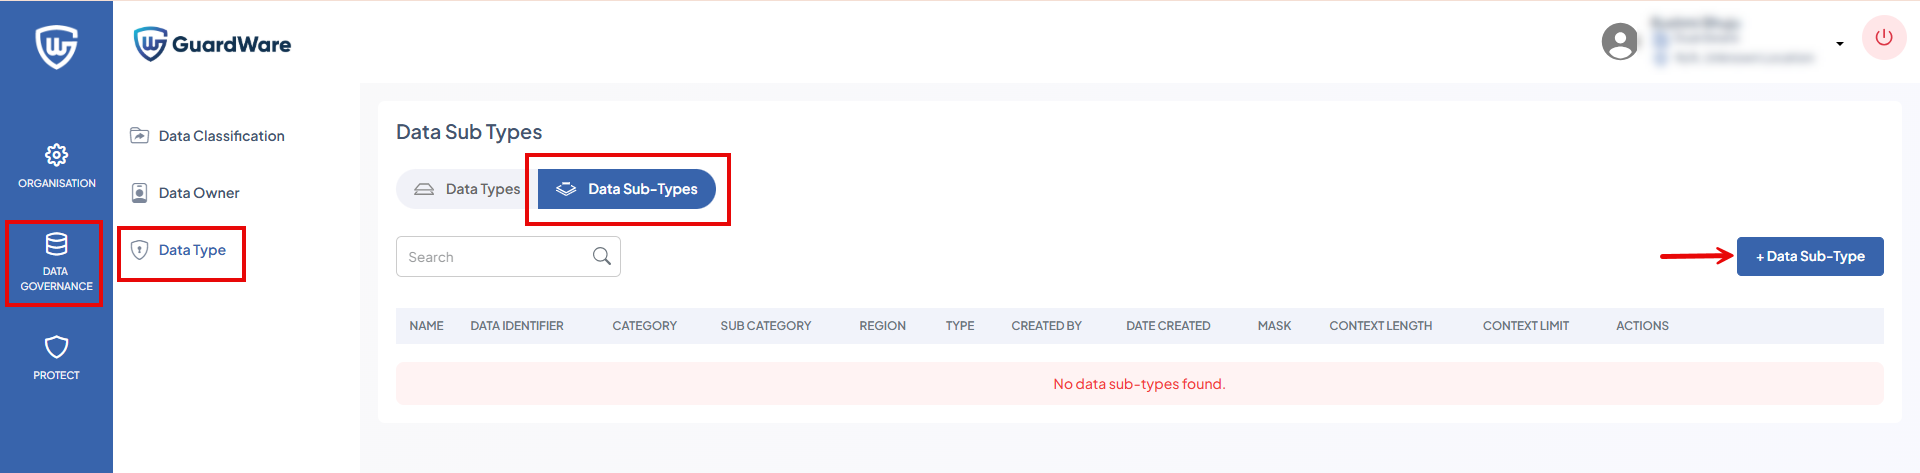
-
Enter the Data Type Name and Description.
-
Select a Data Identifier from the drop-down(Sensitive Words, Regular Expressions, or Filename Expressions). For details on data identifiers, see Add Data Type.
-
Click Save.
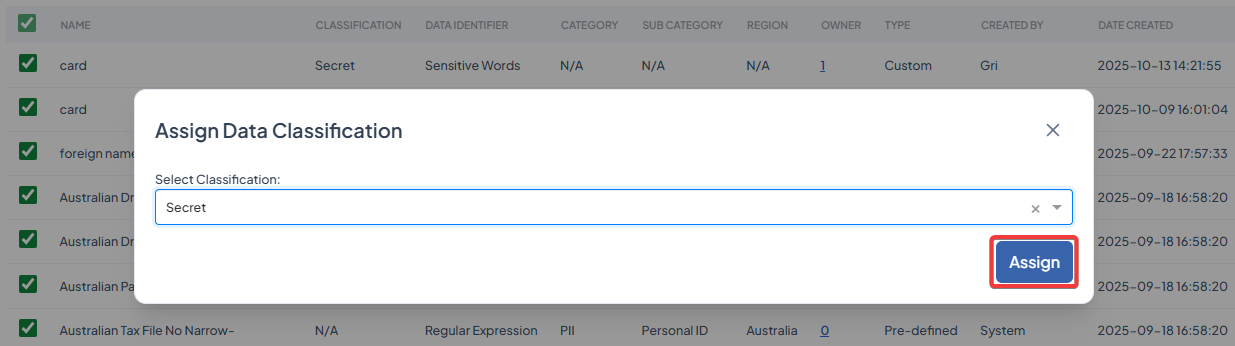
Assign Classification to a Data Type
-
Go to DATA GOVERNANCE > Data Type.
-
Search and select the Data Type to assign and click Assign Classification.
-
Select a classification from the drop-down and click Assign.
PROTECT
The PROTECT section lets you configure, monitor, and manage security groups, users, user policies, user access, authorised applications and websites, key management, and view reports.
Key sections:
Security Groups
Security Groups define which users are allowed to access protected files. When a file is protected using GuardWare PROTECT, only users in the selected Security Groups can access it. Any user who is not a member of those groups is automatically restricted from accessing the file. Security Groups can be created manually or imported directly from Active Directory.
Users must be assigned to a Security Group to use GuardWare PROTECT on their PC. Any new user who installs GuardWare PROTECT Client and logs in successfully is automatically assigned to the default Security Group called All Users. A user can belong to multiple Security Groups.
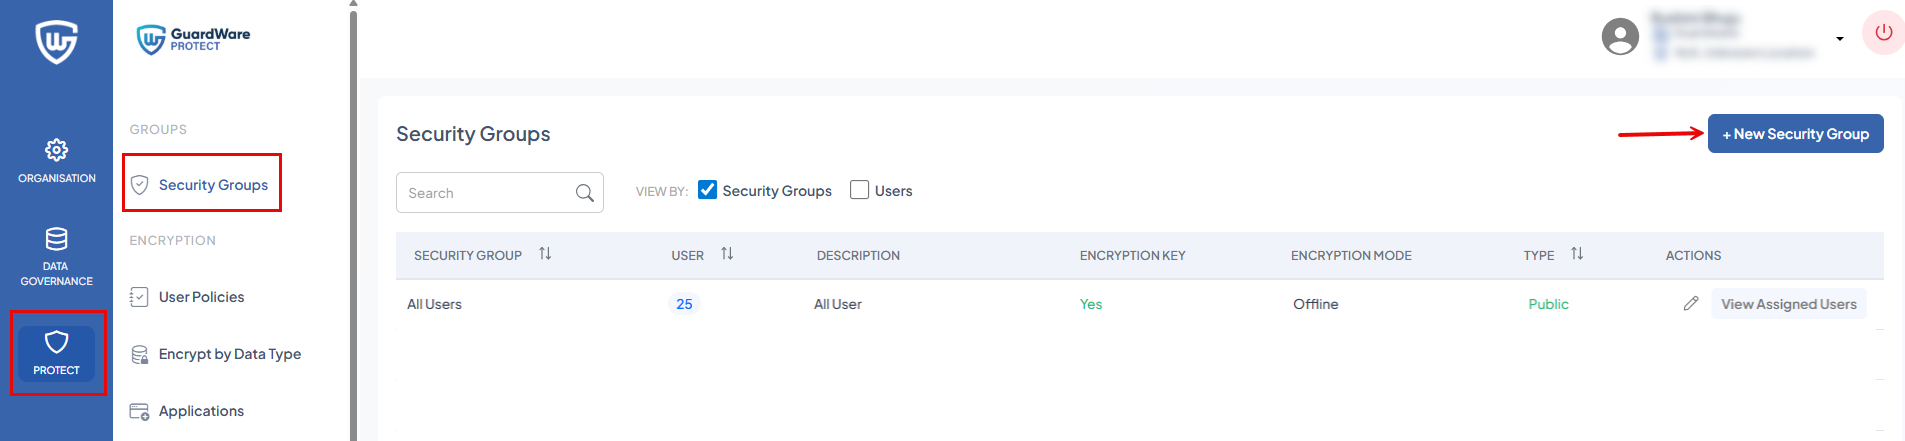
Add a Security Group
-
Log in to the GuardWare PROTECT Management Console.
-
Go to PROTECT > Security Groups.
-
Click +New Security Group. You’ll see an option to create a security group manually or from AD.
-
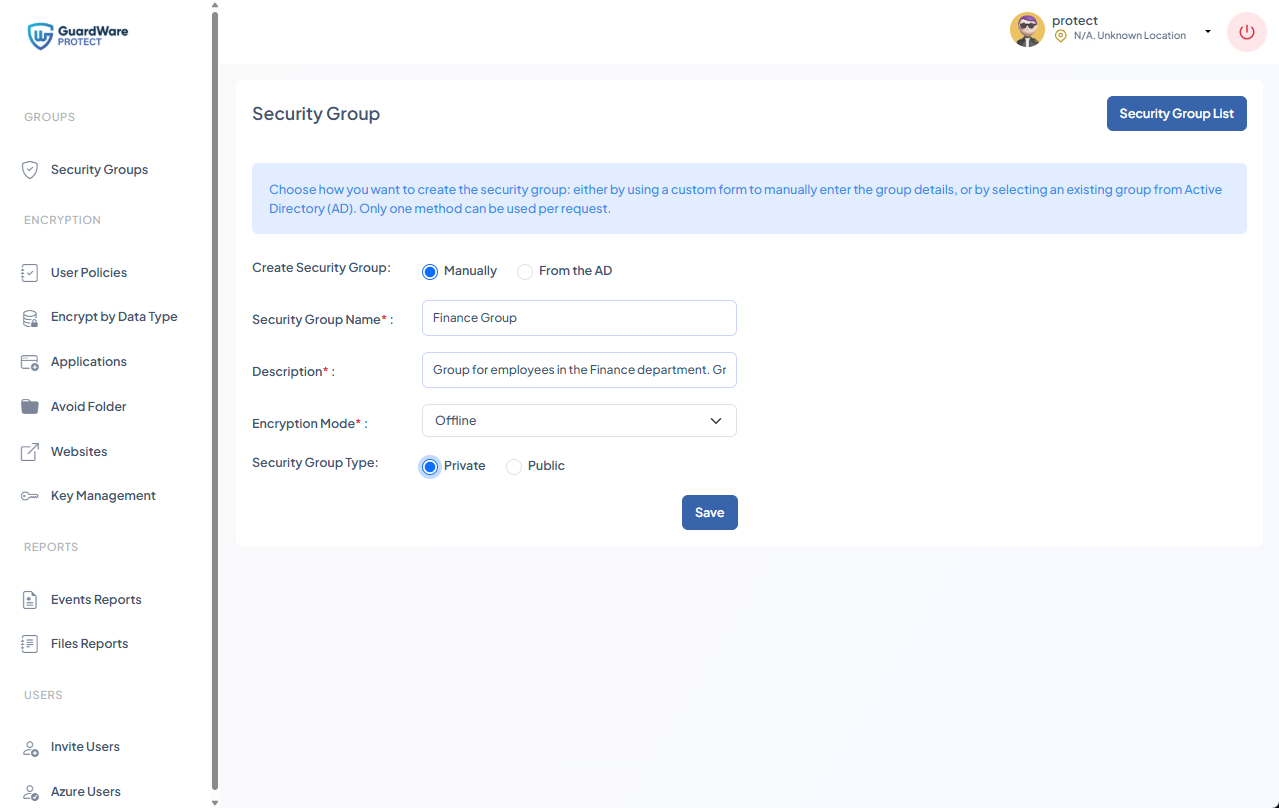
To create manually:
-
Select Manually.
-
In Security Group Name, enter a descriptive name for the group that reflects its purpose.
-
In Description, enter a summary of the group’s role or scope. This helps other administrators understand the intended use.
-
In Encryption Mode, select how files can be decrypted:
-
Online: Decryption is allowed only when the user is connected to the network.
-
Offline: Decryption is allowed even when the user is not connected to the network.
-
-
In Security Group Type, select how membership is managed:
-
Private: Only members and administrators can see the group; it’s hidden from non-members.
-
Public: Visible to all users, and anyone can see the group.
-
-
Click Save.
-
-
To import from AD:
-
Select From the AD.
-
Search for the required AD group. Matching Security Groups appears in the SECURITY GROUPS list.
-
Select the AD group. The selected group appears in the Selected Security Group panel on the right.
-
Click Save.
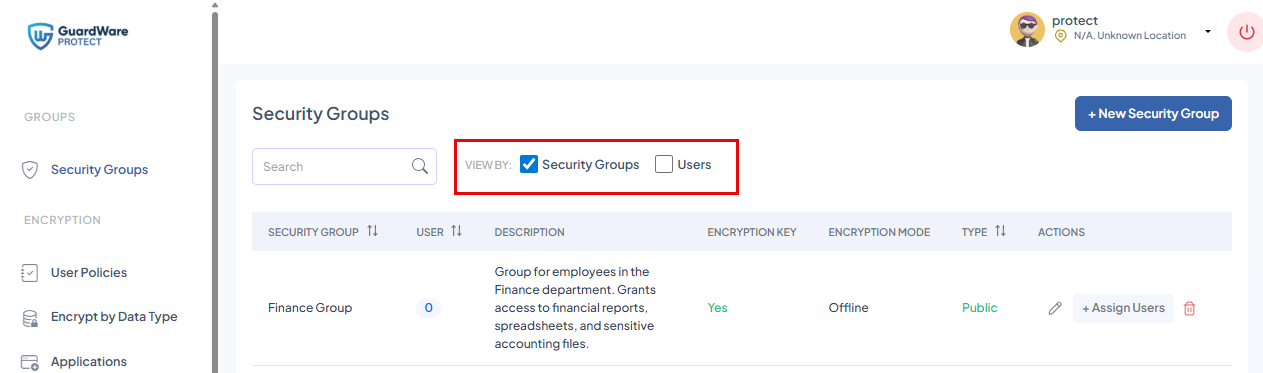
The group will now appear in the Security Group List. You can view the list either by the Group name or by users.
-
Assign Users to Security Group
-
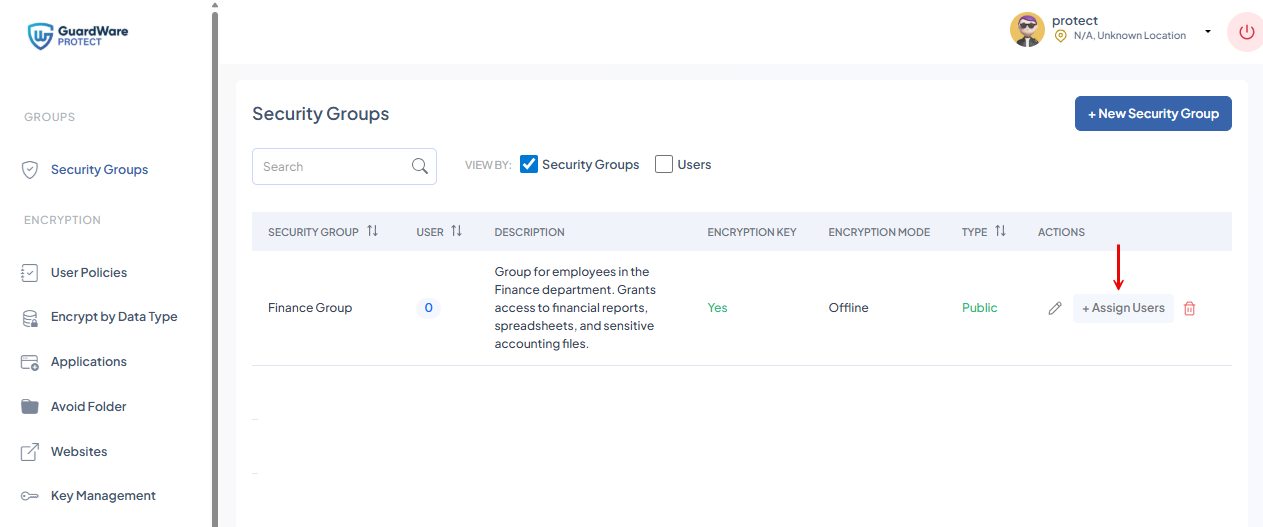
Go to PROTECT > Security Groups.
-
In VIEW BY, select Security Groups.
-
Search for the security group to assign users and click +Assign Users in the ACTIONS column. You’ll see the list of all users, including AD and external users.
External users appear on the list only after they have accepted the invitation, installed GuardWare PROTECT, and logged in successfully. For details on how to invite external users, see Invite Users.
-
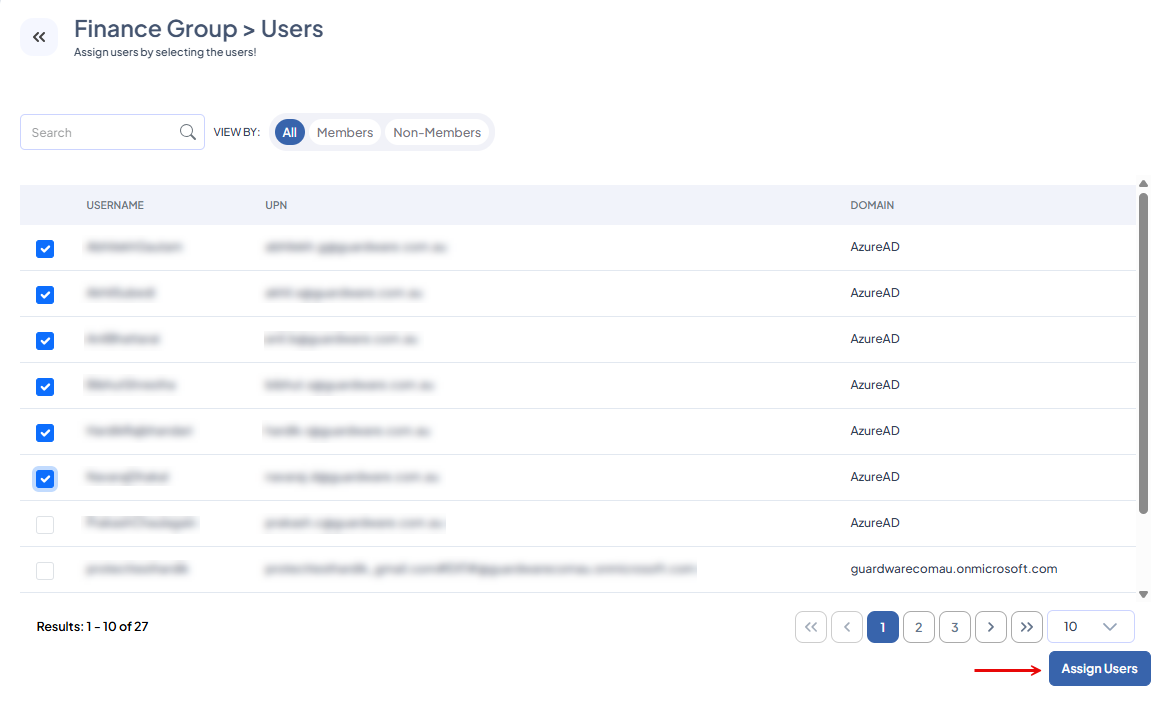
Search and select the users to add, and click Assign Users.
Assign Security Groups to Users
-
Go to PROTECT > Security Groups.
-
In VIEW BY, select Users.
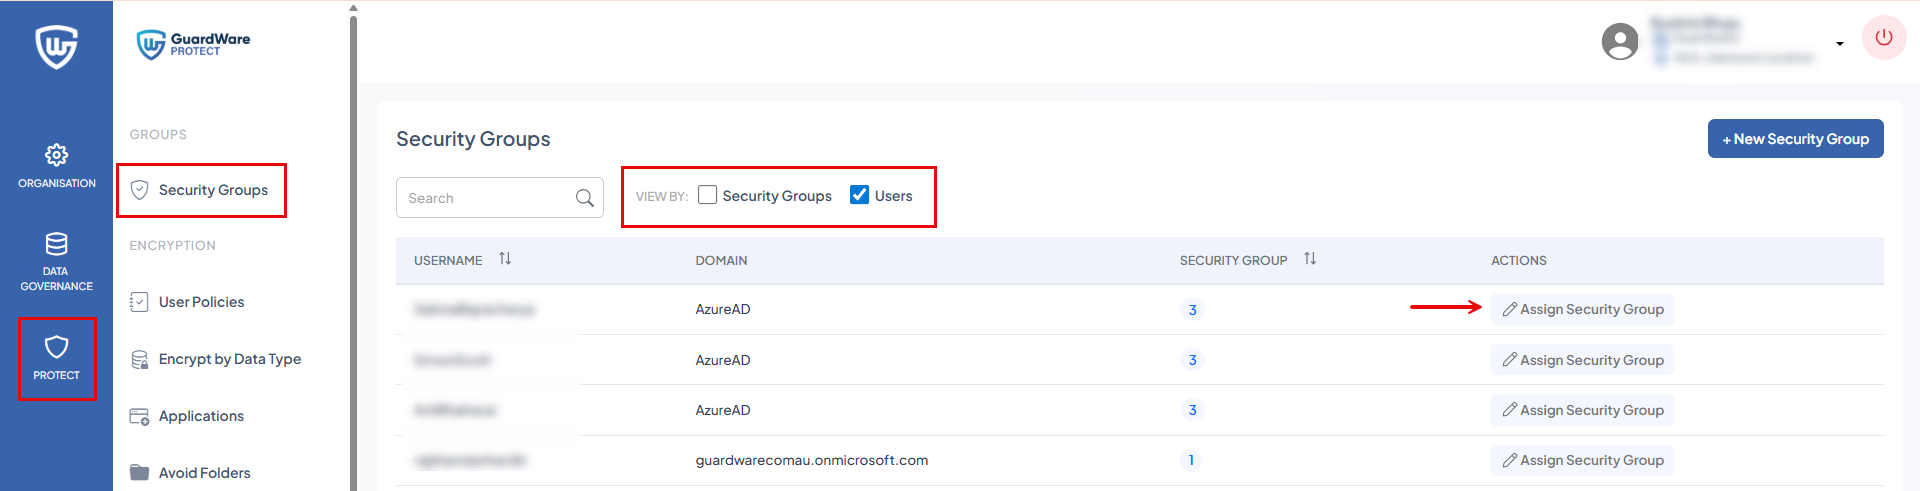
External users appear on the list only after they have accepted the invitation and installed GuardWare PROTECT. For details on how to invite external users, see Invite Users.
-
Search for the user and click Assign Security Group in the ACTIONS column. You’ll see the list of all Security Groups.
-
Select the Security Groups and click Assign Security Group.
Edit a Security Group
-
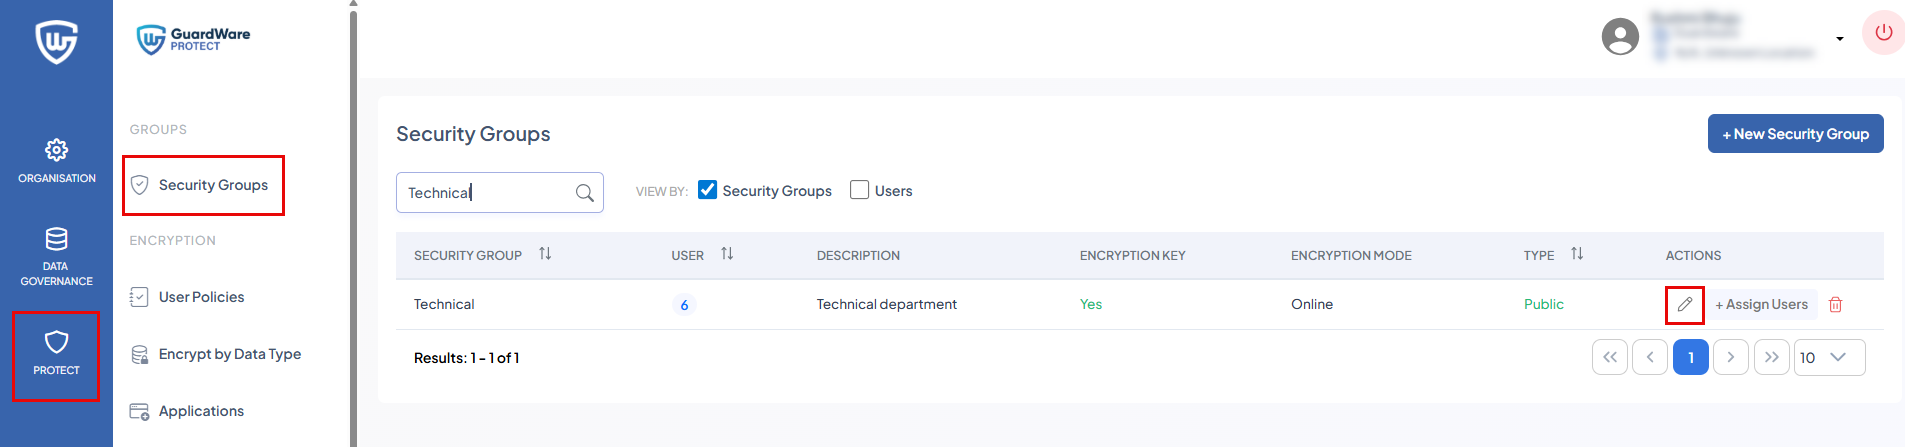
Go to PROTECT > Security Groups and search for the security group to edit.
-
In the ACTIONS column, click the Edit icon.
-
Update the required details and click Save.
Delete a Security Group
-
Go to PROTECT > Security Groups and search for the security group you want to delete.
-
In the ACTIONS column, click the Delete icon.

-
Click Delete in the Alert box to confirm. The group will be permanently removed.

The All Users default group cannot be deleted.
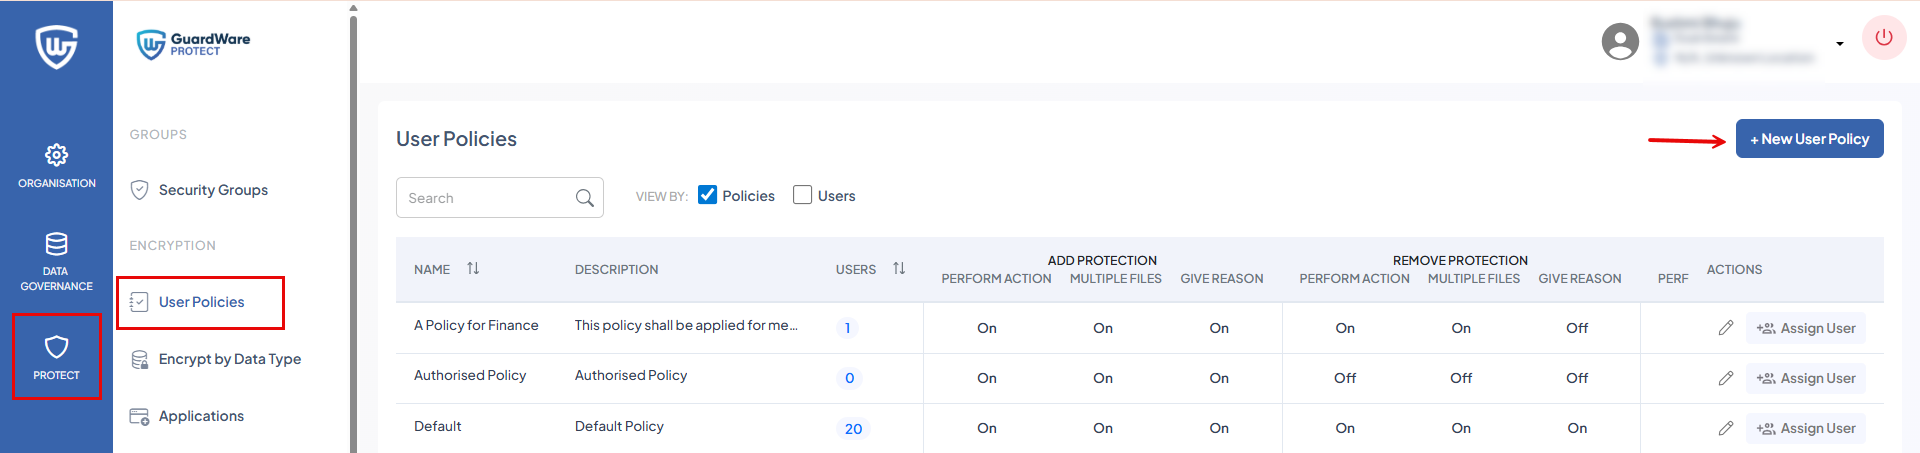
User Policies
User policies determine which features and actions are available in the PROTECT Client, giving administrators control over the end-user experience. These policies define the options that appear in the right-click menu and in dialogs, such as the ability to add file protection to multiple files at once, change or remove file protection, create a ZIP package, etc. Each user can only be assigned one policy at a time.
Any new user who installs GuardWare PROTECT Client and logs in successfully is automatically assigned the Default policy. The Default policy cannot be deleted, but can be edited.
Add a User Policy
Administrators can create custom user policies to align with different roles or departments (e.g., granting more control to IT staff while restricting options for external contractors).
-
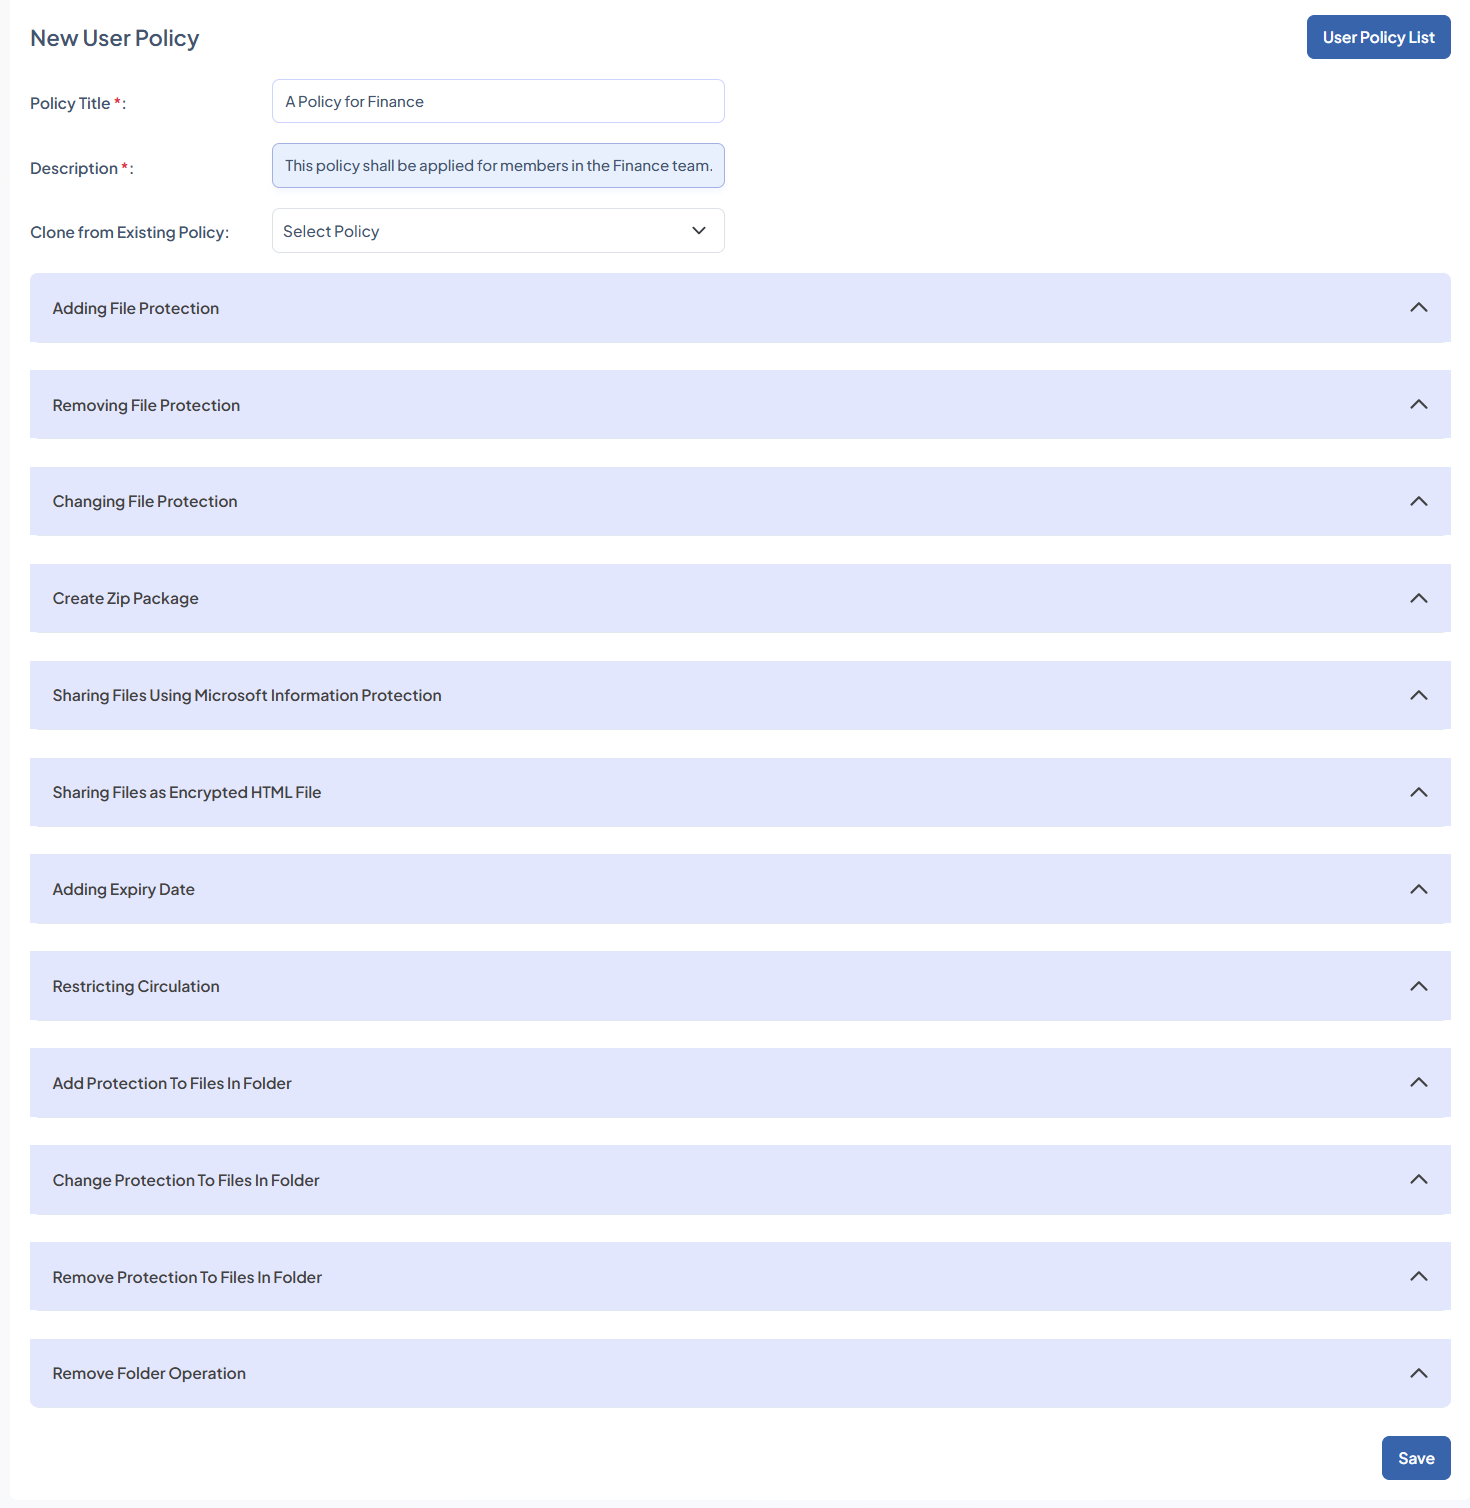
Go to PROTECT > User Policies and click +New User Policy.
-
Enter Policy Title and Description.
-
If you want to duplicate a user policy, select the existing policy from the Clone from Existing Policy dropdown.
-
Select the policies:
-
Adding File Protection
This setting allows users to manually protect files. Users can select a classification label and specify which Security Groups are authorised to access the file.
-
Ability to Add Protection to Unprotected Files: Enable this option to allow users to manually protect individual files.
-
Ability to Add Protection to Multiple Files Simultaneously: Enable this option to allow users to protect multiple files at once.
-
Need to Give Reason for Adding Protection to Unprotected Files: Enable this option if users must provide a justification for adding protection. This helps reviewers understand why the files were protected and supports security audits and compliance requirements.
-
-
Removing File Protection
This setting allows users to remove protection from a file. Removing a file’s protection clears file classification, Security Group restrictions, circulation restrictions, and all other applied protection.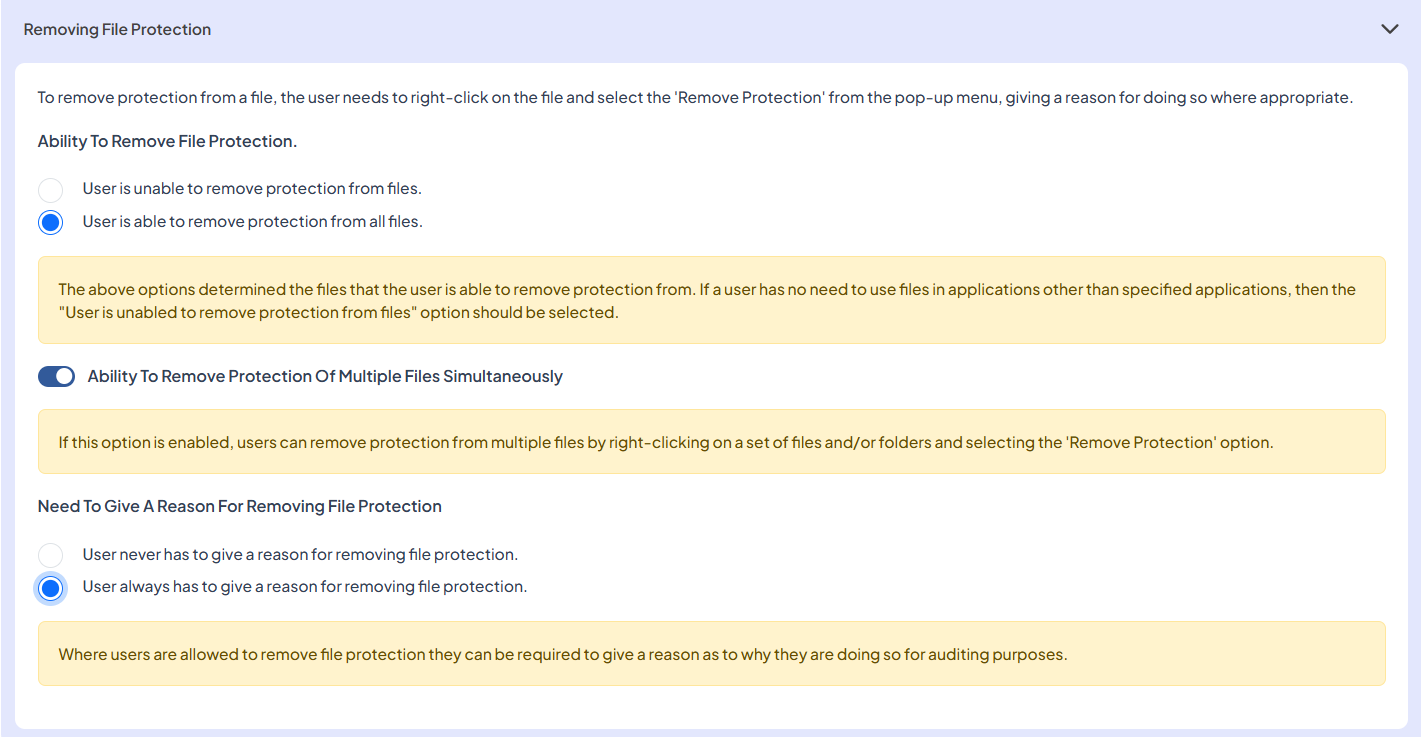
-
Ability to Remove File Protection: Choose whether users are allowed to remove protection from files:
-
User is unable to remove protection from files
Select this option if users should never be able to remove file protection. -
User is able to remove protection from all files
Select this option if users are allowed to remove protection from any file.
-
-
Ability to Remove Protection from Multiple Files Simultaneously
Enable this option if you want users to remove protection from multiple files at once. -
Need to Give a Reason for Removing File Protection
Specify whether a reason is required when users remove protection. This helps reviewers understand why the protection was removed and supports security audits and compliance requirements.-
User never has to give a reason
Select this option if no justification is needed when removing protection. -
User always has to give a reason
Select this option if users must provide a reason for removing protection.
-
-
-
Changing File Protection
This setting allows users to change the protection of a file by modifying the classification of protected files and updating the Security Groups that are allowed to access them.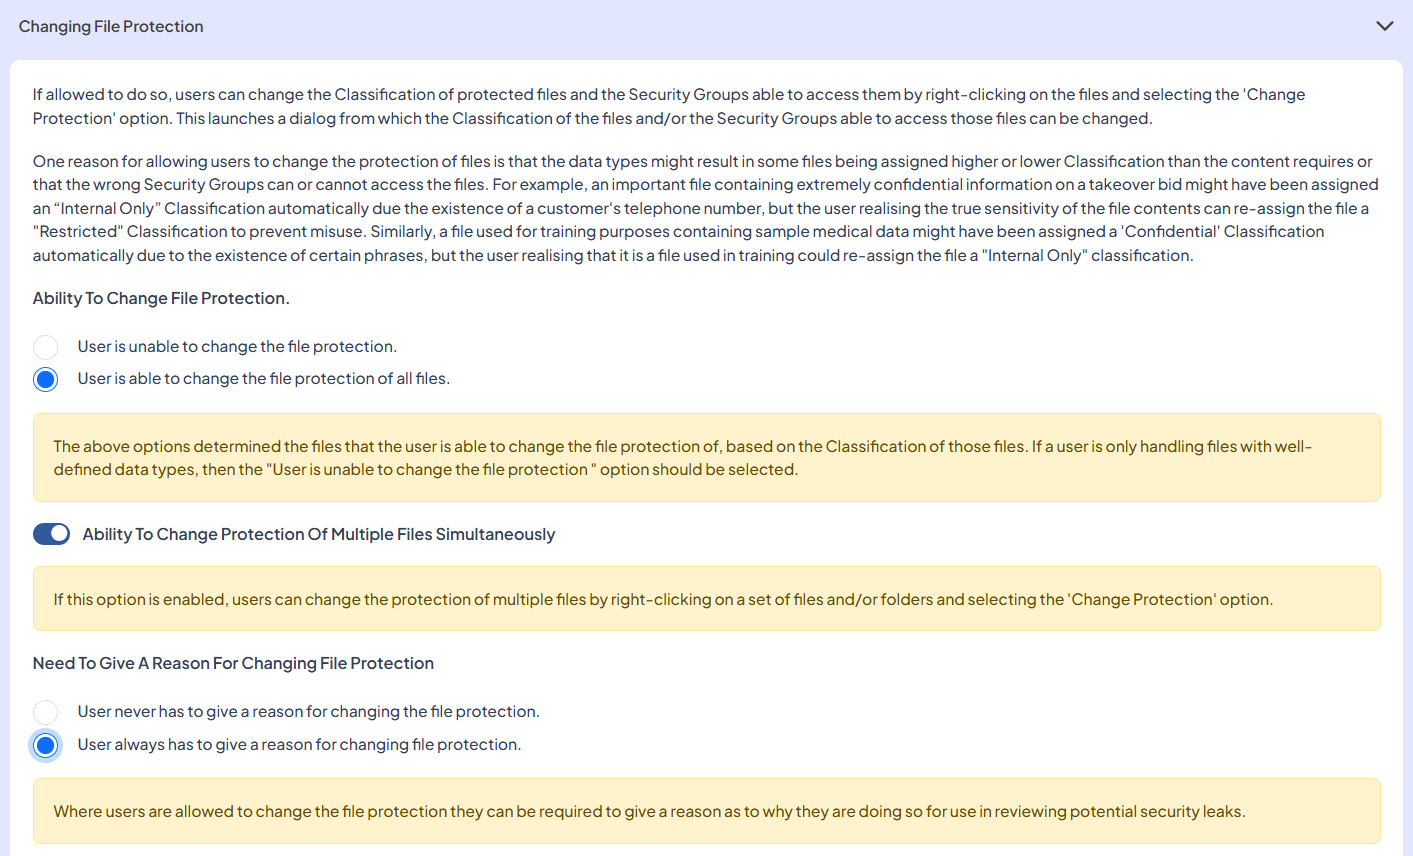
-
Ability to Change File Protection: Select whether users are allowed to modify protection settings:
-
User is unable to change file protection
Select this option if you don’t want to allow users to update the classification or security group settings of any file. -
User is able to change the file protection of all files
Select this option if you want to allow users to modify protection on any protected file.
-
-
Ability to Change Protection of Multiple Files Simultaneously: Enable this option if you want users to update protection for multiple files at once.
-
Need to Give a Reason for Changing File Protection: Specify whether a reason is required when users change protection. This helps reviewers understand why the protection as changed and supports security audits and compliance requirements.
-
User never has to give a reason for changing file protection
Select this option if no justification is required. -
User always has to give a reason for changing file protection
Select this option if the user must provide a reason for applying changes.
-
-
-
Create ZIP Package
This setting allows users to securely share protected files to external recipients who do not have the PROTECT Client installed by creating a password-protected ZIP package.

-
Ability to Package Files: Select whether users are allowed to create ZIP packages:
-
User is unable to package files
Select this option if users are not allowed to share files with third parties by creating ZIP packages. -
User is able to package all files
Select this option to allow users to share files as password-protected ZIP packages.
-
-
Ability to Package Multiple Files: Enable this option if you want to allow users to include multiple files in a single ZIP package.
-
Need to Give a Reason for Packaging Files: Specify whether a justification is required when users create a ZIP package. This helps reviewers understand why the ZIP package was created and supports security audits and compliance requirements.
-
User never has to give a reason for packaging files
Select this option if no reason is required when creating a ZIP package. -
User always has to give a reason for packaging files
Select this option if a reason must be entered for creating a ZIP package.
-
-
-
Sharing Files Using Microsoft Information Protection (MIP)
This setting allows users to securely share protected files by using Microsoft Information Protection (MIP) with recipients who do not have the PROTECT Client installed.
When a file is shared using this option, PROTECT’s protection is temporarily removed and replaced with Microsoft Information Protection.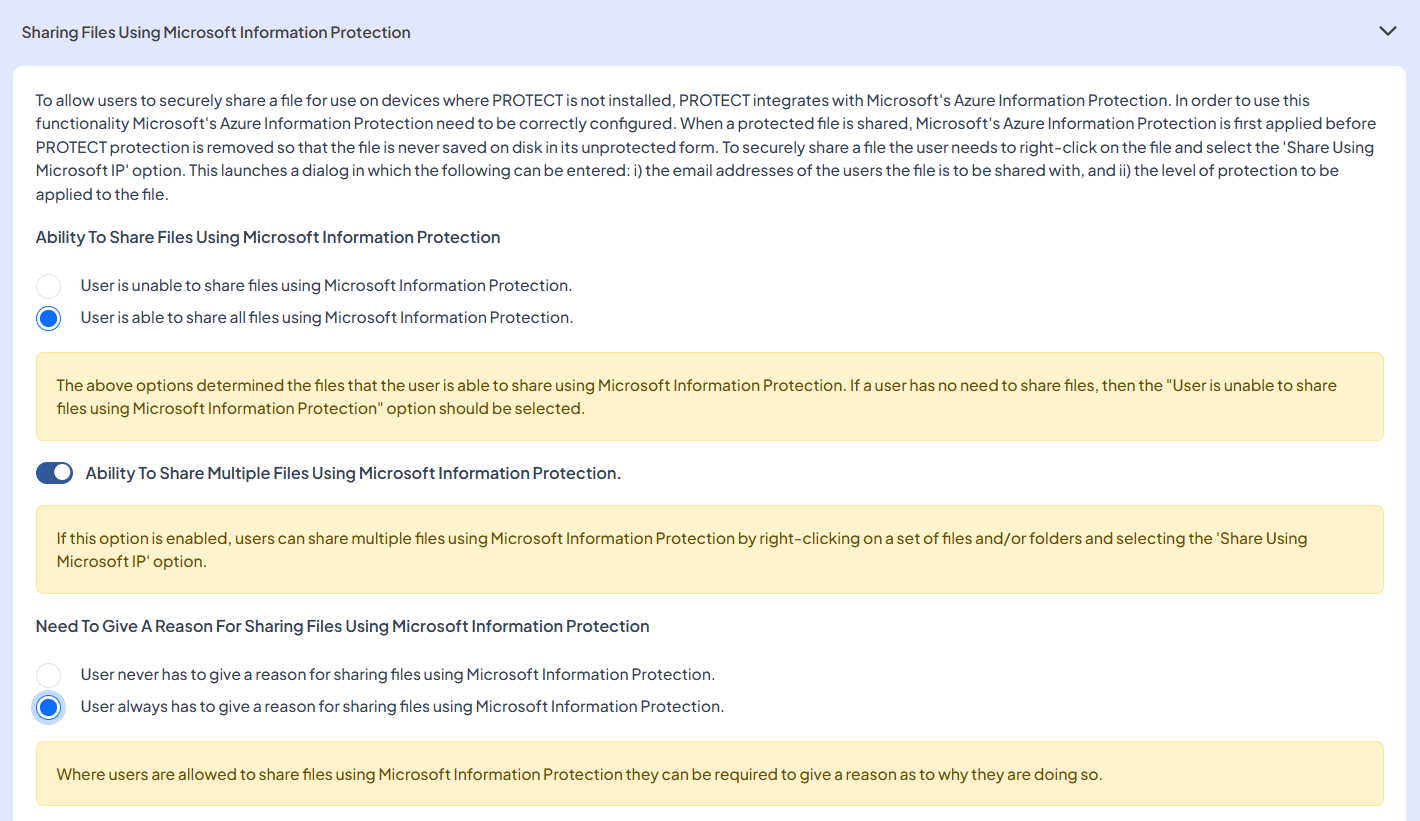
-
Ability to Share Files Using Microsoft Information Protection: Choose whether users are allowed to share files using MIP:
-
User is unable to share files using Microsoft Information Protection
Select this if users should not be able to share files via MIP. -
User is able to share all files using Microsoft Information Protection
Select this if users are allowed to share protected files using MIP.
-
-
Ability to Share Multiple Files Using Microsoft Information Protection: Enable this option to allow users to share multiple files at once.
-
Need to Give a Reason for Sharing Files Using Microsoft Information Protection: Choose whether users must provide a justification when sharing files. This helps reviewers understand why the files were shared using MIP and supports security audits and compliance requirements.
-
User never has to give a reason
Select this option if no reason is required when sharing files using MIP. -
User always has to give a reason
Select this option if users must enter a reason when sharing files using MIP.
-
-
-
Sharing Files as Encrypted HTML File
This setting allows users to convert protected MS Office files and PDFs into password-protected HTML files for secure external sharing. This keeps the original file unchanged while applying password-based access control for secure external sharing.
-
Ability to Share Files as Password-Protected HTML File: Choose whether users are allowed to export protected files as secure HTML:
-
User is unable to share files as password-protected HTML file
Select this option if HTML export should be disabled for all users. -
User is able to share all files as password-protected HTML file
Select this option to allow users to create secure HTML exports.
-
-
Ability to Share Multiple Files as Password-Protected HTML File: Enable this option to allow users to export multiple files at once.
-
Need to Give a Reason for Sharing Files as Encrypted HTML File: Choose whether users must provide a justification. This helps reviewers understand why HTML file was created and supports security audits and compliance requirements.
-
User never has to give a reason
Select this option if no reason is required when sharing files using secure HTML. -
User always has to give a reason
Select this option if a reason must be entered for generating secure HTML.
-
-
-
Adding Expiry Date
This setting allows users to restrict access to a protected file after a specific expiry date. After the expiry date, no users, including the one who set the expiry, can access the file.
Note: The device must be able to connect to the PROTECT server for the expiry policy to take effect.
-
Ability to Add an Expiry Date to Files: Decide whether users are allowed to set expiry dates:
-
User is unable to add an expiry date to files
Choose this option if expiry control should not be available. -
User is able to add an expiry date to all files
Choose this option to allow users to set expiry dates on any protected file.
-
-
Need to Give a Reason for Adding an Expiry Date: Choose whether users must provide a justification when applying an expiry date. This helps reviewers understand why the expiry date was added and supports security audits and compliance requirements.
-
User never has to give a reason
Select this option if no explanation is required for adding an expiry date. -
User always has to give a reason
Select this option if a reason must be entered for adding an expiry date.
-
-
-
Restricting Circulation
This setting allows users to prevent other users from expanding access by adding Security Groups. Once circulation is restricted, no one, including users with access, can add new Security Groups or expand who can open the file. This ensures that only the original file owner retains full control over sharing and access.-
Ability to Restrict the Circulation of Files: Choose whether users can apply circulation restrictions:
-
User is unable to restrict the circulation of files
Select this option if users should not be allowed to restrict access permissions. -
User is able to restrict the circulation of all files
Select this option if users are allowed to prevent others from modifying file access.
-
-
Need to Give a Reason for Restricting the Circulation of Files: Choose whether users must provide a justification when applying a circulation restriction. This helps reviewers understand why the circulation was restricted and supports security audits and compliance requirements.
-
User never has to give a reason
Select this option if no explanation is required for restricting circulation. -
User always has to give a reason
Select this option if a reason must be entered for restricting circulation.
-
-
-
Add Protection to Files in Folder
This setting enables automatic protection to be applied to any unprotected files that are moved or copied into a specific folder. Once enabled, users do not need to manually apply protection to files; the system will do it automatically when a file enters the folder.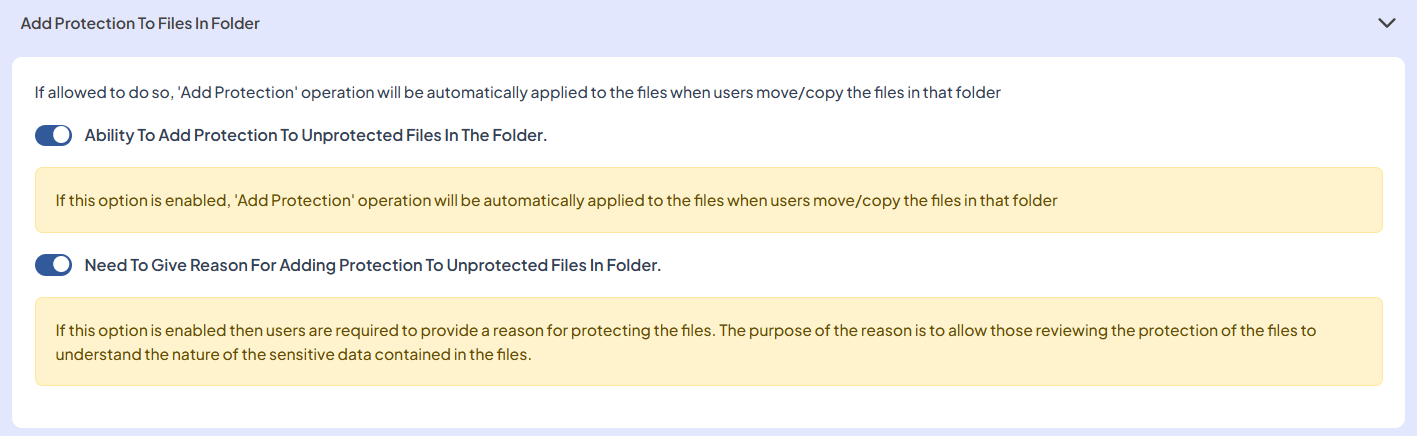
-
Ability to Add Protection to Unprotected Files in the Folder: Enable this option if you want automatic protection enforcement. When enabled, any unprotected file moved or copied into the folder will automatically have protection applied.
This option is useful when a folder is designated as a secure storage area for confidential files.
-
Need to Give a Reason for Adding Protection to Unprotected Files in Folder: Enable this option if users must provide a justification when this setting is applied. This helps reviewers understand why the files were protected and supports security audits and compliance requirements.
-
-
Change Protection Added to Files In Folder
This setting enables automatic protection changes to be applied to files when they are moved or copied into a specific folder. It ensures that any file placed in the folder automatically inherits the folder’s defined protection rules, such as updated classification or security group settings, without requiring manual action from the user.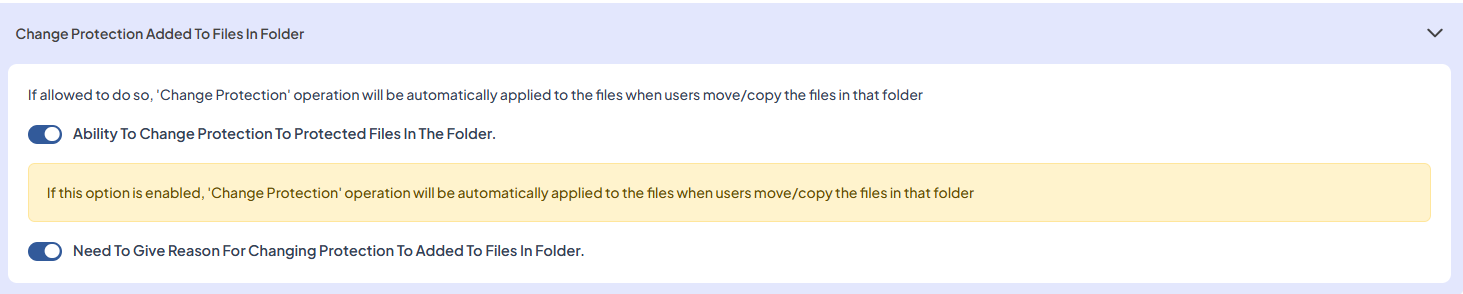
-
Ability to Change Protection to Protected Files in the Folder: Enable this option if you want PROTECT to automatically apply the folder’s protection settings to any files moved or copied into the folder.
-
Need to Give a Reason for Changing Protection to Added Files in Folder: Enable this option if users must provide a justification when this setting is applied. This helps reviewers understand why the protection settings were altered and supports security audits and compliance requirements.
-
-
Remove File Protection
This setting enables automatic removal of protection from files when they are moved or copied into a specific folder. It is useful in scenarios where a designated folder is intended for storing or processing files in an unprotected state, for example, for internal reviews, temporary editing, or reclassification.
-
Ability to Remove Protection to Protected Files in the Folder: Enable this option to allow automatic removal of protection from files moved or copied into the folder.
-
Need to Give a Reason for Removing Protection from Files in Folder: Enable this option if users must provide a justification when applying this setting. This helps reviewers understand why the protection settings were altered and supports security audits and compliance requirements.
-
-
Disable Folder Rules
This setting allows users to remove all automated protection rules and actions previously applied to a specific folder. When this option is enabled, all existing folder-level operations, such as automatic Add Protection, Change Protection, or Remove Protection, will be deleted. However, the existing files in the folder remain unchanged. This will remove protection from the folder only, not from the files it contains.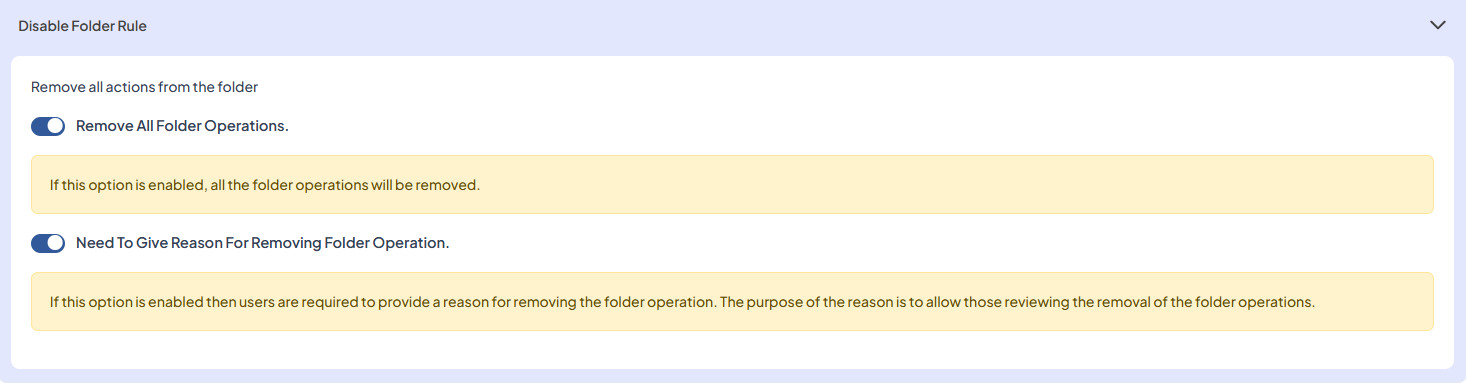
-
Remove All Folder Operations: Enable this option to remove all folder-level protection and automation rules.
-
Need to Give a Reason for Removing Folder Operation: Enable this option if users must provide a justification when this setting is applied. This helps reviewers understand why the protection settings were altered and supports security audits and compliance requirements.
-
-
Edit User Policy
-
Go to PROTECT > User Policies.
-
Search for the policy to edit and click the Edit icon under ACTIONS.
-
Update the policy and click Save.
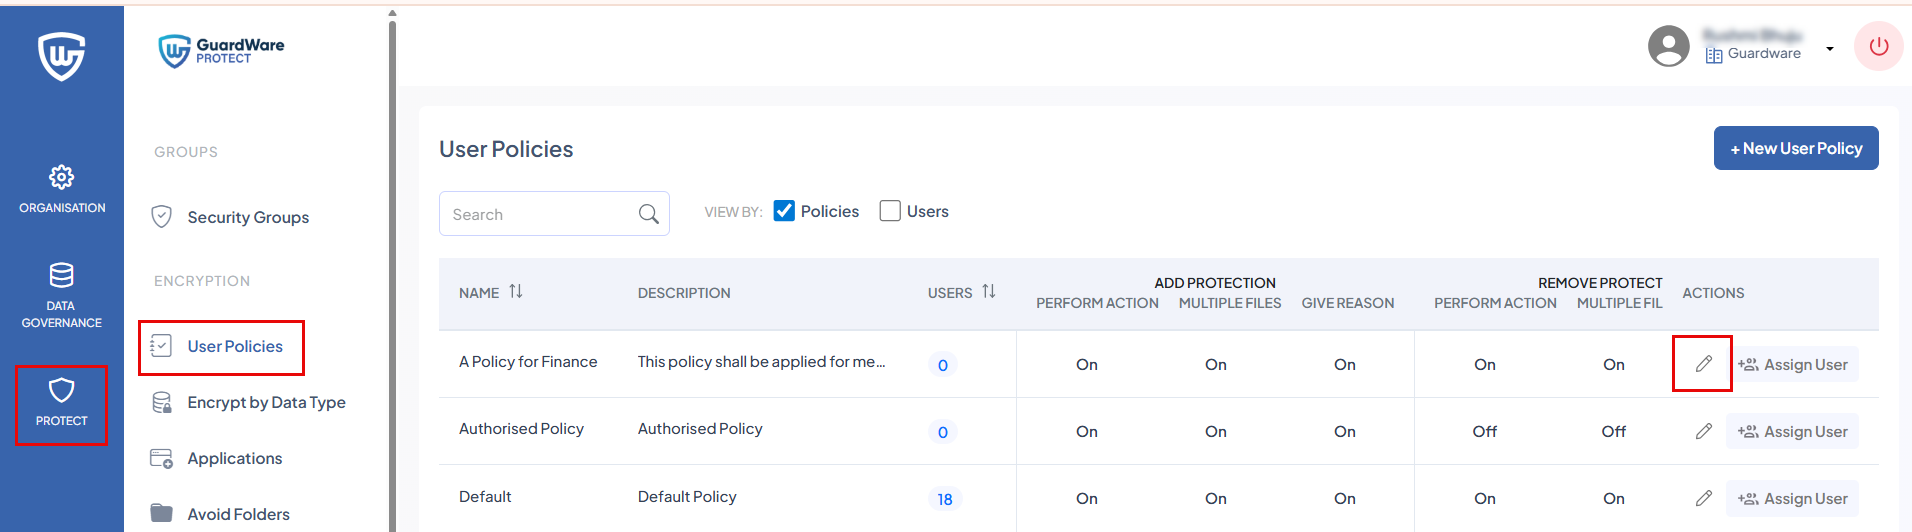
Assign Users to User Policy
-
Go to PROTECT > User Policies.
-
Search for the policy to assign and click Assign User under ACTIONS.

-
Search and select the users you want to assign the policy to, and click Assign Users. If the user already has a policy, it is replaced with the new one.

-
Click Ok in the Alert.
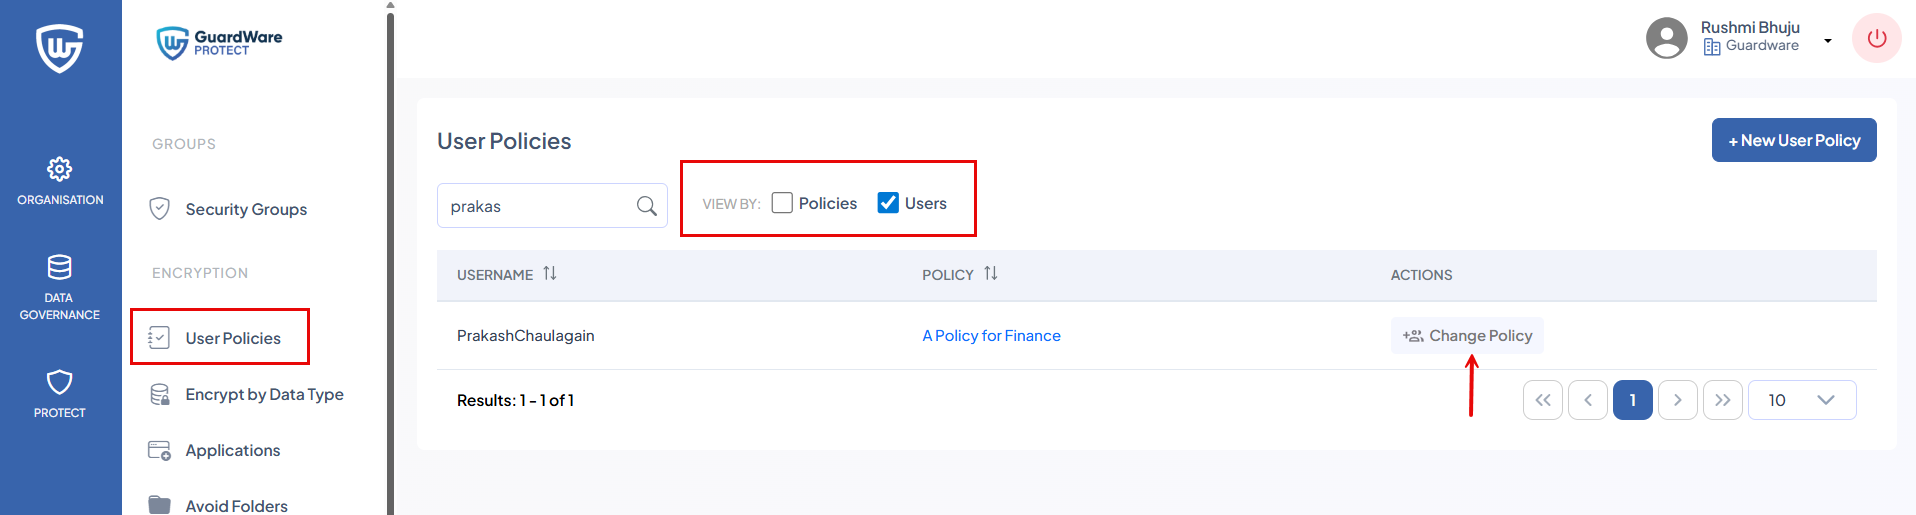
Change User’s Policy
-
Go to PROTECT > User Policies.
-
In VIEW BY, select Users.
-
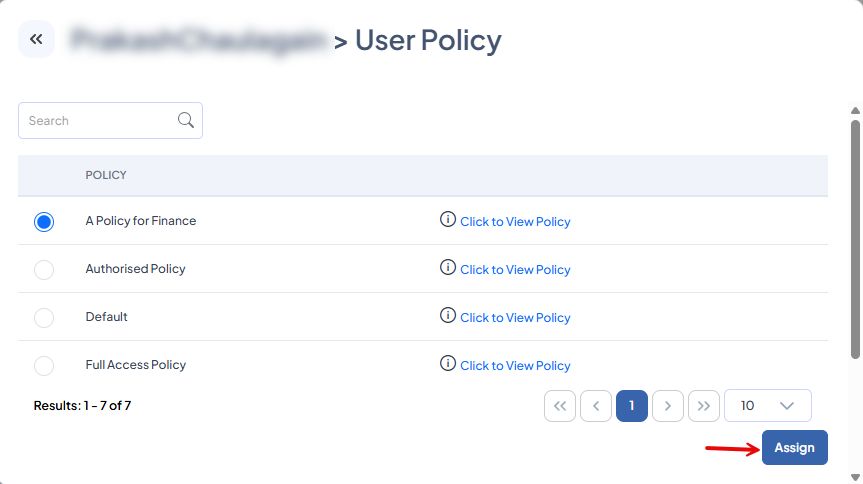
Search and select the user whose policy you want to change, and click Change Policy.
-
Select the new policy and click Assign.
Encrypt by Data Type
A Data Type defines the kind of information PROTECT recognises as sensitive, such as personal details, financial data, or confidential business information. For details on Data Type, see here.
This section defines whether PROTECT automatically protects files based on their contents or the location where they are stored.
PROTECT identifies sensitive files through:
-
Sensitive Words
-
Regular Expressions
-
Filename Expressions)
Once a match is found, PROTECT encrypts the file according to the Data Type’s assigned Classification.
You must assign Security Groups to each Data Type to control who can access or decrypt the files that match that Data Type.
1. Sensitive Words
PROTECT scans files for pre-defined sensitive keywords or phrases. If any of the words or phrases are detected, PROTECT automatically encrypts the file.
Example:
-
Data Type: Payroll Documents
-
Data Identifier: Sensitive Words
-
Phrases: PAYSTUB
In this example, if PROTECT finds the word PAYSTUB in any file, the file is automatically encrypted.
2. Regular Expression
Regular expressions are used to detect structured data patterns such as credit card numbers or identification numbers. If PROTECT finds a matching pattern, it automatically encrypts the file.
Example:
-
Data Type: Card Number Regex
-
Data Identifier: Regular Expression
-
Expression: (?:\d[ -]*?){13,19}
In this example, if a file contains a number that matches this pattern, PROTECT encrypts it.
3. Filename Expression
PROTECT can automatically encrypt files based on their folder paths or file-name patterns. These expressions can include:
-
Folder expression: Encrypt files stored in a specific directory or path.
-
File expression: Encrypt files that match certain naming patterns, regardless of where they are saved.
When a user creates, moves, or saves a file that matches any defined Filename Expression, PROTECT applies encryption even if the file content does not contain sensitive words or detection patterns.
Examples:
-
Folder expression:
*\Desktop\*\Confidential\*
*\Desktop\Confidential\*
\\192.168.0.5\Public\PROTECT\Confidential\*
In this example, any file stored in or moved to a folder path containing the word “Confidential”, whether on a local desktop or network location, will be automatically encrypted by PROTECT. -
File expression:
*_salary.xlsx
In this example, any file that ends with “_salary.xlsx”, no matter where it is saved, will be automatically encrypted.
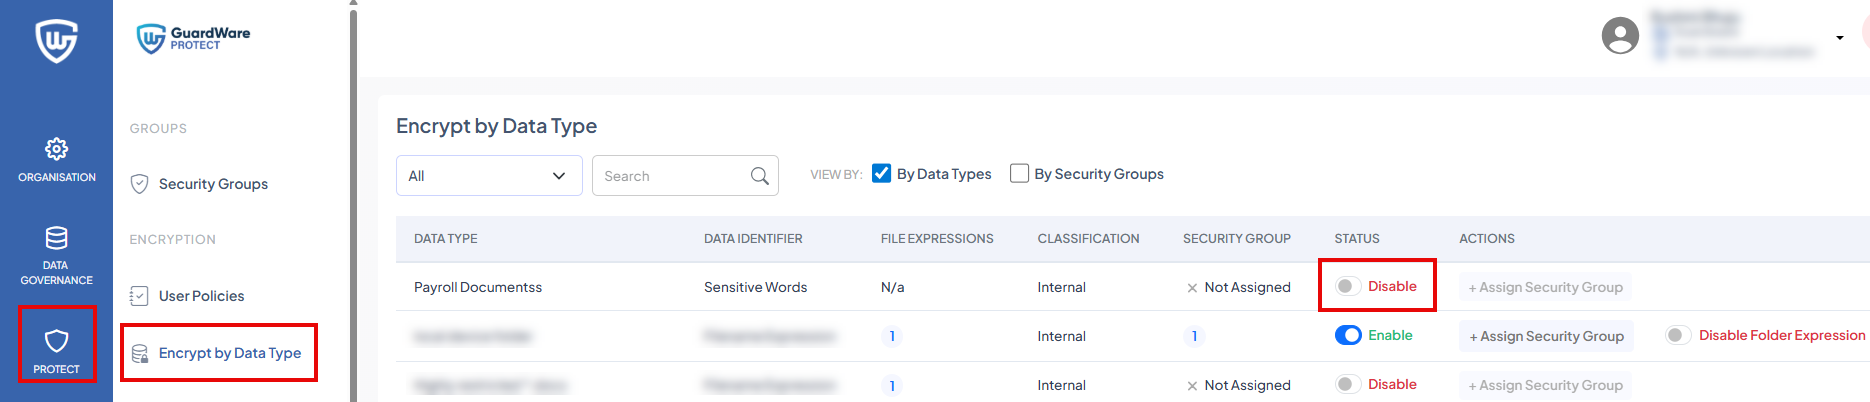
Assign Security Group to a Data Type
-
Go to PROTECT > Encrypt by Data Type. You’ll see a list of Data Types (both pre-defined and custom).
-
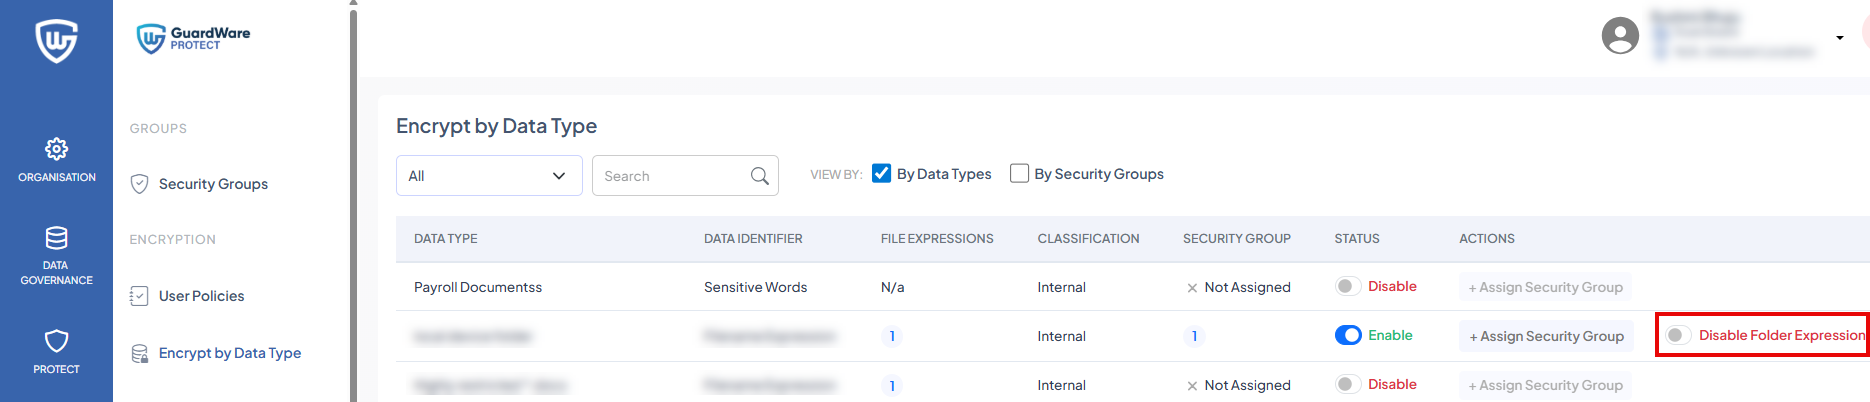
Search for the Data Type you want to assign and enable the data type from the STATUS column. You’ll only be able to assign Security Groups once the Data Type is enabled.
-
For Filename Expression, if folder expression is not required, you can disable it using Disable Folder Expression, while still keeping file expression active. For details on folder expression, see Filename Expression.
-
Click +Assign Security Group in the ACTIONS column.

-
Search for and select the Security Groups and click Assign Security Group. Only the assigned Security Group members can access the protected files.

Assign Data Type to a Security Group
-
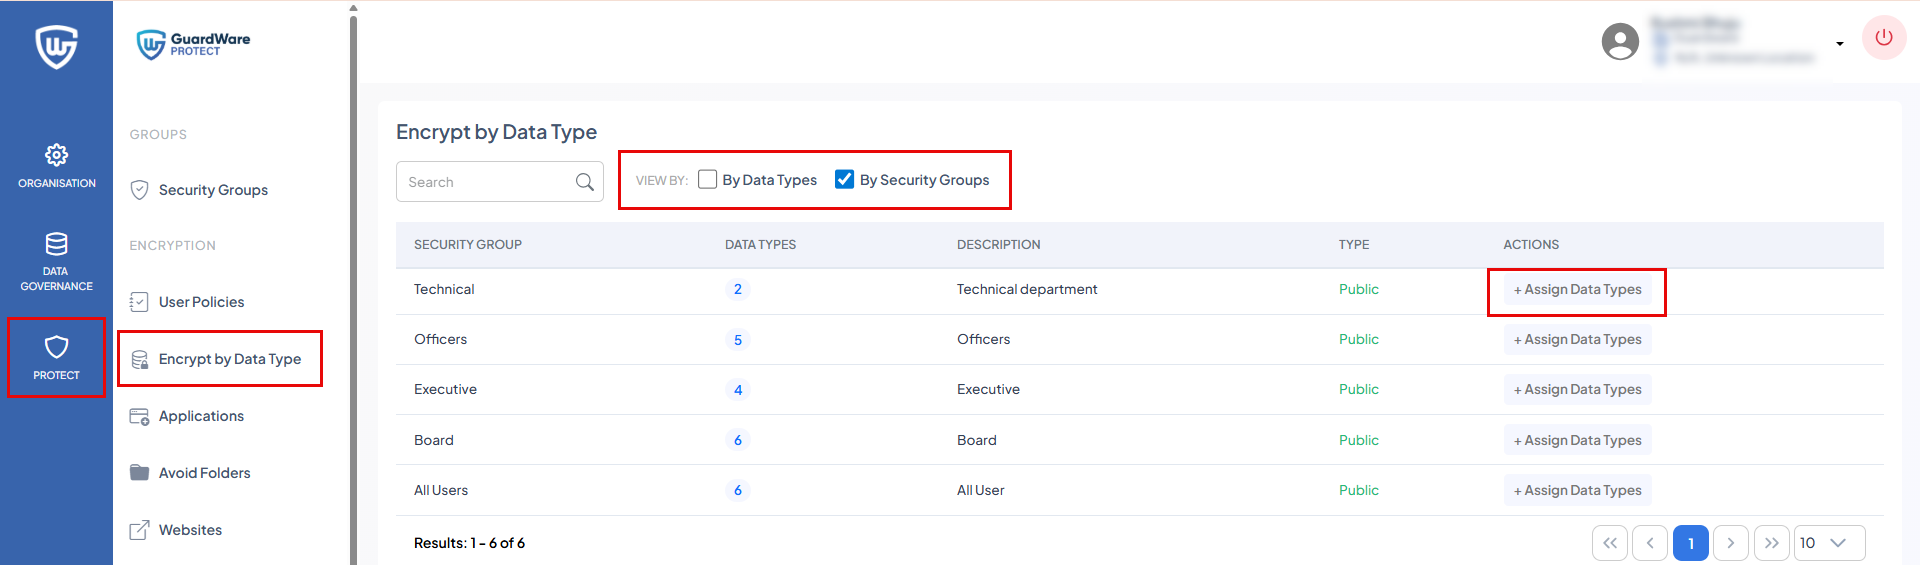
Go to PROTECT > Encrypt by Data Type. You’ll see a list of pre-defined Data Types.
-
In VIEW BY, select By Security Groups.
-
Search for the Security Group you want to assign and click +Assign Data Types in the ACTIONS column.
-
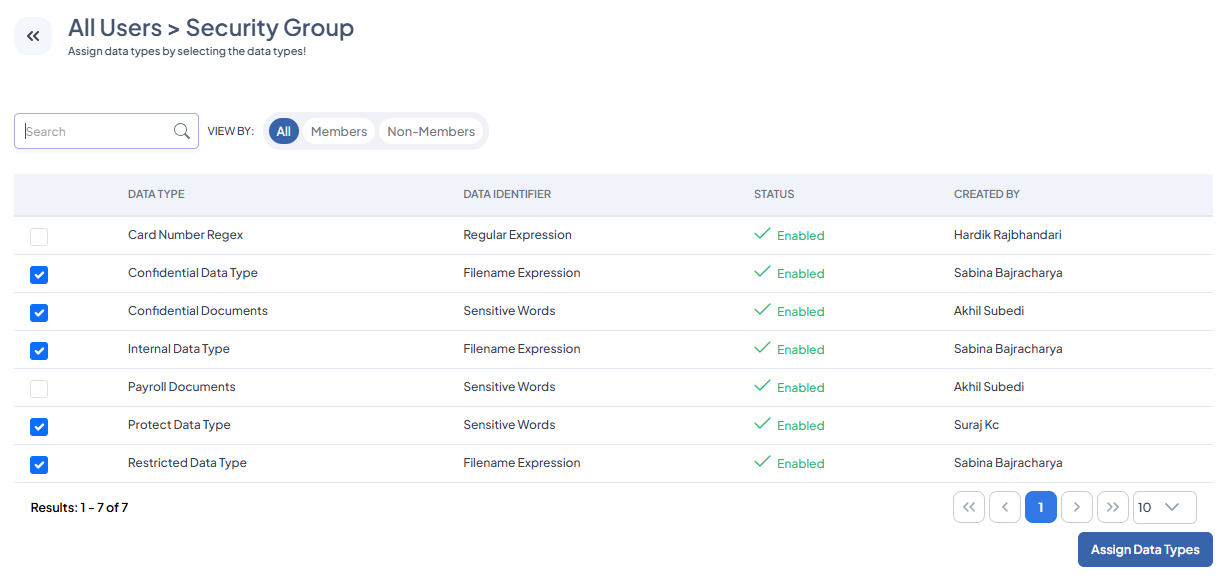
Search for and select the Data Types and click Assign Data Types. Only the assigned Security Group members can access the protected files.
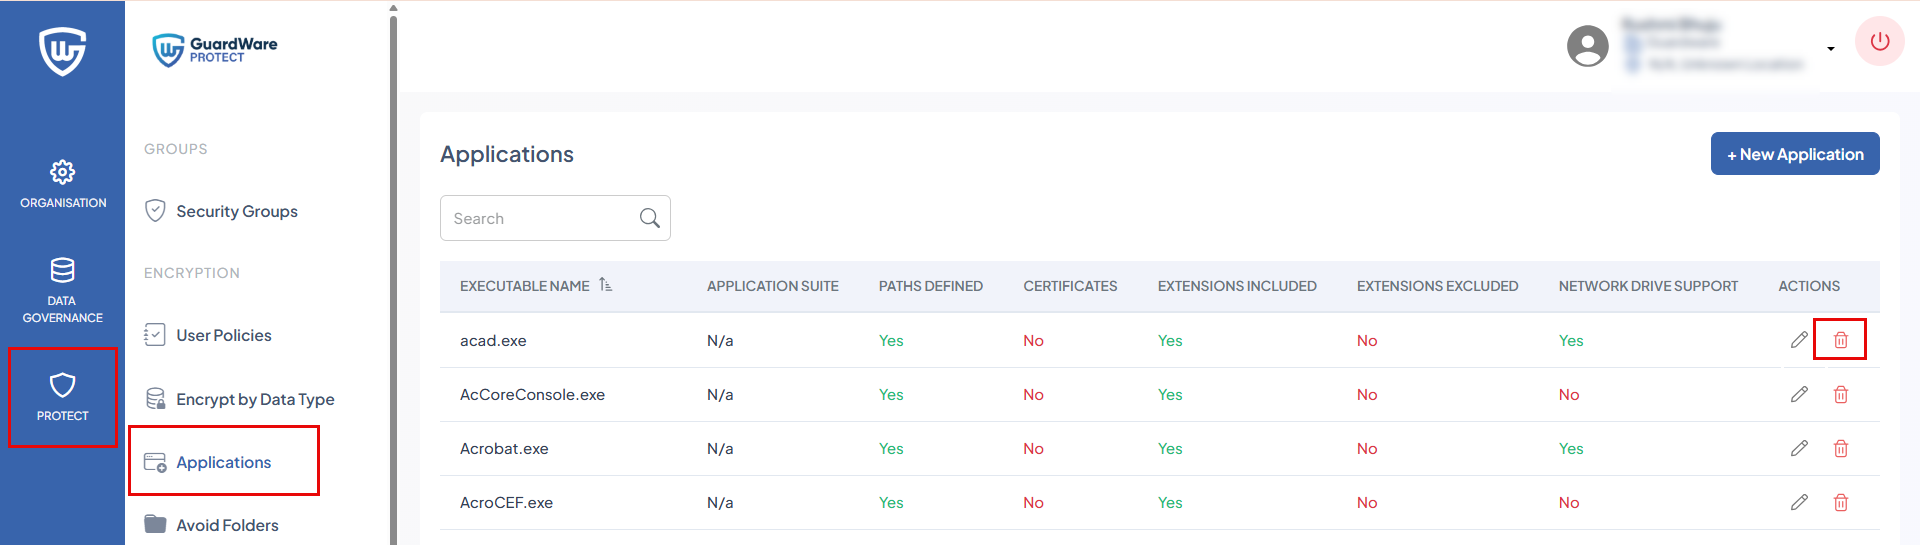
Applications
The Applications section defines which applications can open, edit, and save protected files. These applications ensure PROTECT can encrypt files when users save or export them in different formats. This ensures only approved applications can access or modify protected content.
Add an Application
-
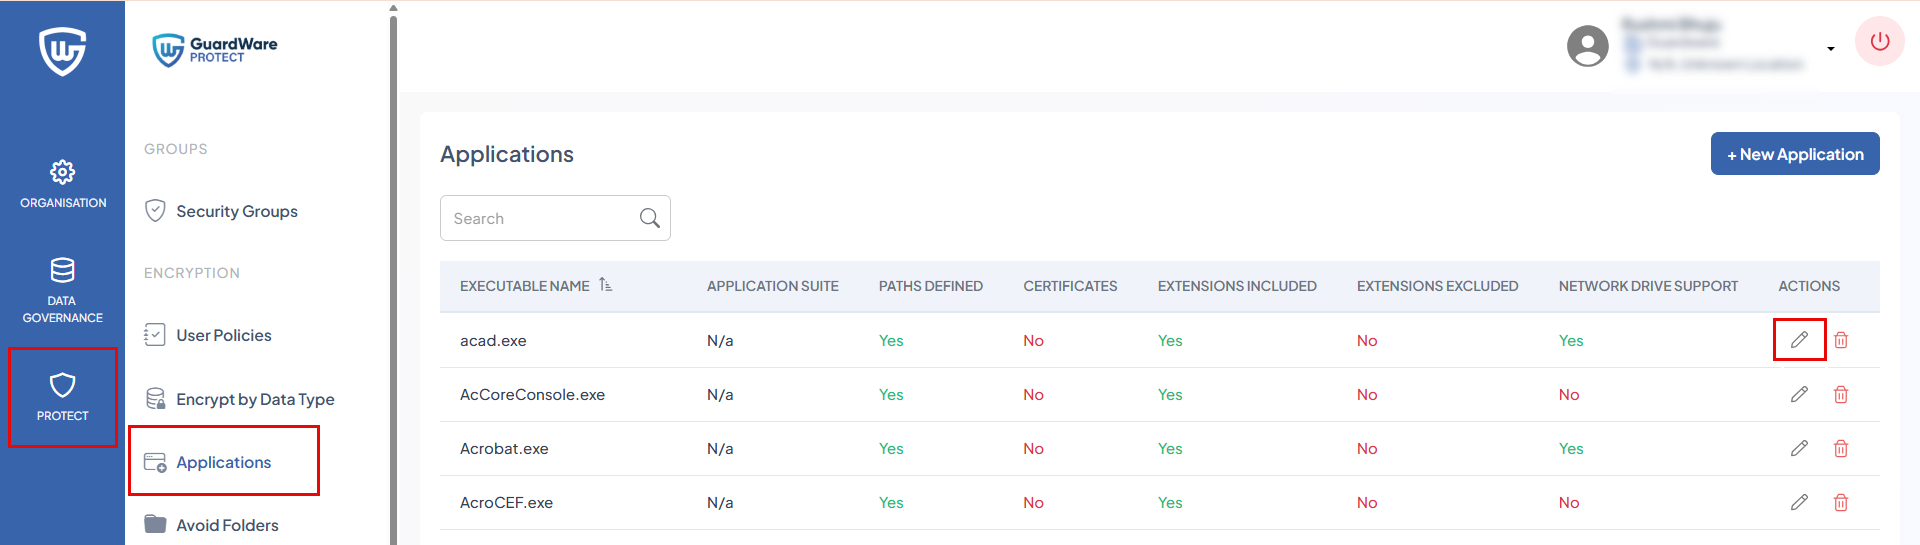
Go to PROTECT > Applications. The page displays the list of registered applications and allows adding or editing applications.
-
Click +New Application.

-
In Executable Name, enter the executable file name (e.g.,
winword.exe,acad.exe) of the application you want to register. This defines which program is authorised to access encrypted files. -
In Application Suite, specify the suite or category the application belongs to (e.g., Microsoft Office, Adobe, AutoCAD). This helps group related applications for easier management.
-
In Folder Path, enter the path substring if the executable resides in a specific location. (e.g.,
C:\Program Files\Microsoft Office).
Click + to add the folder path to the selected list. The selected paths appear under Folder Path Selected on the right.
-
In Extensions that are encrypted/decrypted, define which file types the application can encrypt and decrypt securely. Choose one of the following options:
-
All Extensions
The application can encrypt/decrypt all files regardless of their extension. -
All but these extensions
The application can encrypt/decrypt all files except those with the specified extensions.
For example, if you enter.docx, .cad, the application will encrypt/decrypt all other file types except these two. -
Only these extensions
The application can only encrypt/decrypt the file types listed here.
For example, if you add.docx,.xls,.ppt, the application will encrypt/decrypt only these extensions.
Click + to add each extension to the list.
-
-
Enable Network Drive Support if the application needs to access encrypted files stored on network drives (shared folders or mapped drives).
-
Click Save.
The application will appear in the Application List and will be allowed to encrypt or decrypt files securely based on your configuration.
Edit an Application
-
Go to PROTECT > Applications.
-
Search for the application to edit and click the Edit icon in the ACTIONS column.
-
Update the necessary information and click Save.
Delete an Application
-
Go to PROTECT > Applications.
-
Search for the application to delete and click the Delete icon in the ACTIONS column.
-
Click Delete in the Confirmation Alert.
Avoid Folders
The Avoid Folders section lets you define directories that can be excluded from encryption.
Files stored in these folders will not be encrypted by PROTECT, even if they include sensitive words or match any pre-defined Data Type.
Use this feature carefully to avoid accidental exposure of sensitive data.
Add a Directory to Exclude
-
Go to PROTECT > Avoid Folders.
-
Click +New Directory.

-
In Title, enter a name for this exclusion rule. Example: Accounting Temp Folder.
-
In Directory, enter the full directory path that should be excluded from encryption.
Example:
C:\Users\Public\AccountingTemp\
-
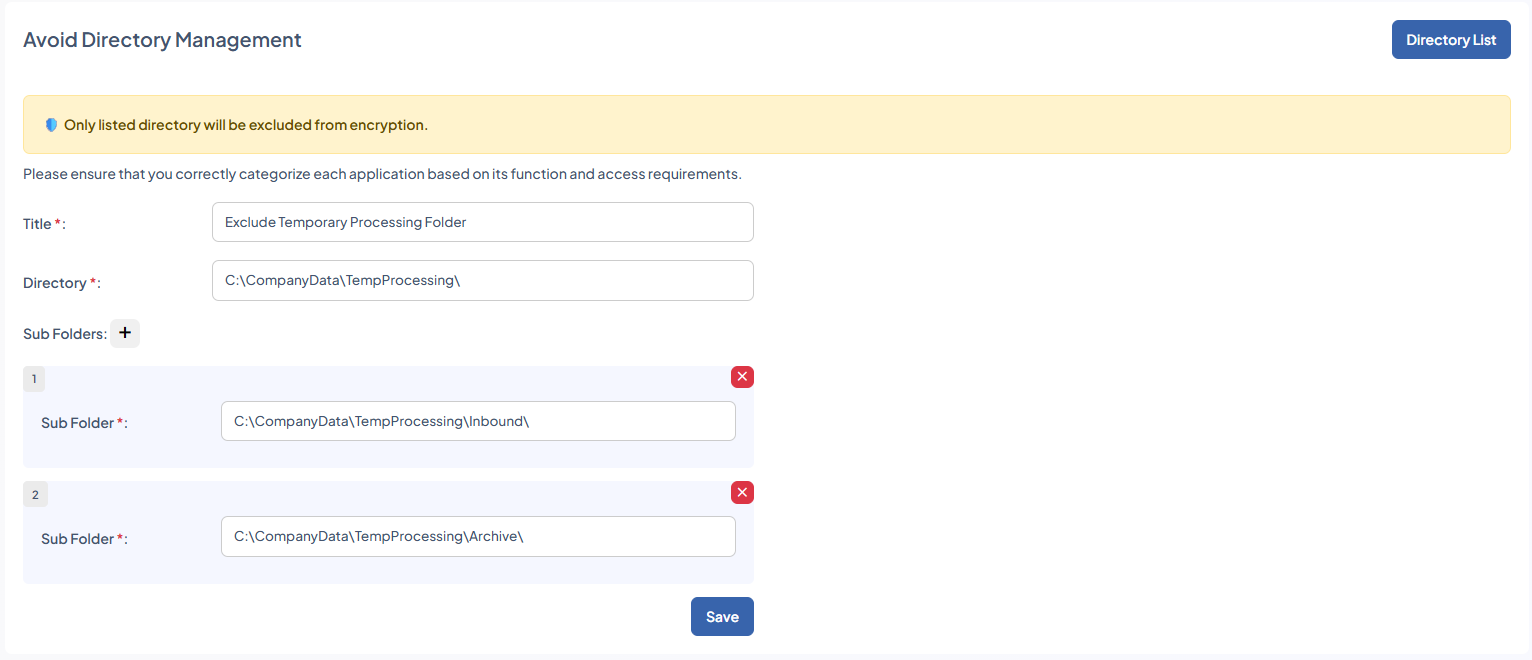
In Sub Folders, click + and add a complete path of sub folders within the directory that must continue to be encrypted. These sub folders override the exclusion rule of folder.
While the main directory is excluded from encryption, any sub folder added here will continue to follow normal encryption rules. This allows you to exclude a directory for operational needs while still protecting specific sub folders that contain sensitive or regulated information.
Use the + button to add multiple sub folders.
You must enter a complete path in Directory and Sub Folder.
Example:
If you add C:\CompanyData\TempProcessing\ to Avoid Folders and specify C:\CompanyData\TempProcessing\Inbound\ and C:\CompanyData\TempProcessing\Archive\ as excluded sub folders, all other sub folders within TempProcessing will not be encrypted, while only these two specified sub folders will be encrypted.
-
C:\CompanyData\TempProcessing\→ Not encrypted -
C:\CompanyData\TempProcessing\Inbound\→ Encrypted -
C:\CompanyData\TempProcessing\Archive\→ Encrypted -
Other sub folders inside TempProcessing→ Not Encrypted
-
Click Save.
The directory will appear in the Directory List, where it can be edited or removed later.
Edit a Directory
-
Go to PROTECT > Avoid Folders.
-
Search for the directory to edit and click the Edit icon in the ACTIONS column.

-
Update the necessary information and click Save.
Delete a Directory
-
Go to PROTECT > Avoid Folders.
-
Search for the directory to delete and click the Delete icon in the ACTIONS column.

-
Click Delete in the Confirmation Alert.
Websites
The Websites section lets you add trusted websites that can open protected files. When a listed website interacts with encrypted files, PROTECT automatically decrypts the files during upload, so the website can process them and encrypts any file that is downloaded from the website for continued protection.
Only websites added to this list are allowed to securely open or handle encrypted files.
Add a Website
-
Go to PROTECT > Websites.
-
Click +New Website.

-
In URL, enter the website address that can interact with protected files.
Example: https://protect.mycompany.com -
In Identifiers (Optional), click + to add an identifier. Identifiers help PROTECT detect specific elements or sections of the website where file uploads or downloads occur. This ensures decryption and encryption occur only on authorised upload/download components, not the whole page.
Each identifier includes:-
DOM Element Selector: Enter the CSS selector for the webpage element that PROTECT should identify or match.
This tells PROTECT which element on the page is linked to file operations.Examples:
-
#uploadBtn -
.input-field -
div.file-section -
button[data-action="upload"]
-
-
Search Value: Enter a value that identifies your organisation in the selected element (for example, part of the signed-in email address or company name). PROTECT will only decrypt files when this value is found, so decryption happens only for accounts that belong to your company.
Examples:
-
guardware.com.au -
@guardware.com.au -
GuardWare Australia
-
-
-
In Extensions that are decrypted, choose how PROTECT handles file extensions when interacting with the website:
-
All: All encrypted files uploaded or downloaded by this website will be decrypted/encrypted automatically.
-
All but these extensions: All files except the listed extensions will be decrypted.
-
Only these extensions: Only files with the specified extensions will be decrypted for this website.
Example:
.csv,.xml
Use the + button to add multiple extensions.
-
-
Click Save. The website will appear in the Website List, where you can edit or remove it later.

For example, with the configuration shown in the image, files will only decrypt during upload when the user is signed into SharePoint with a GuardWare Australia account. If the user is logged in with any other account, files remain encrypted.
Edit a Website
-
Go to PROTECT > Websites.
-
Search for the website to edit and click the Edit icon in the ACTIONS column.
-
Update the necessary information and click Save.
Delete a Website
-
Go to PROTECT > Websites.
-
Search for the website you want to delete and click the Delete icon in the ACTIONS column.
-
Click Delete in the Confirmation Alert.
Key Management
The Key Management section lets you manage encryption keys used by PROTECT. These keys ensure that only authorised users and applications can open encrypted files.
In any encryption system, attackers may eventually gain access to private keys. To reduce this risk, the private keys used for file encryption should be changed regularly. To maintain security, PROTECT supports scheduled key rotation, immediate key rotation, offline key lifespan control, and user key status changes.

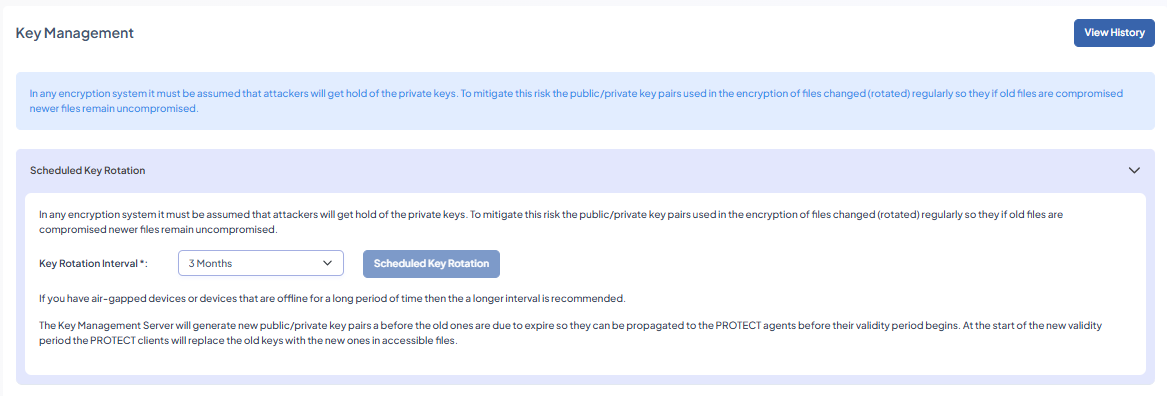
Scheduled Key Rotation
This section lets you set scheduled key rotation intervals. Regular key rotation ensures that even if old keys are compromised, newer files remain secure.
How Scheduled Rotation Works
-
PROTECT automatically generates new private keys based on the selected interval.
-
New keys are distributed to all PROTECT Clients before the old keys expire.
-
Once the old key expires, PROTECT Clients automatically use the updated keys.
To schedule key rotation:
In Key Rotation Interval, select a duration and click Scheduled Key Rotation to activate the rotation cycle.
Immediate Key Rotation
Use immediate key rotation if a private key has been compromised, such as in cases like lost or stolen devices, compromised accounts, and suspected security breaches.
To rotate the key immediately:
Click Rotate Keys Now! to immediately generate and deploy new encryption keys across the system.

Default Offline Key Lifespan
Offline keys determine how long a user can access encrypted files without being connected to the PROTECT server.
If a user does not reconnect to PROTECT within the defined timeframe, their offline key expires. This prevents unauthorised access when a device is lost, stolen, or offline for too long.
To define the default offline key lifespan:
In Default Offline Key Lifespan, select a duration and click Set Lifespan.

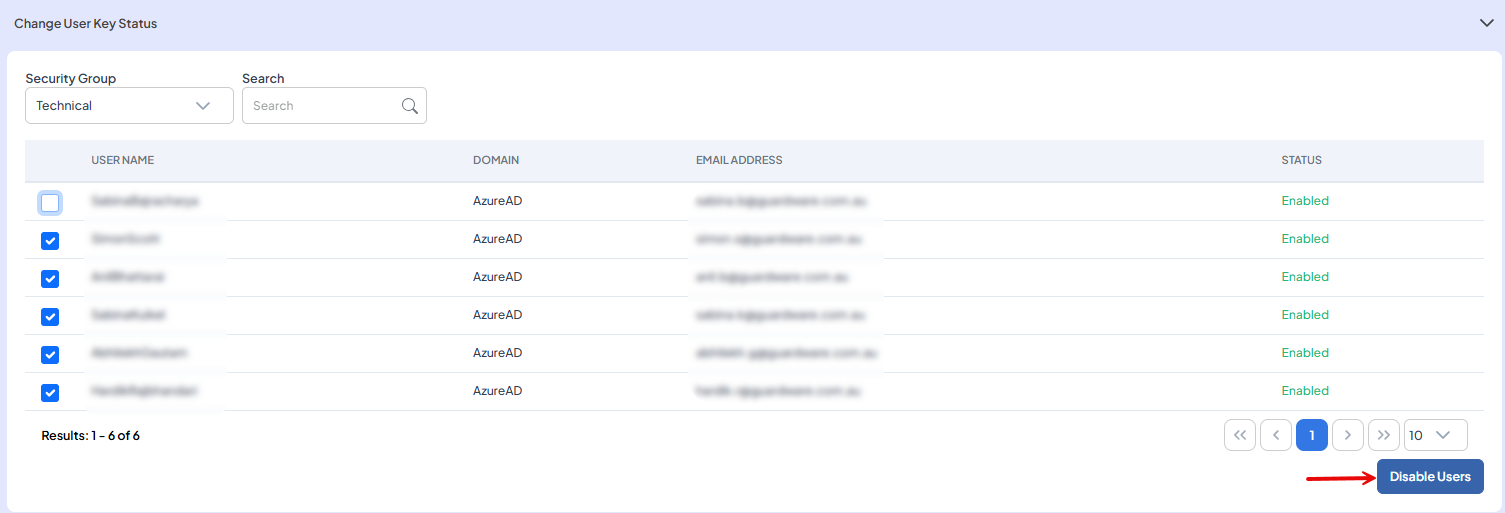
Change User Key Status
This section allows you to enable or disable encryption key access for specific users within a selected security group. When a user’s key status is disabled, they will no longer be able to access any protected files.
To change user key status:
-
Select a Security Group from the dropdown.
-
Select the users whose status you want to change.
-
Click Enable Users or Disable Users based on your needs.
View History
Click View History at the top-right corner to view a complete log of previous key rotations, changes, and key-related events.

Events Reports
The Events Reports section provides a summary of all protection-related actions performed by users. This helps you understand user behaviour, identify high-volume activity, and detect unusual patterns.

To view events reports:
-
Go to PROTECT > Events Reports.
-
Select a date range to filter user activity within a specific period. You’ll see a list of users with the following details:
|
Column |
Description |
|---|---|
|
Username |
Name of the user performing the actions. |
|
Add Protection |
Number of times the user applied protection to a file. |
|
Remove Protection |
Number of times the user removed protection from files. |
|
Change Protection |
Number of times the user changed protection of files. |
|
Add Expiry |
Number of times the user added an expiry date. |
|
Restrict Circulation |
Number of times the user restricted file circulation. |
|
Share with HTML |
Number of times the user created a securel HTML. |
|
Share with MIP |
Number of times the user shared files using Microsoft Information Protection. |
|
Share with ZIP |
Number of times the user created password-protected ZIP packages. |
|
Access |
Number of times the user accessed protected files. |
|
Save As |
Number of times the user saved protected files as new copies. |
-
Click any record to view further details, such as, name of the protected file, file path, location of users who accessed protected files, classification of the file, justification message, and timestamp of the action performed.

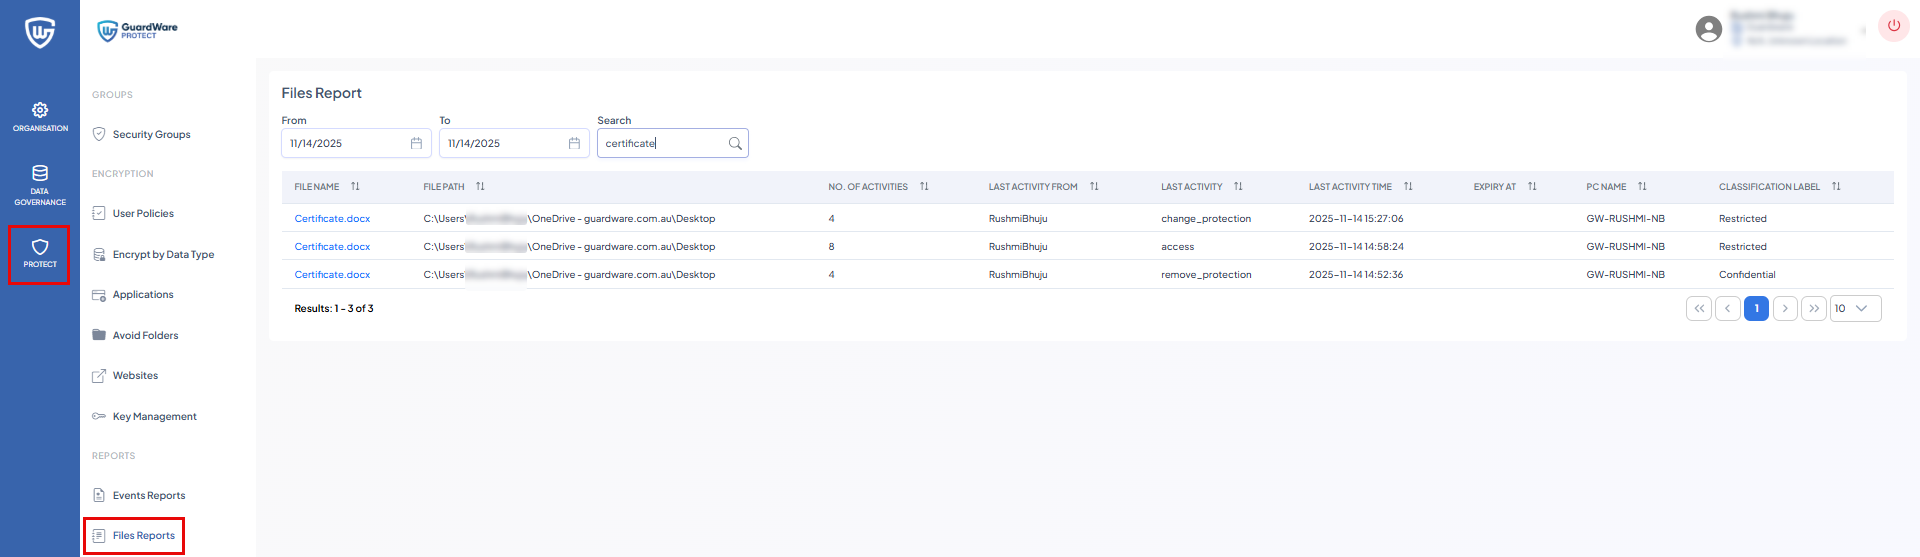
Files Reports
The Files Reports section provides a detailed audit trail of all file-related activities within PROTECT. This report helps you track which files were accessed, modified, or interacted with, and by whom.
To view files reports:
-
Go to PROTECT > Files Reports.
-
Select a date range to filter file activities within a specific period. You’ll see a list of users with the following details:
|
Column |
Description |
|---|---|
|
File Name |
Name of the file that was accessed or modified. |
|
File Path |
Location of the file on the device or network. |
|
No. of Activities |
Total number of actions performed on the file. |
|
Last Activity From |
The user who last performed an action on the file. |
|
Last Activity |
Type of the last action (e.g., add protection, remove protection). |
|
Last Activity Time |
Timestamp of the last action. |
|
Expiry At |
Expiry date applied to the file. |
|
PC Name |
Name of the computer where the activity occurred. |
|
Classification Label |
Classification applied to the file (e.g., Restricted, Internal). |
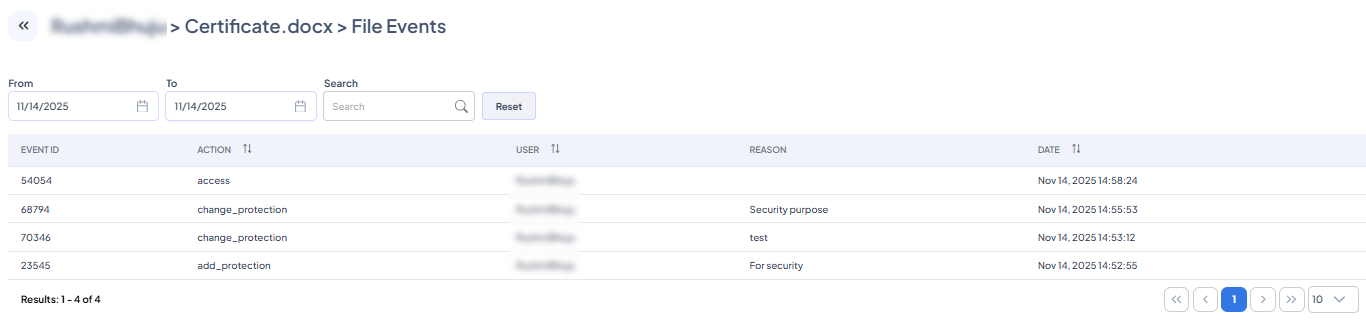
-
Click on any file to view further details such as event ID, action performed on the file, user who performed the action, justification message, and timestamp of the action performed.
Invite Users
The Invite Users section lets you invite external users to use GuardWare PROTECT by sending them an invitation email. Invited users can access encrypted files according to assigned permissions and security groups.
To invite an external user:
-
Go to PROTECT > Invite Users.
-
In Email, enter the email address of the external user you want to invite.
-
In Redirect URL, leave the default value as it is. This is the URL the user will be redirected to after accepting the invitation.
-
For Subject and Message, you can keep the default text or customise them as needed.
-
Click Send Invitation.

The external user receives a link to accept the invitation, details about GuardWare PROTECT, and how to get started. The user will be added to the Azure User list once they accept the invitation.
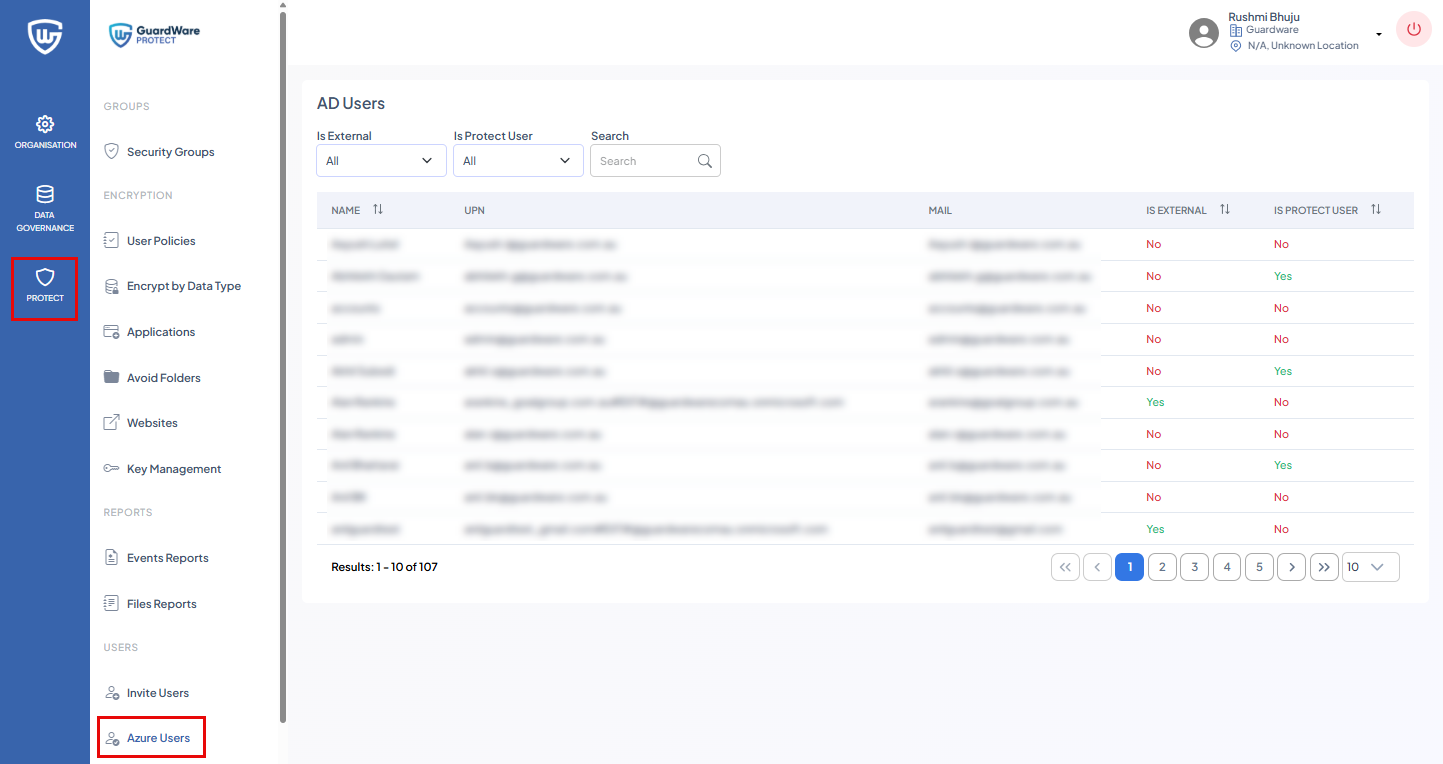
Azure Users
The Azure Users section lists all Azure AD users and external users in your organisation and shows whether each user is allowed to use GuardWare PROTECT.
To view Azure users:
-
Go to PROTECT > Azure Users.
-
Use the following filters to refine results:
-
Is External
Filter internal vs. external guest users. -
Is Protect User
Filter users who have PROTECT enabled or disabled. -
Search
Search by name, email, or UPN.
User Table Details
|
Name |
Display name of the Azure AD user. |
|
UPN |
Azure User Principal Name. |
|
|
Primary email address. |
|
Is External |
Shows if the user is an external/guest account. |
|
Is Protect User |
Shows if PROTECT is enabled for the user. |
PROTECT Devices
The PROTECT Devices section displays all devices running the GuardWare PROTECT Client within your organisation.
To view PROTECT devices:
-
Go to PROTECT > Protect Devices.
-
Use the following filters to refine results:
-
From / To: Filter devices by the date they were added.
-
Last Handshake: See when each device last communicated with the server.
-
Search: Search by PC name, IP, MAC, or user.

Device Table Details:
|
PC NAME |
Name of the device running PROTECT. |
|
USERS |
Number of active PROTECT users on the device.
|
|
PC IP |
IP address of the device. |
|
MAC |
MAC address of the network adapter. |
|
VERSION |
Version of the installed PROTECT Client. |
|
LOCATION |
Location tag (e.g., Nepal, AU). |
|
CLIENT OS |
The operating system used. |
|
NUMBER CORES |
CPU core count. |
|
TOTAL RAM |
Total memory on the device. |
|
CREATED DATE |
When the device first registered with PROTECT. |
|
LAST COMMAND |
The last command executed on this device. |
|
LAST HANDSHAKE |
Last time PROTECT Client communicated with the server. |
Office Add-in
The Office Add-in section allows you to configure how Microsoft Office applications (Word, Excel, PowerPoint) behave when working with PROTECT-encrypted files. These settings help enforce classification, control sharing behaviour, and ensure files remain protected while being edited.
To configure Office Add-in:
-
Go to PROTECT > Office Add-in.
-
Configure the following:
|
Display Classifications |
Enable this if you want Office apps to show Office’s built-in classification labels (such as Public, Internal, or Confidential) inside Office documents. |
|
Force Classifications |
Enable this if you require users to choose a classification before saving a file. |
|
Watermark |
Select in which part of the Office document (header, body, footer) to apply a watermark to visually reinforce sensitivity.
|
|
Watermark Align |
Select where to place the watermark (centre, left, right). |
|
Disable Auto Save |
Enable this if you want to restrict Office from automatically saving changes to encrypted documents. |
|
Disable Connected Services |
Enable this to disable cloud services such as OneDrive, SharePoint sync, and other cloud services in Office to prevent unintentional upload of sensitive files. |
|
Disable Share |
Enable this to prevent users from sharing files using Office’s Share button. Users must share files using approved PROTECT sharing options instead. |
|
Blocked Printers |
Select the virtual or software-based printers that PROTECT should block. When selected, users will be blocked from printing protected files using these printer types, including options such as OneNote, XPS, Print to PDF, generic PDF printers, and third-party tools like Foxit, doPDF, Nitro, or Bluebeam. This helps stop users from creating unprotected copies of sensitive files through virtual printing. |
-
Click Submit.